European Silverlight 4 & Silverlight 5 Hosting BLOG

BLOG about Silverlight 5 Hosting and Its Techologies - Dedicated to European Windows Hosting Customer

Silverlight 6 Hosting - HostForLIFE.eu :: How to Use ASP.NET to Create Silverlight Clock Apps

clock September 10, 2015 11:37 by author Rebecca

In this post, we will learn how to create Analog Clock completely from code behind using .NET Silverlight.

Step 1

Create a new project in Visual Studio and select "Silverlight Application".

Step 2

Open MainPage.xaml and add the following code:


    <UserControl x:Class="SilverlightAnalogClock.MainPage" 
        xmlns="http://schemas.microsoft.com/winfx/2006/xaml/presentation" 
        xmlns:x="http://schemas.microsoft.com/winfx/2006/xaml" 
        xmlns:d="http://schemas.microsoft.com/expression/blend/2008" 
        xmlns:mc="http://schemas.openxmlformats.org/markup-compatibility/2006" 
        mc:Ignorable="d" 
        d:DesignHeight="300" d:DesignWidth="400"> 
     
        <Grid x:Name="LayoutRoot" Background="White"> 
            
        </Grid> 
    </UserControl> 

Step 3

Open MainPage.xaml.cs and add the following code:

    using System; 
    using System.Collections.Generic; 
    using System.Linq; 
    using System.Net; 
    using System.Windows; 
    using System.Windows.Controls; 
    using System.Windows.Documents; 
    using System.Windows.Input; 
    using System.Windows.Media; 
    using System.Windows.Media.Animation; 
    using System.Windows.Media.Imaging; 
    using System.Windows.Shapes; 
     
    namespace SilverlightAnalogClock 
    { 
        public partial class MainPage : UserControl 
        { 
     
            public Canvas ClockArea = null; 
            public Rectangle secondHand = null; 
            public Rectangle minuteHand = null; 
            public Rectangle hourHand = null; 
     
            public RotateTransform secondHandRotate = null; 
            public RotateTransform minuteHandRotate = null; 
            public RotateTransform hourHandRotate = null; 
     
            public Ellipse outerCircle = null; 
     
            public Point centerPoint; 
            public double HEIGHT  = 0; 
            public double WIDTH  = 0; 
            public double RADIUS = 0; 
     
            public MainPage() 
            { 
                InitializeComponent(); 
     
                ClockArea = new Canvas() 
                { 
     
                    Width = 300, 
                    Height = 300, 
                    HorizontalAlignment = HorizontalAlignment.Left, 
                    VerticalAlignment = VerticalAlignment.Top 
     
                }; 
     
                ClockArea.SetValue(Grid.RowProperty, 0); 
                ClockArea.SetValue(Grid.ColumnProperty, 0); 
                ClockArea.Margin = new Thickness(0, 0, 0, 0); 
                this.LayoutRoot.Children.Add(ClockArea); 
     
                WIDTH = ClockArea.Width; 
                HEIGHT = ClockArea.Height; 
                centerPoint.X = (WIDTH/2); 
                centerPoint.Y = (HEIGHT/2); 
                      
                RADIUS = 400; 
                DrawClockFace(); 
     
                Point TOPPOINT = new Point(0, 0); 
     
                DrawMinuteHand(); 
                DrawSecondHand(); 
                DrawHourHand(); 
                DrawCenterCircle(); 
     
     
                //Start the Clock 
                ClockStart(); 
                 
     
            } 
     
            public void ClockStart() 
            { 
                // Create and Start the Thread Timer 
                System.Windows.Threading.DispatcherTimer clockTimer = new System.Windows.Threading.DispatcherTimer(); 
                clockTimer.Interval = new TimeSpan(0, 0, 0, 0, 1000); 
                clockTimer.Tick += new EventHandler(Clock_Tick); 
                clockTimer.Start(); 
            } 
     
            // Get and Set the Angles of Each Hand at every Clock Ticks 
            public void Clock_Tick(object o, EventArgs sender) 
            { 
                double hourRotateValue = Convert.ToDouble(DateTime.Now.Hour.ToString()); 
                double minuteRotateValue = Convert.ToDouble(DateTime.Now.Minute.ToString()); 
                double secondRotateValue = Convert.ToDouble(DateTime.Now.Second.ToString()); 
                hourRotateValue = (hourRotateValue + minuteRotateValue / 60) * 30; 
                minuteRotateValue = (minuteRotateValue + secondRotateValue / 60) * 6; 
                secondRotateValue = Convert.ToDouble(DateTime.Now.Second.ToString()) * 6; 
                minuteHandRotate.Angle = minuteRotateValue; 
                hourHandRotate.Angle = hourRotateValue; 
                secondHandRotate.Angle = secondRotateValue; 
            } 
     
            // Draw Center Circle 
            public void DrawCenterCircle() 
            {             
                Ellipse centerCircle = new Ellipse() 
                { 
     
                    Width = 10, 
                    Height = 10, 
                    Stroke = new SolidColorBrush(Colors.Red), 
                    Fill = new SolidColorBrush(Colors.Red), 
                    HorizontalAlignment = HorizontalAlignment.Center, 
                    VerticalAlignment = VerticalAlignment.Center 
     
                }; 
     
                centerCircle.SetValue(Grid.RowProperty, 0); 
                centerCircle.SetValue(Grid.ColumnProperty, 0); 
                Canvas.SetLeft(centerCircle, (WIDTH / 2) - (centerCircle.Width / 2)); 
                Canvas.SetTop(centerCircle, (HEIGHT / 2) - (centerCircle.Height / 2)); 
                ClockArea.Children.Add(centerCircle); 
            } 
     
            // Draw Clock Face 
            public void DrawClockFace() 
            { 
                         
                int smallCircle = 5; 
     
                Color c = Colors.Blue; 
                int p = 0; 
     
                // Draw Shadow of Outer Circle 
                Ellipse outerCircleShadow = new Ellipse() 
                { 
                    Width = (WIDTH), 
                    Height = (WIDTH), 
                    Stroke = new SolidColorBrush(Colors.Gray), 
                    StrokeThickness = 5, 
                    HorizontalAlignment = HorizontalAlignment.Center, 
                    VerticalAlignment = VerticalAlignment.Center 
                     
                }; 
                
                outerCircleShadow.SetValue(Grid.RowProperty, 0); 
                outerCircleShadow.SetValue(Grid.ColumnProperty, 0); 
                Canvas.SetLeft(outerCircleShadow, (WIDTH / 2) - (outerCircleShadow.Width / 2) + 6.5); 
                Canvas.SetTop(outerCircleShadow, (HEIGHT / 2) - (outerCircleShadow.Height / 2) + 6.5); 
                ClockArea.Children.Add(outerCircleShadow); 
                
                //  Draw Outer Circle 
                outerCircle = new Ellipse() 
                { 
                    Width = (WIDTH ), 
                    Height = (WIDTH), 
                    Stroke = new SolidColorBrush(Colors.Black), 
                    StrokeThickness = 5, 
                    HorizontalAlignment = HorizontalAlignment.Center, 
                    VerticalAlignment = VerticalAlignment.Center 
                };             
                outerCircle.SetValue(Grid.RowProperty, 0); 
                outerCircle.SetValue(Grid.ColumnProperty, 0); 
                Canvas.SetLeft(outerCircle, (WIDTH / 2) - (outerCircle.Width / 2) + 4.5); 
                Canvas.SetTop(outerCircle, (HEIGHT / 2) - (outerCircle.Height / 2) + 4.5); 
                ClockArea.Children.Add(outerCircle); 
     
     
                outerCircle.Fill = new LinearGradientBrush() 
                    { 
                        EndPoint = new Point(1, 0), 
                        GradientStops = new GradientStopCollection() 
                        { 
                                new GradientStop() { Color = Colors.White, Offset = 0 }, 
                                new GradientStop() { Color = Colors.Gray, Offset = 0.5 }, 
                                 new GradientStop() { Color = Colors.White, Offset = 1 } 
                        } 
                    }; 
     
                int clockDigits = 3; 
                double rad = (WIDTH/2) - 10.0f; 
                // 60 Innner Dots as Small Circle 
                for (double i = 0.0; i < 360.0; i += 6)  
                {  
     
                double angle = i * System.Math.PI / 180; 
     
                int x = (int)(centerPoint.X + rad * System.Math.Cos(angle)); 
                int y = (int)(centerPoint.Y + rad * System.Math.Sin(angle)); 
     
                if (p % 5 == 0) 
                { 
                    smallCircle = 10; 
                    c = Colors.Orange;                 
                } 
                else 
                { 
                    smallCircle = 5; 
                    c = Colors.Blue; 
                } 
                if (p % 15 == 0) 
                { 
                    TextBlock tb = new TextBlock(); 
                    tb.Text = clockDigits.ToString(); 
                    tb.FontSize = 24; 
                     
                    tb.SetValue(Grid.RowProperty, 0); 
                    tb.SetValue(Grid.ColumnProperty, 0); 
                    Canvas.SetLeft(tb, x ); 
                    Canvas.SetTop(tb, y); 
                    if (clockDigits == 3) 
                    { 
                        Canvas.SetLeft(tb, x - 20); 
                        Canvas.SetTop(tb, y - 10); 
                    } 
                    if (clockDigits == 6) 
                    { 
                        Canvas.SetLeft(tb, x); 
                        Canvas.SetTop(tb, y - 30); 
                    } 
                    if (clockDigits == 9) 
                    { 
                        Canvas.SetLeft(tb, x + 15); 
                        Canvas.SetTop(tb, y - 10); 
                    } 
                    if (clockDigits == 12) 
                    { 
                        Canvas.SetLeft(tb, x - 10); 
                        Canvas.SetTop(tb, y + 5 ); 
                    }  
                   
                     
                    ClockArea.Children.Add(tb); 
                    clockDigits = clockDigits + 3; 
                } 
     
                p++; 
                
                            Ellipse innerPoints = new Ellipse() 
                            { 
                                Width = smallCircle, 
                                Height = smallCircle, 
                                Stroke = new SolidColorBrush(c), 
                                Fill = new SolidColorBrush(c), 
                                HorizontalAlignment = HorizontalAlignment.Center, 
                                VerticalAlignment = VerticalAlignment.Center 
                            }; 
                            innerPoints.SetValue(Grid.RowProperty, 0); 
                            innerPoints.SetValue(Grid.ColumnProperty, 0); 
                            Canvas.SetLeft(innerPoints, x); 
                            Canvas.SetTop(innerPoints, y); 
                            ClockArea.Children.Add(innerPoints); 
     
                } 
     
                 
            } 
            // Draw the Second Hand 
            public void DrawSecondHand() 
            { 
     
                double handLength = (HEIGHT / 2) - 20; 
                secondHand = new Rectangle() 
                { 
                    Width = 1, 
                    Height = handLength, 
                    Stroke = new SolidColorBrush(Colors.Red), 
                    Fill = new SolidColorBrush(Colors.Red), 
                    HorizontalAlignment = HorizontalAlignment.Center, 
                    VerticalAlignment = VerticalAlignment.Center 
                }; 
                 
                secondHand.SetValue(Grid.RowProperty, 0); 
                secondHand.SetValue(Grid.ColumnProperty, 0); 
                //Add Rotate Transformation 
                secondHandRotate = new RotateTransform(); 
                secondHandRotate.Angle = 0; 
                //Set Center for Rotation 
                secondHandRotate.CenterX = Canvas.GetLeft(secondHand); 
                secondHandRotate.CenterY = secondHand.Height; 
                secondHand.RenderTransform = secondHandRotate; 
                //Set Initial Position of Hand 
                Canvas.SetTop(secondHand, centerPoint.Y - handLength); 
                Canvas.SetLeft(secondHand, WIDTH/2);            
                ClockArea.Children.Add(secondHand); 
                
            } 
     
            public void DrawMinuteHand() 
            { 
                double handLength = (HEIGHT / 2) - 50; 
                minuteHand = new Rectangle() 
                { 
                    Width = 4, 
                    Height = handLength, 
                    Stroke = new SolidColorBrush(Colors.Black), 
                    Fill = new SolidColorBrush(Colors.Black), 
                    HorizontalAlignment = HorizontalAlignment.Center, 
                    VerticalAlignment = VerticalAlignment.Center 
                }; 
     
                minuteHand.SetValue(Grid.RowProperty, 0); 
                minuteHand.SetValue(Grid.ColumnProperty, 0); 
     
                minuteHandRotate = new RotateTransform(); 
                minuteHandRotate.Angle = 0; 
                minuteHandRotate.CenterX = Canvas.GetLeft(minuteHand); 
                minuteHandRotate.CenterY = minuteHand.Height; 
                minuteHand.RenderTransform = minuteHandRotate; 
                Canvas.SetTop(minuteHand, centerPoint.Y - handLength); 
                Canvas.SetLeft(minuteHand, WIDTH / 2); 
                ClockArea.Children.Add(minuteHand); 
     
            } 
            public void DrawHourHand() 
            { 
                double handLength = (HEIGHT / 2) - 80; 
                hourHand = new Rectangle() 
                { 
                    Width = 4, 
                    Height = handLength, 
                    Stroke = new SolidColorBrush(Colors.Black), 
                    Fill = new SolidColorBrush(Colors.Black), 
                    HorizontalAlignment = HorizontalAlignment.Center, 
                    VerticalAlignment = VerticalAlignment.Center 
                }; 
     
                hourHand.SetValue(Grid.RowProperty, 0); 
                hourHand.SetValue(Grid.ColumnProperty, 0); 
     
                hourHandRotate = new RotateTransform(); 
                hourHandRotate.Angle = 0; 
                hourHandRotate.CenterX = Canvas.GetLeft(hourHand); 
                hourHandRotate.CenterY = hourHand.Height; 
                hourHand.RenderTransform = hourHandRotate; 
                Canvas.SetTop(hourHand, centerPoint.Y - handLength); 
                Canvas.SetLeft(hourHand, WIDTH / 2);    
                ClockArea.Children.Add(hourHand); 
     
            } 
     
        } 
    } 


The Output

Now execute and you will get a fully drawn Silverlight Analog Clock.


HostForLIFE.eu Silverlight 6 Hosting
HostForLIFE.eu is European Windows Hosting Provider which focuses on Windows Platform only. We deliver on-demand hosting solutions including Shared hosting, Reseller Hosting, Cloud Hosting, Dedicated Servers, and IT as a Service for companies of all sizes. We have customers from around the globe, spread across every continent. We serve the hosting needs of the business and professional, government and nonprofit, entertainment and personal use market segments.


Silverlight 6 Hosting UK - HostForLIFE.eu :: How to Use Silverlight Storyboard to Create Busy Indicator Bar

clock August 4, 2015 07:14 by author Rebecca

The Silverlight toolkit comes with Busy Indicator control, but some time you may need to develop custom Busy Indicator for your application. Here are the steps to create Busy Indicator using Silverlight StoryBoard.

Step 1: Create Silverlight Application

Create Silverlight application and add ProgressBar.xaml user control in your project.
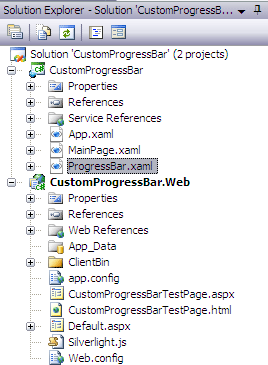
Step 2: Code Progress Bar

Copy and paste below given code ten times and change grid name from circle0 through circle9. This code will be used to generate small filled circles.

<Grid x:Name="circle0" HorizontalAlignment="Center" Margin="0,0,0,0"
                    VerticalAlignment="Center" Opacity="0" RenderTransformOrigin="0.5,0.5">
     <Grid.RenderTransform>
          <TransformGroup>
            <ScaleTransform />
                  <SkewTransform />
                  <RotateTransform />
                  <TranslateTransform X="29" Y="-44" />
          </TransformGroup>
      </Grid.RenderTransform>
      <Ellipse HorizontalAlignment="Center" Margin="0,0,0,0" Width="10"
               RenderTransformOrigin="0.5,0.5" Stroke="{x:Null}" Height="10"
                        VerticalAlignment="Center">
          <Ellipse.Fill>
                   <RadialGradientBrush>
                   <GradientStop Color="#FF000000" />
                   <GradientStop Color="#00000000" Offset="1" />
                   <GradientStop Color="#7F000000" Offset="0.551" />
                   </RadialGradientBrush>
          </Ellipse.Fill>
          <Ellipse.RenderTransform>
                   <TransformGroup>
                   <ScaleTransform />
                   <SkewTransform />
                   <RotateTransform />
                   <TranslateTransform X="2" Y="2" />
                   </TransformGroup>
          </Ellipse.RenderTransform>
       </Ellipse>
       <Ellipse Height="9" HorizontalAlignment="Center" Margin="0,0,0,0"
            Width="9" RenderTransformOrigin="0.5,0.5"   VerticalAlignment="Center" Stroke="{x:Null}">
          <Ellipse.Fill>
                   <LinearGradientBrush EndPoint="0.5,1" StartPoint="0.5,0">
                   <GradientStop Color="#FF9ED9E7" />
                   <GradientStop Color="#FF67BED9" Offset="1" />
                   </LinearGradientBrush>
          </Ellipse.Fill>
            <Ellipse.RenderTransform>
                  <TransformGroup>
                         <ScaleTransform />
                         <SkewTransform />
                         <RotateTransform />
                         <TranslateTransform X="0" Y="0" />
                  </TransformGroup>
            </Ellipse.RenderTransform>
          </Ellipse>
</Grid>

Step 3: Add  StoryBoard code

Add this StoryBoard in user control resources section. This will start Busy Indicator animation.

<Storyboard x:Name="StartAnimation">
            <DoubleAnimation Storyboard.TargetProperty="(UIElement.Opacity)"
                    Storyboard.TargetName="LayoutRoot" From="0" To="1" Duration="0:0:0.3">
            </DoubleAnimation>
</Storyboard>


Copy and paste below code ten times and change StoryBoard name from ProgressStoryboard0 through ProgressStoryboard9 and StoryBoard TargetName from circle0 through circle9 (you have already declared code for circles above). This code will be used to generate StoryBoard animation for Busy Indicator.

<Storyboard x:Name="ProgressStoryboard0">
            <DoubleAnimationUsingKeyFrames BeginTime="00:00:00" Storyboard.TargetName="circle0"
                    Storyboard.TargetProperty="(UIElement.Opacity)">
                <SplineDoubleKeyFrame KeyTime="00:00:00" Value="0" />
                <SplineDoubleKeyFrame KeyTime="00:00:00.0050000" Value="1" />
                <SplineDoubleKeyFrame KeySpline="0,0,0.601999998092651,0.400999993085861"
                        KeyTime="00:00:00.7000000" Value="1" />
                <SplineDoubleKeyFrame KeyTime="00:00:00.7120000" Value="0" />
            </DoubleAnimationUsingKeyFrames>
            <DoubleAnimationUsingKeyFrames BeginTime="00:00:00" Storyboard.TargetName="circle0"
                    Storyboard.TargetProperty="(UIElement.RenderTransform).(TransformGroup.Children)[0].(ScaleTransform.ScaleY)">
                <SplineDoubleKeyFrame KeyTime="00:00:00" Value="1" />
                <SplineDoubleKeyFrame KeyTime="00:00:00.0050000" Value="1" />
                <SplineDoubleKeyFrame KeySpline="0,0,0.601999998092651,0.400999993085861"
                        KeyTime="00:00:00.7000000" Value="0.3" />
                <SplineDoubleKeyFrame KeyTime="00:00:00.7120000" Value="0.30000001192092896" />
            </DoubleAnimationUsingKeyFrames>
            <DoubleAnimationUsingKeyFrames BeginTime="00:00:00" Storyboard.TargetName="circle0"
                    Storyboard.TargetProperty="(UIElement.RenderTransform).(TransformGroup.Children)[0].(ScaleTransform.ScaleX)">
                <SplineDoubleKeyFrame KeyTime="00:00:00" Value="1" />
                <SplineDoubleKeyFrame KeyTime="00:00:00.0050000" Value="1" />
                <SplineDoubleKeyFrame KeySpline="0,0,0.601999998092651,0.400999993085861"
                        KeyTime="00:00:00.7000000" Value="0.3" />
                <SplineDoubleKeyFrame KeyTime="00:00:00.7120000" Value="0.30000001192092896" />
            </DoubleAnimationUsingKeyFrames>
</Storyboard>

Step 4: Add animation start and stop code

Add below code in your ProgressBar.xaml.cs file. This has a dependency property IsActive. When IsActive is set to true the Busy Indicator animation will start and when it is set to false the animation will be stopped.

public partial class ProgressBar : UserControl
{
    private Storyboard storyBoard;
    private List<Storyboard> storyBoardList;
    private int nextStoryBoard;
    public static readonly DependencyProperty IsActiveProperty =
            DependencyProperty.Register("IsActive", typeof(bool), typeof(ProgressBar), new PropertyMetadata(IsActivePropertyChanged));
    public ProgressBar()
    {
          InitializeComponent();
          this.storyBoard = new Storyboard()
          {
                   Duration = new Duration(TimeSpan.FromMilliseconds(100))
          };
           this.storyBoard.Completed += new EventHandler(this.OnIntervalTimerCompleted);
           this.storyBoardList = new List<Storyboard>()
          {
                   ProgressStoryboard0,
                   ProgressStoryboard1,
                   ProgressStoryboard2,
                   ProgressStoryboard3,
                   ProgressStoryboard4,
                   ProgressStoryboard5,
                   ProgressStoryboard6,
                   ProgressStoryboard7,
                   ProgressStoryboard8,
                   ProgressStoryboard9
          };
    }
    public bool IsActive
    {
        get { return (bool)GetValue(IsActiveProperty); }
        set { SetValue(IsActiveProperty, value); }
    }
    private static void IsActivePropertyChanged(DependencyObject sender, DependencyPropertyChangedEventArgs e)
    {
        var spinControl = sender as ProgressBar;
        if (spinControl != null)
        {
            if ((bool)e.NewValue)
           {
               spinControl.Start();
          }
          else
          {
              spinControl.Stop();
          }
        }
    }
    private void Start()
    {
        this.Visibility = Visibility.Visible;
        StartAnimation.Begin();
        this.storyBoard.Begin();
    }
    private void Stop()
    {
        this.Visibility = Visibility.Collapsed;
        StartAnimation.Stop();
        this.nextStoryBoard = 0;
        this.storyBoard.Stop();
        foreach (var item in this.storyBoardList)
        {
            item.Stop();
        }
    }
    private void OnIntervalTimerCompleted(object sender, EventArgs e)
    {
        this.storyBoardList[nextStoryBoard].Begin();
        this.nextStoryBoard = this.nextStoryBoard > 8 ? 0 : this.nextStoryBoard + 1;
        this.storyBoard.Begin();
    }
}

At this point you have completed coding for BusyIndicator control. Now the next step is implementation to see how exactly it works.

Step 5: Implementing Busy Indicator

To implement and test the above mentioned Busy Indicator, I have added a simple WCF MathService which returns sum of two values supplied to its Add method. The main reason behind choosing WCF service for this example is, this is the most common scenario to implement Busy Indicator.  Add service reference of this service into Silverlight project.MainPage.xaml changes:
Add namespace for Busy Indicator in MainPage.xaml file.

xmlns:progressBar="clr-namespace:CustomProgressBar"

And add below code in the same file.

<Grid x:Name="LayoutRoot" Margin="20,20,20,20">
        <Grid Margin="5,5,5,5">
            <StackPanel HorizontalAlignment="Center">
                <TextBlock x:Name="lblResult" />
                <Button x:Name="btnAdd" Width="100" Content="Add" Click="btnAdd_Click" />
            </StackPanel>
        </Grid>
        <progressBar:ProgressBar x:Name="ProgressBar1" Visibility="Collapsed"/>
</Grid>

You can see in above code, I have placed custom Busy Indicator control in MainPage using below line of code.

<progressBar:ProgressBar x:Name="ProgressBar1" Visibility="Collapsed"/>

MainPage.xaml.cs change: Add below code in this file.

private void btnAdd_Click(object sender, RoutedEventArgs e)
{
    ProgressBar1.IsActive = true;
    MathService.MathServiceClient proxy = new CustomProgressBar.MathService.MathServiceClient();
    proxy.AddCompleted += new EventHandler<CustomProgressBar.MathService.AddCompletedEventArgs>(proxy_AddCompleted);
    proxy.AddAsync(10, 10);
}
void proxy_AddCompleted(object sender, CustomProgressBar.MathService.AddCompletedEventArgs e)
{
    lblResult.Text = e.Result.ToString();
    ProgressBar1.IsActive = false;
}

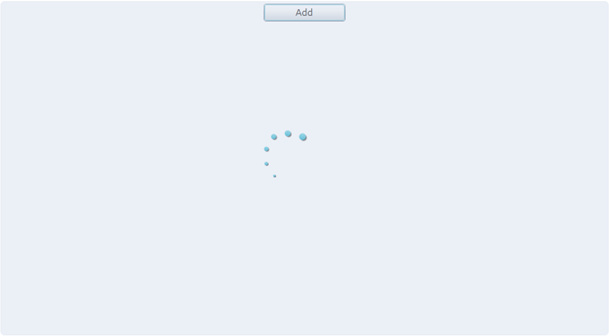
Here I have added a button with the name "Add", on click of this button I am calling MathService to calculate sum of two given numbers. Once the result is returned from MathService it will be displayed in TextBlock.  On button click event I am setting Progress Bar IsActive property to true, at this moment the Busy Indicator animation will start. And when the Add method completed event is called I am setting IsActive property value to false, to stop the animation.

Step 6: Run the application

Once all the changes are completed run the application. You will see below screen when you click on "Add" button. The good thing is, until the Busy Indicator runs the UI portion of the application will be locked and once the processing is completed screen will be unlocked again.
HostForLIFE.eu Silverlight 6 Hosting
HostForLIFE.eu is European Windows Hosting Provider which focuses on Windows Platform only. We deliver on-demand hosting solutions including Shared hosting, Reseller Hosting, Cloud Hosting, Dedicated Servers, and IT as a Service for companies of all sizes. We have customers from around the globe, spread across every continent. We serve the hosting needs of the business and professional, government and nonprofit, entertainment and personal use market segments.


Silverlight 6 Hosting Romania - HostForLIFE.eu :: How to Create Storyboard Animation using Expression Blend in Silverlight

clock June 30, 2015 06:11 by author Rebecca

There are two ways to animate in Silverlight, through storyboards and through code. Expression Blend offers extensive help in creating storyboard animations. Silverlight animation is time based not frame based, this means that your animation will benefit from running at the maximum frame rate that the users machine will allow. Multiple storyboards can be created and run at the same time, but for the purpose of this basic tutorial, you'll be shown how to create a single storyboard.

Follow these simple steps to create storyboard animation using expression blend in Silverlight:

Step 1

To create a new storyboard, go to the Objects and Timeline tab then click on the ‘plus’ icon.

If you are using the default UI layout in Blend, you may want to hit the ‘F6‘ key to switch the layout from design mode to animation mode, this will give you a better layout for working with storyboards.

Notice that after adding a storyboard a red circle will be displayed in the top right of the screen, this indicates that you are in record mode. When in record mode, every change you make is treated as an animation and will be tied to a Keyframe. To turn record mode on or off click on the red circle in the top right of the screen, it should toggle from red to grey.

Step 2

For the purpose of this tutorial I have created a ball graphic and a shadow graphic as shown below. You can use any objects thay you like to make your own animation project.  I have placed them off the page to the left so that they start out of site.

Step 3

Storyboard animation is based on Keyframes set to specific times. To add a Keyframe, go back to the ‘Objects and Timeline‘ tab, select the objects that you want to animate and click the Record Keyframe button as highlighted below. You will see that a new Keyframe is added by each object at zero seconds.

Step 4

To add a Keyframe at a specific point along your timeline, drag the yellow time bar to the required point and then hit the Record Keyframe button. To make our ball graphic animate I have selected a time stamp of 0.5 seconds and moved the ball to the position shown below:

Step 5

Then you can animate the ball and shadow graphics again at 1 second.

And once more at 1.5 seconds to finish the animation.

Step 6

Now that we have completed the animation we may want to loop it multiple times or loop it forever. To make the animation loop, make sure you have the storyboard selected under the ‘Objects and Timeline‘ tab, then go to your ‘Properties‘ tab and scroll down to the ‘Common Properties‘ section. Here you have an option to repeat the animation several times, for this tutorial, you have to set it to ‘Forever‘.

Step 7

Finally, you need to tell the storyboard to play. Sometimes you will need a storyboard to be called by the code behind file, but you can use ‘Behaviors’ to start a storyboard instead. ‘Behaviors’ are pre-set actions that can be dropped onto objects in Blend, they are an easy way to achieve functionality without requiring knowledge of C# or alternative languages. To tell the storyboard to autoplay, go to the ‘Assets‘ button on the main tool bar (the last icon), select ‘Behaviors‘ from the list on the left to bring up the selection of behaviors. Find the behavior titled ‘ControlStoryboardAction‘ and drag it onto your ‘LayoutRoot‘. See how the behavior is indented below the ‘LayoutRoot‘. Select the behavior and go to the ‘Properties‘ tab, scroll down to the ‘Triggers‘ section and set the following settings:

EventName = Loaded

ControlStoryboard… = Play

Storyboard = Storyboard1 (the name of your storyboard)

You are done with your storyboard animation!

HostForLIFE.eu Silverlight 6 Hosting
HostForLIFE.eu is European Windows Hosting Provider which focuses on Windows Platform only. We deliver on-demand hosting solutions including Shared hosting, Reseller Hosting, Cloud Hosting, Dedicated Servers, and IT as a Service for companies of all sizes. We have customers from around the globe, spread across every continent. We serve the hosting needs of the business and professional, government and nonprofit, entertainment and personal use market segments.


Silverlight 5 Hosting France - HostForLife.eu :: How to Use Silverlight to Run an Elevated Trust Applications

clock June 23, 2015 06:39 by author Rebecca

In this article, you will see how to run an Elevated Trust Application within the Browser using Silverlight 5 Beta. For this demonstration, you will first create a Silverlight application by using Visual Studio 2010 with Silverlight Version 5.

Step 1

We will rename the application as 'TrustedAppsInBrowser' as shown below:

Step 2

Make sure you choose Silverlight version 5.0. Now let's add a reference of a API 'Microsoft.CSharp.dll' to our Silverlight application. Browse this API from the path 'C:\Program Files (x86)\Microsoft SDKs\Silverlight\v4.0\Libraries\Client'. Then, design the MainPage.xaml. and replace <Grid></Grid> with following code:

<Grid x:Name="LayoutRoot" Background="Black">         <Grid.RowDefinitions>             <RowDefinition Height="44*" />             <RowDefinition Height="44*" />             <RowDefinition Height="44*" />             <RowDefinition Height="170*" />         </Grid.RowDefinitions>         <StackPanel Orientation="Horizontal" Grid.Row="0">             <TextBlock Text="TO - :" Foreground="Yellow" FontSize="14"         HorizontalAlignment="Center" VerticalAlignment="Center"/>             <TextBox x:Name="txtTO" Width="350" Height="30"/>         </StackPanel>         <StackPanel Orientation="Horizontal" Grid.Row="1">             <TextBlock Text="CC - :" Foreground="Yellow" FontSize="14"         HorizontalAlignment="Center" VerticalAlignment="Center"/>             <TextBox x:Name="txtCC" Width="350" Height="30"/>         </StackPanel>         <StackPanel Orientation="Horizontal" Grid.Row="2">             <TextBlock Text="Subject - :" Foreground="Yellow" FontSize="14"         HorizontalAlignment="Center" VerticalAlignment="Center"/>             <TextBox x:Name="txtsubject" Width="315" Height="30"/>         </StackPanel>         <StackPanel Orientation="Vertical" Grid.Row="3">             <TextBox x:Name="txtmessage" Width="400" Height="120"         HorizontalAlignment="Left" VerticalAlignment="Top" />             <StackPanel Orientation="Horizontal" HorizontalAlignment="Center">                 <Button x:Name="btnSend" Content="Send" Height="30" Width="100"          Click="btnSend_Click"/>                 <Button x:Name="btncancel" Content="Cancel" Height="30" Width="100" />             </StackPanel>         </StackPanel> </Grid>

Step 3

Now let's import a namespace to our code behind:

using System.Runtime.InteropServices.Automation;

Step 4

Now run your application and click on the 'Send' button. You will get an exception as shown below:

The operation is not supported in this context. You cannot call COM components directly from the browser due to security reasons. However you can achieve the same by making this Silverlight Application as an Out-Of-Browser application with Elevated Trust. You have to run this application in the Browser. To run this application in the browser, you must set this application to run Out-Of-Browser with Elevated Trust. Right click the Silverlight Application and go to Properties. Choose checkbox 'Enable running application Out of the browser' and click on 'Out of browser settings' button. From the setting window, chose a checkbox 'Require Elevated trust when running outside the browser'.

Step 5

Now you will have to follow the steps given below for enabling our Silverlight application to run within the browser, with Elevated trust.

1: Go to Start and click on Run.  Type 'RegEdit'. This will open the 'Registry Editor' window. Now the most important thing is that If you running the app on a 32 bit machine, you will have to find:

· HKEY_LOCAL_MACHINE\Software\Microsoft\Silverlight\

and if you are running on a 64-bit machine, you will have to find:

· HKEY_LOCAL_MACHINE\Software\Wow6432Node\Microsoft\Silverlight\

I took the reference of MSDN for this path. My computer is 64-bit, so I have chosen the second option. Once you find the above path in the registry, make a change to 'UpdateConsentMode' from '0' to '1' as shown below:

2: Now the second step is to Sign the .XAP file of our Silverlight application with code signing certificate. Right click t Sheilverlight application and go to properties. Choose ‘Signing from the left hand side’ and check the checkbox 'Sign the .XAP file' as shown below:

Now click on the button 'Create Test Certificate'. Enter the password and confirm password and click 'OK' button.

3: Now click on the 'More Details' button highlighted in blue colour. This will show you a 'Certificate' window. Click on the 'Install Certificate' button as shown below:

Clicking on the button brings up the 'Certificate Import wizard'. Click on the 'Next' button and choose 'Place all certificates in the following store'. Click on the Browse button. This will show you a 'Certificate Store'. Choose 'Trusted Publisher' and finish the wizard. Now repeat the same step to install this certificate in 'Trusted Root Certification Authorities'.

That's it! You are done with the configuration. Now hit 'F5' to launch the Silverlight application in a browser. Fill the details and click on the 'Send' button. This will show you a Internet Security dialog box. Click on the 'Allow' button and you will see the output as shown below:

HostForLIFE.eu Silverlight 5 Hosting
HostForLIFE.eu is European Windows Hosting Provider which focuses on Windows Platform only. We deliver on-demand hosting solutions including Shared hosting, Reseller Hosting, Cloud Hosting, Dedicated Servers, and IT as a Service for companies of all sizes. We have customers from around the globe, spread across every continent. We serve the hosting needs of the business and professional, government and nonprofit, entertainment and personal use market segments.


Silverlight 6 with Free ASP.NET Hosting - HostForLIFE.eu :: How to Get User's Geo Location

clock June 3, 2015 06:19 by author Rebecca

In this tutorial, I'm going to tell you about getting the Geo-location of the user of your Silverlight Application. We will use Javascript as the core of our scenario.

Step 1

You will be calling following JavaScript API here in the aspx page:

 <script language="JavaScript" type="text/javascript" src="http://j.maxmind.com/app/geoip.js"></script>

Now there are functions in that API that will return the Latitude, Longitude, country name and whatever we demand. Some of the function are viz:

  •     geoip_country_code()
  •     geoip_country_name()
  •     geoip_latitude()
  •     geoip_longitude()

Instead of just calling these functions directly in Silverlight, we will write our functions that will call these functions and return whatever these functions return. For example here is the custom script written just beneath the API call:

<script type="text/javascript">

   function GetCountryCode() {

   return geoip_country_code();

      }

  function GetCountryName() {

  return geoip_country_name();

      }       

  function GetLatitude() {

  return geoip_latitude();

       }

   function GetLongitude() {

   return geoip_longitude();

        }
 </script>

So finally, here is what the aspx page with API call and the scripts that you have written:

 <script type="text/javascript" src="Silverlight.js"></script>

 <script language="JavaScript" type="text/javascript" src="http://j.maxmind.com/app/geoip.js"></script>

 <script type="text/javascript">

 function GetCountryCode() {

 return geoip_country_code();

   }

 function GetCountryName() {

 return geoip_country_name();

   }

 function GetLatitude() {

 return geoip_latitude();

    }

 function GetLongitude() {

return geoip_longitude();

      }   
 </script>

Step 2

Now let's move toward your mainpage. You must make the JavaScript function call from the main page. As you all know, it is a simple method call:

HtmlPage.Window.Invoke("<JavaScriptMethod>");

The XAML of the main page consists of four Text Blocks, each to pursue the respective value for Country code, Country Name, Latitude and Longitude.

 <Grid x:Name="LayoutRoot" Background="White">

 <TextBlock x:Name="txtCountryCode" Margin="20 20 0 0"/>

 <TextBlock x:Name="txtCountryName" Margin="20 40 0 0"/>

 <TextBlock x:Name="txtLatitude" Margin="20 60 0 0"/>

  <TextBlock x:Name="txtLongitude" Margin="20 80 0 0"/>

  </Grid>


For giving the corresponding values to the Blocks, you need to write some C# in the code behind and in the constructor of the main page.

    public MainPage()

    {

   InitializeComponent();

  txtCountryCode.Text = HtmlPage.Window.Invoke("GetCountryCode").ToString();

  txtCountryName.Text = HtmlPage.Window.Invoke("GetCountryName").ToString();

  txtLatitude.Text = HtmlPage.Window.Invoke("GetLatitude").ToString();

  txtLongitude.Text = HtmlPage.Window.Invoke("GetLongitude").ToString();  


That's it. Just hit F5 and run the project. It will provide you all the information you've requested in the code.

Happy coding!

Silverlight 6 with Free ASP.NET Hosting
Try our Silverlight 6 with Free ASP.NET Hosting today and your account will be setup soon! You can also take advantage of our Windows & ASP.NET Hosting support with Unlimited Domain, Unlimited Bandwidth, Unlimited Disk Space, etc.


Silverlight 6 with Free ASP.NET Hosting - HostForLIFE.eu :: How to Drag & Drop a Rich TextBox in Silverlight

clock May 27, 2015 05:41 by author Rebecca

In this post, I will show you how to drag and drop a RichTextBox in Silverlight. For your information, the code below also could be adapted to drag any element around.

The XAML that you are going to use here consists of one Border control which contains your Rich TextBox.  The Border control has several event handlers defined to capture the Mouse Buttons and Movement:

<UserControl x:Class="TreeViewDragAndDrop.Page"
    xmlns="http://schemas.microsoft.com/winfx/2006/xaml/presentation"
    xmlns:x="http://schemas.microsoft.com/winfx/2006/xaml"
    xmlns:liquidTreeView="clr-namespace:Liquid;assembly=Liquid.TreeView"
    Width="400" Height="300">
    <Grid x:Name="LayoutRoot" Background="White" VerticalAlignment="Top" HorizontalAlignment="Left">
        <liquidTreeView:Tree x:Name="tree" EnableDragAndDrop="true" Drop="Tree_Drop" Width="300" Height="151" Margin="4">
            <liquidTreeView:Tree.Nodes>
                <liquidTreeView:Node ID="0" Title="Root" Icon="images/folder.png" IconExpanded="images/folderOpen.png">
                    <liquidTreeView:Node.Nodes>
                        <liquidTreeView:Node ID="1" Title="Folder 1" Icon="images/folder.png" IconExpanded="images/folderOpen.png">
                            <liquidTreeView:Node.Nodes>
                                <liquidTreeView:Node ID="10" Title="File 1.doc" Icon="images/doc.png" />
                                <liquidTreeView:Node ID="11" Title="File 2.doc" Icon="images/doc.png" />
                            </liquidTreeView:Node.Nodes>
                        </liquidTreeView:Node>
                        <liquidTreeView:Node ID="2" Title="Folder 2" Icon="images/folder.png" IconExpanded="images/folderOpen.png">
                            <liquidTreeView:Node.Nodes>
                                <liquidTreeView:Node ID="20" Title="File 3.doc" Icon="images/doc.png" />
                                <liquidTreeView:Node ID="21" Title="File 4.doc" Icon="images/doc.png" />
                                <liquidTreeView:Node ID="21" Title="File 5.doc" Icon="images/doc.png" />
                            </liquidTreeView:Node.Nodes>
                        </liquidTreeView:Node>
                    </liquidTreeView:Node.Nodes>
                </liquidTreeView:Node>
            </liquidTreeView:Tree.Nodes>
        </liquidTreeView:Tree>
    </Grid>
</UserControl>

The C# for this tutorial contains the 3 event handlers which do the actual work here. Remember your Border control has been placed on a Canvas object which allows you to specify using absolute coordinates where the Border should be rendered:

using System.Windows.Controls;

using Liquid;

namespace TreeViewDragAndDrop
{
    public partial class Page : UserControl
    {
        public Page()
        {
            InitializeComponent();
        }

        private void Tree_Drop(object sender, TreeEventArgs e)
        {
            e.DropAction = Tree.DropActions.InsertAfter;
        }
    }
}

As you can see, you have detected when the mouse is clicked over the border (using the Border_MouseLeftButtonDown event) and set _mouseDown = true, you also call myBorder.CaptureMouse(), this is important as it tells Silverlight to route allmouse events to the Border control.

When the user moves the mouse the new position of the Border is calculated by adding the amount of pixels the cursor has moved since the last MouseMove event was called.  This is all handled in the Border_MouseMove event. And the final mouse event handler, Border_MouseLeftButtonUp clears the _mouseDown flag releases the capture lock we set previously.

Silverlight 6 with Free ASP.NET Hosting
Try our Silverlight 6 with Free ASP.NET Hosting today and your account will be setup soon! You can also take advantage of our Windows & ASP.NET Hosting support with Unlimited Domain, Unlimited Bandwidth, Unlimited Disk Space, etc.


Silverlight 6 Hosting with Free ASP.NET Hosting - HostForLIFE.eu :: How to Use Isolated Storage Feature in Silverlight

clock May 20, 2015 07:05 by author Rebecca

In Silverlight, due to security issues, an ordinary application is NOT allowed to write to/read from arbitrary locations on the file system (except through some dialogs). How do we save those data temporarily inside the file system (such as a text file) so that the application can retrieve and use it later? Sure you can use the Isolated Storage Feature in Silverlight.

Isolated Storage allows you to access to a small segment of hard-disk space, which you will have no idea where the files are being stored. Usually you need it when you want to store small amounts of not essential information (eg: user-specific details, user preferences). Especially when you want to communicate with the web service, having the back-up storage can enable to page to reload the data without the user retyping again.

You can save DateTime into the memory and can retrieve it using Isolated Storage. Here is the example:'

Step 1

First, you need to open an Isolated Store. You can use the IsolatedStorageFile class and call the static IsolatedStorageFile.GetUserStoreForApplication() method:

IsolatedStorageFile store = IsolatedStorageFile.GetUserStoreForApplication()

With this, you can use System.IO namespace to write and read data.

Step 2

Now, you have to write DateTime into memory as follows:

using (IsolatedStorageFile store = IsolatedStorageFile.GetUserStoreForApplication())
            {
                using (IsolatedStorageFileStream stream = store.CreateFile("Date.txt"))
                {
                    StreamWriter writer = new StreamWriter(stream);
                    writer.Write(DateTime.Now);
                    writer.Close();
                }
                textBox1.Text = "Data written";
            }

Step 3

Then, you can retrieve DateTime from memory, use this following code:

using (IsolatedStorageFile store = IsolatedStorageFile.GetUserStoreForApplication())
            {
                using (IsolatedStorageFileStream stream = store.OpenFile("Date.txt", FileMode.Open))
                {
                    StreamReader reader = new StreamReader(stream);
                    textBox2.Text = reader.ReadLine();
                    reader.Close();
                }
            }

Simple right?

Silverlight 6 with Free ASP.NET Hosting
Try our Silverlight 6 with Free ASP.NET Hosting today and your account will be setup soon! You can also take advantage of our Windows & ASP.NET Hosting support with Unlimited Domain, Unlimited Bandwidth, Unlimited Disk Space, etc.


Silverlight 6 with Free ASP.NET Hosting - HostForLIFE.eu :: How to Create Web Service in SIlverlight

clock May 13, 2015 06:35 by author Rebecca

Have you ever wonder, how do you actually program on the server side to handle the requests by the client? And how do a client know that his uploading request has been complete before proceeding to the another one? There are several approaches for the solution. Here, I introduce how to create WCF (Windows Communication Foundation) web service in Silverlight, which involves lesser code.


How to Create a WCF Web Service:

a) Right-click your ASP.NET website, add the Silverlight-enabled WCF Service template.
b) Create a new method (with the OperationContract attribute)
c) Right-click your Silverlight project -> Add Service. Click Discover button. Then Click OK button.

After you have add a service reference, Visual Studio actually creates a proxy class that you can interface with the Web Service. The proxy class is named after the original Service class name + the world Client at the end.

How to use or call the WCF Web Service:

Import the namespace for the service reference. In Silverlight, all web services are asynchronous. That means after you have called the method to fire it, it returns immediately and proceed to the next line of code. When the response is received, you handle the event inside the MethodNameCompleted.

A standard order of using the web service is as follow:

    Service1Client myService = new Service1Client();
    myService.BeginUploadCompleted += new EventHandler<System.ComponentModel.AsyncCompletedEventArgs>(myService_BeginUploadCompleted);
    myService.BeginUploadAsync(...);

That's all, simple, right?

Silverlight 6 with Free ASP.NET Hosting
Try our Silverlight 6 with Free ASP.NET Hosting today and your account will be setup soon! You can also take advantage of our Windows & ASP.NET Hosting support with Unlimited Domain, Unlimited Bandwidth, Unlimited Disk Space, etc.


Silverlight 6 with Free ASP.NET Hosting - HostForLIFE.eu :: How to Add Data into a DataGrid Dynamically

clock May 6, 2015 06:48 by author Rebecca

The DataGrid control in the Silverlight is one of the very important and useful controls. It is highly customizable with support of sorting, editing, grouping and paging. Here, this tutorial will talk about how to add data dynamically into the DataGrid. Specifically, it lets the user to input the Staff data during run time, as many as he/she likes.

Here the example of output in Silverlight that I have made:

Add a DataGrid by Drag and Drop, then add 3 columns

Note that each column has a binding path to the variable it displays.

    <sdk:DataGrid AutoGenerateColumns="False" Height="206" HorizontalAlignment="Left" Margin="12,65,0,0" Name="myDataGrid" VerticalAlignment="Top" Width="352" >
                <sdk:DataGrid.Columns>
                    <sdk:DataGridTextColumn Header="Name" Binding="{Binding Path=staffName, Mode=OneWay}" Width="120"></sdk:DataGridTextColumn>
                    <sdk:DataGridTextColumn Header="ID" Binding="{Binding Path=staffID, Mode=OneWay}" Width="100"></sdk:DataGridTextColumn>
                    <sdk:DataGridTextColumn Header="Age" Binding="{Binding Path=staffAge, Mode=OneWay}" Width="100"></sdk:DataGridTextColumn>
                </sdk:DataGrid.Columns>
            </sdk:DataGrid>

Create a class for the Data Object. Eg: Staff.cs

Define the variables which used in the data binding in the class

            public string staffName { get; set; }
            public string staffID { get; set; }
            public string staffAge { get; set; }

            public Staff(string _name, string _id, string _age)
            {
                staffName = _name;
                staffID = _id;
                staffAge = _age;
            }

Add Button

This is the button that fires the event assigning the values. Here, I use ObservableCollection<Staff> to store the data inside the DataGrid. (Define it as a global variable).

            private void AddButton_Click(object sender, RoutedEventArgs e)
            {
                //Get the text from the textboxes
                string _name = textBox1.Text;
                string _id = textBox2.Text;
                string _age = textBox3.Text;
              
                //Add them inside the ObservableCollection variable: collectionInRow
                collectionInRow.Add(new Staff(_name, _id, _age));

                //This is the Most Vital line: assign the Source of the dataGrid to the ObservableCollection
                myDataGrid.ItemsSource = collectionInRow;
            }

Silverlight 6 with Free ASP.NET Hosting
Try our Silverlight 6 with Free ASP.NET Hosting today and your account will be setup soon! You can also take advantage of our Windows & ASP.NET Hosting support with Unlimited Domain, Unlimited Bandwidth, Unlimited Disk Space, etc.


Silverlight 6 Hosting Denmark - HostForLIFE.eu :: How to Get and Set the Control's Coordinate

clock April 29, 2015 06:40 by author Rebecca

Unlike normal C#, in Silverlight, you can't access a control's coordinate through the object.Location.X and object.Location.Y. Instead, it is more troublesome to get and set the values. So this tutorial will tell you wow to get and set the control's coordinate/location/position.

For example, if you want to add Label on the GUI through the code instead of XAML, you have to do the following codes:

          Label[] arrayScores = new Label[MAX_PLAYERS]; //MAX_PLAYERS = 4
          for (int i = 0; i < arrayScores.Length; i++)
                {
                    arrayScores[i] = new Label();
                    arrayScores[i].Name = "Scores" + i;
                    arrayScores[i].Width = 50;
                    arrayScores[i].Height = 30;
                }

But that's not enough, you haven't set the coordinates of the Labels. You might think that adding the remaining codes at anywhere can do the job. However, it does not. Remember to put the coordinates setting code 'AFTER' the page is loaded.

Step 1

Add this.Loaded event in the constructor after the InitializeComponent()

    public MainPage()
            {
                InitializeComponent();
                ...
                ...
                this.Loaded += new RoutedEventHandler(MainPage_Loaded);
            }

Step 2

Set coordinates using CANVAS: set position, then add into canvas.

void MainPage_Loaded(object sender, RoutedEventArgs e)
        {
            Canvas.SetLeft(arrayScores[0], SCORE_OFFSET_LEFT);
            Canvas.SetLeft(arrayScores[1], SCORE_OFFSET_LEFT);
            Canvas.SetLeft(arrayScores[2], SCORE_OFFSET_LEFT);
            Canvas.SetLeft(arrayScores[3], SCORE_OFFSET_LEFT);
            canvas1.Children.Add(arrayScores[0]);
            canvas2.Children.Add(arrayScores[1]);
            canvas3.Children.Add(arrayScores[2]);
            canvas4.Children.Add(arrayScores[3]);
        }

That's all! And you're done!

HostForLIFE.eu Silverlight 6 Hosting
HostForLIFE.eu is European Windows Hosting Provider which focuses on Windows Platform only. We deliver on-demand hosting solutions including Shared hosting, Reseller Hosting, Cloud Hosting, Dedicated Servers, and IT as a Service for companies of all sizes. We have customers from around the globe, spread across every continent. We serve the hosting needs of the business and professional, government and nonprofit, entertainment and personal use market segments.


About HostForLIFE.eu

HostForLIFE.eu is European Windows Hosting Provider which focuses on Windows Platform only. We deliver on-demand hosting solutions including Shared hosting, Reseller Hosting, Cloud Hosting, Dedicated Servers, and IT as a Service for companies of all sizes.

We have offered the latest Windows 2016 Hosting, ASP.NET Core 2.2.1 Hosting, ASP.NET MVC 6 Hosting and SQL 2017 Hosting.


Tag cloud

Sign in