May 23, 2019 05:30 by
 Peter
PeterHow we can print the document in a Silverlight application.
Step 1
We have the PrintDocument Class which defines a reusable object that sends output to a printer.
PrintDocument
The PrintDocument object encapsulates all the information needed to print a page. They associate with the control which content can be print. They handle the events and operations of printing.
Namespace - System.Drawing.Printing.PrintDocument
[C#]
public class PrintDocument : Component
We can create an instance of the PrintDocument class, set the properties that describe how to print, and call the Print method to start the printing process. Handle the PrintPage event where you specify the output to print, by using the Graphics included in the PrintPageEventArgs.
Associate control to Print document
private void printDoc_PrintPage(object sender, PrintPageEventArgs e) {
// print current page
e.PageVisual = printPage;
}
Step 2
Create one user control page name as PrintPage.Xaml and design header and footer in this user control page like as following.
<Grid x:Name="LayoutRoot" Background="White">
<Grid.RowDefinitions>
<RowDefinition Height="Auto" />
<RowDefinition />
<RowDefinition Height="Auto" />
</Grid.RowDefinitions>
<!--Header-->
<Grid>
<TextBlock Text="HEADER" />
</Grid>
<!--Body-->
<ItemsControl Name="BodyItemsControl" Grid.Row="1" Margin="0,24" />
<ItemsControl Name="TemplateItemsControl">
<ItemsControl.ItemTemplate>
<DataTemplate>
<Grid>
<Grid.ColumnDefinitions>
<ColumnDefinition Width="Auto" />
<ColumnDefinition Width="Auto" />
<ColumnDefinition Width="*" />
</Grid.ColumnDefinitions>
<TextBlock Text="{Binding ID}" Margin="2" />
<TextBlock Text=" - " Grid.Column="1" Margin="2" />
<TextBlock Text="{Binding Description}" Grid.Column="2" TextWrapping="Wrap" MaxWidth="500" HorizontalAlignment="Left" Margin="2" />
</Grid>
</DataTemplate>
</ItemsControl.ItemTemplate>
</ItemsControl>
<Grid Grid.Row="2">
<TextBlock Text="FOOTER" />
</Grid>
Step 3
In MainPage.Xaml create an instance of PrintDocument like as following.
public MainPage() {
InitializeComponent();
this.Loaded += new RoutedEventHandler(MainPage_Loaded);
}
void MainPage_Loaded(object sender, RoutedEventArgs e) {
GetItems();
printDoc.PrintPage += newEventHandler < PrintPageEventArgs > (printDoc_PrintPage);
}
//following items for printing.
privatevoid GetItems() {
for (int i = 0; i < 100; i++) {
items.Add(newItem() {
ID = i,
Description = "This is Print Document " + i
});
}
}
//Handling the event when we're printing:
private void printDoc_PrintPage(object sender, PrintPageEventArgs e) {
PrintPage printPage = new PrintPage();
// print current page
e.PageVisual = printPage;
e.HasMorePages = true;
break;
}
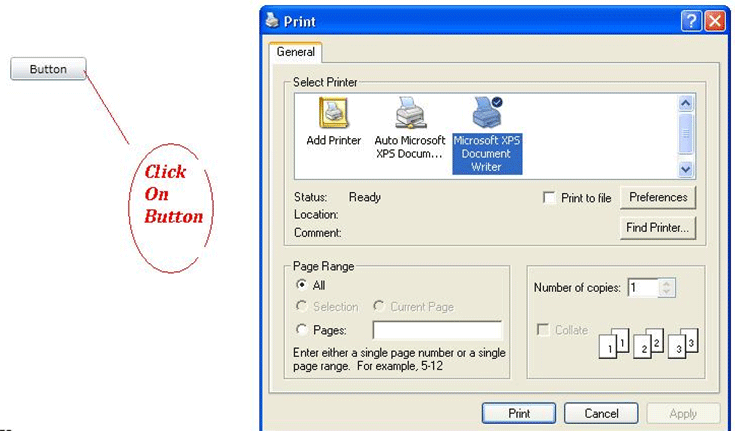
Step 4
Add a button to the MainPage.Xaml and print the document when the button is clicked,
<Button Content="Button" Grid.Row="1" Height="23" HorizontalAlignment="Left" Margin="42,56,0,0" Name="button1" VerticalAlignment="Top" Width="75" Click="button1_Click" />
private void Button_Click(object sender, RoutedEventArgs e)
{
printDoc.Print("Printing A Page");
}
Step 5
Output look like as following,
HostForLIFE.eu Silverlight 6 Hosting
HostForLIFE.eu is European Windows Hosting Provider which focuses on Windows Platform only. We deliver on-demand hosting solutions including Shared hosting, Reseller Hosting, Cloud Hosting, Dedicated Servers, and IT as a Service for companies of all sizes. We have customers from around the globe, spread across every continent. We serve the hosting needs of the business and professional, government and nonprofit, entertainment and personal use market segments.

May 17, 2019 11:36 by
PeterIn this post allow us to understand how to use ScrollViewer panel Layout inside a Silverlight application. ScrollViewer is an additional layout container, that we don’t use constantly. It's chiefly useful showing contents in an exceedingly scrollable panel such as ListBox or Editor window. ListBox, TextBox, RichTextBox internally uses ScrollViewer to implement the scrolling functionality. Allow us to discuss the implementation in this post.

As usual, open up visual studio and choose Silverlight project. We will discover there's a Grid layout in your MainPage. xaml. Eliminate the default Grid layout and merely drag and drop the Stack panel Layout into our application. The code for this looks such as:
<StackPanel x:Name="LayoutRoot" > </StackPanel>
Inside the stack panel I am just defining 12 different rectangles. And this is the code that I used:
<StackPanel x:Name="LayoutRoot" Orientation="Vertical" Width="100">
<Rectangle Height="50" Width="100" Fill="Red" />
<Rectangle Height="50" Width="100" Fill="Green" />
<Rectangle Height="50" Width="100" Fill="Orange" />
<Rectangle Height="50" Width="100" Fill="Tomato" />
<Rectangle Height="50" Width="100" Fill="WhiteSmoke" />
<Rectangle Height="50" Width="100" Fill="Green" />
<Rectangle Height="50" Width="100" Fill="Blue" />
<Rectangle Height="50" Width="100" Fill="Yellow" />
<Rectangle Height="50" Width="100" Fill="Azure" />
<Rectangle Height="50" Width="100" Fill="Gold" />
<Rectangle Height="50" Width="100" Fill="Blue" />
<Rectangle Height="50" Width="100" Fill="Violet" />
</StackPanel>
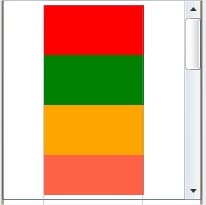
In case we compile the above code as it's, we will notice all of the rectangles however no scroll bar result. Thus in an effort to get scroll bar effect we ought to put the above stack panel inside scroll viewer and ought to offer fixid width towards the scroll viewer. And this is the code snippet:
<ScrollViewer Height="200" >
<StackPanel x:Name="LayoutRoot" Orientation="Vertical" Width="100">
<Rectangle Height="50" Width="100" Fill="Red" />
<Rectangle Height="50" Width="100" Fill="Green" />
<Rectangle Height="50" Width="100" Fill="Orange" />
<Rectangle Height="50" Width="100" Fill="Tomato" />
<Rectangle Height="50" Width="100" Fill="WhiteSmoke" />
<Rectangle Height="50" Width="100" Fill="Green" />
<Rectangle Height="50" Width="100" Fill="Blue" />
<Rectangle Height="50" Width="100" Fill="Yellow" />
<Rectangle Height="50" Width="100" Fill="Azure" />
<Rectangle Height="50" Width="100" Fill="Gold" />
<Rectangle Height="50" Width="100" Fill="Blue" />
<Rectangle Height="50" Width="100" Fill="Violet" />
</StackPanel>
</ScrollViewer>
Finally, Run the code and here is the result: