European Silverlight 4 & Silverlight 5 Hosting BLOG

BLOG about Silverlight 5 Hosting and Its Techologies - Dedicated to European Windows Hosting Customer

European Silverlight 5 Hosting - Amsterdam :: Telerik RadCoverFlow in SilverLight 5

clock December 20, 2013 06:18 by author Patrick

Today, in this article let's play around with another interesting concept of Telerik RadControls.

What is RadCoverFlow?
In simple terms "It enables to provide a rich GUI interface which navigates through a group of images.".

Step 1: The complete code of MainPage.xaml looks like this:

<UserControl x:Class="RadCoverApplication.MainPage"xmlns="http://schemas.microsoft.com/winfx/2006/xaml/presentation" xmlns:x="http://schemas.microsoft.com/winfx/2006/xaml"xmlns:d="http://schemas.microsoft.com/expression/blend/2008" xmlns:mc="http://schemas.openxmlformats.org/markup-compatibility/2006"xmlns:telerik="http://schemas.telerik.com/2008/xaml/presentation"mc:Ignorable="d" d:DesignWidth="640" d:DesignHeight="480">
    <Grid x:Name="LayoutRoot">
        <telerik:RadCoverFlow Margin="126,12,108,61" Name="radCoverFlow1" OffsetX="0"OffsetY="40"CameraViewpoint="Top"DistanceBetweenItems="20"DistanceFromSelectedItem="5"
RotationY="56"IsReflectionEnabled="True"ItemScale="0.60">
            <Image Source="pics/e6e22af6f3224593a6c658b3d3f7a1fd.jpg"  Width="400" Height="120"></Image>
            <Image Source="pics/Microsoft-.NET-logo-white.png"  Width="400" Height="120"></Image>
            <Image Source="pics/microsoft-windows-8.jpg" Width="400" Height="120"></Image>
            <Image Source="pics/microsoft (1).jpg"  Width="400" Height="120"></Image>
            <Image Source="pics/Microsoft.jpg"  Width="400" Height="120"></Image>
        </telerik:RadCoverFlow>
    </Grid>
</UserControl>


Step 2: The complete code of MainPage.xaml.cs looks like this:

using System;
using System.Collections.Generic;
using System.Linq;
using System.Net;
using System.Windows;
using System.Windows.Controls;
using System.Windows.Documents;
using System.Windows.Input;
using System.Windows.Media;
using System.Windows.Media.Animation;
using System.Windows.Shapes;
namespace RadCoverApplication
{
    public partial class MainPage : UserControl
    {
        public MainPage()
        {
            InitializeComponent();
        }
    }
}

Step 3: The output of the application looks like this:

Step 4: The output of the left moved pics application looks like this:

Step 5: The output of the right moved pics application looks like this:

Hope this article is useful!


European Silverlight 5 Hosting - Amsterdam :: Vector and Bitmap Printing for Reports in Silverlight 5

clock October 17, 2013 07:11 by author Scott

Printing Basics

Just as it was in Silverlight 4, Printing is centered around the PrintDocument class, found in System.Windows.Printing. This class has three primary events: BeginPrint, EndPrint, and PrintPage, which are your hooks into the printing system. You do setup in BeginPrint, teardown in EndPrint, and all the actual page production in PrintPage.

Page Markup

Here's the simple test page XAML I used for this printing example.

<Grid x:Name="LayoutRoot" Background="White">
    <Button Content="Print Bitmap"
            Height="23"
            HorizontalAlignment="Left"
            Margin="141,79,0,0"
            Name="PrintBitmap"
            VerticalAlignment="Top"
            Width="95"
            Click="PrintBitmap_Click" />
    <Button Content="Print Vector"
            Height="23"
            HorizontalAlignment="Left"
            Margin="141,108,0,0"
            Name="PrintVector"
            VerticalAlignment="Top"
            Width="95"
            Click="PrintVector_Click" />
    <Button Content="Force Vector"
            Height="23"
            HorizontalAlignment="Left"
            Margin="141,137,0,0"
            Name="PrintVectorForced
            VerticalAlignment="Top"
            Width="95"
            Click="PrintVectorForced_Click" />
</Grid>

The application UI looks really simple, just three buttons on a page. This is one of my finest designs.

Next, I'll wire up an event handler for each button, and use it to demonstrate the behavior of the three different printing approaches.

Page Code for Basic Vector Printing

Here's the code for a basic vector print of 30 rows.

// Tests basic (not forced) vector printing  
private void PrintVector_Click(object sender, RoutedEventArgs e)
{
    PrintDocument doc = new PrintDocument();

    doc.PrintPage += (s, ea) =>
        {
            StackPanel printPanel = new StackPanel();

            Random rnd = new Random();

            for (int i = 0; i < 30; i++)
            {                  
                TextBlock row = new TextBlock();
                row.Text = "This is row " + i + " of the current page being printed in vector mode.";                      

                printPanel.Children.Add(row);
            }

            ea.PageVisual = printPanel;
            ea.HasMorePages = false;
        };

    PrinterFallbackSettings settings = new PrinterFallbackSettings();

    doc.Print("Silverlight Vector Print");
}

Note that the PageVisual is assigned after the printPanel is populated. If you assign it prior, and do not force a recalculation of layout (in my example, the panel isn't in the visual tree, but layout is calculated with you assign PageVisual), you'll get a StackPanel with 30 items all piled on each other in the same row. The easiest way to fix this is to assign the PageVisual after the visual has all its children populated.

You could also point the PageVisual to an on-screen visual if you desire. If you're going to do that, you'll need to unhook the visual from the tree first, as a single element cannot have two parents.

If you have no more pages to print other than this one, set HasMorePages to false. If you have additional pages after this one, set it to true.

Printer Fallback Settings and Forcing Vector Printing Mode

New in Silverlight 5 is the PrinterFallbackSettings class. This class is used by one of the overloads of PrintDocument.Print to set two options: ForceVector and OpacityThreshold.

In the previous example, if you had any elements that had opacity other than 1.0, perspective transforms, or other things PostScript doesn't understand, Silverlight would silently fall back to bitmap-based printing.

ForceVector forces Silverlight to print in vector mode, assuming you have a PostScript-enabled printer driver, even when postscript-incompatible items exist in the element tree assigned to PageVisual. You use this in tandem with OpacityThreshold. The Opacity threshold sets the value over which Silverlight will treat an element's opacity as 1.0 to support PostScript printing.

// tests trying to force vector printing mode
private void PrintVectorForced_Click(object sender, RoutedEventArgs e)
{
    PrintDocument doc = new PrintDocument();

    doc.PrintPage += (s, ea) =>
    {
        StackPanel printPanel = new StackPanel();

        Random rnd = new Random();

        for (int i = 0; i < 30; i++)
        {
            TextBlock row = new TextBlock();
            row.Opacity = (rnd.Next(3, 10)) / 10.0;
            row.Text = "This is row " + i + " of the current page being printed. Opacity is " + row.Opacity;

            printPanel.Children.Add(row);
        }

        ea.PageVisual = printPanel;
        ea.HasMorePages = false;
    };

    PrinterFallbackSettings settings = new PrinterFallbackSettings();
    settings.ForceVector = true;
    settings.OpacityThreshold = 0.5;

    doc.Print("Silverlight Forced Vector Print", settings);
}

If your content or your printer doesn't support PostScript printing, Silverlight automatically falls back to sending an uncompressed bitmap to the printer. If your printer doesn't support PostScript, you'll see the effect of opacity in the printed results (some items lighter colored than others, for example) as the fallback bitmap mode supports opacity.

Printing in Bitmap Mode

Sometimes you know you want to print in bitmap mode. Rather than let vector mode fall back to bitmap, you can simply force bitmap printing from the start. If you have a PostScript compatible printer and driver, this is quite a bit faster than it was in Silverlight 4, as the bitmap is compressed. If you don't have a PostScript driver, it sends a plain old uncompressed bitmap just like Silverlight 4.

// tests printing in bitmap mode
private void PrintBitmap_Click(object sender, RoutedEventArgs e)
{
    PrintDocument doc = new PrintDocument();

    doc.PrintPage += (s, ea) =>
    {
        StackPanel printPanel = new StackPanel();

        Random rnd = new Random();

        for (int i = 0; i < 30; i++)
        {
            TextBlock row = new TextBlock();
            row.Opacity = (rnd.Next(3, 10)) / 10.0;
            row.Text = "This is row " + i + " of the current page being printed in bitmap mode. Opacity is " + row.Opacity;

            printPanel.Children.Add(row);
        }

        ea.PageVisual = printPanel;
        ea.HasMorePages = false;
    };

    doc.PrintBitmap("Silverlight Bitmap Print");
}

Bitmap mode will preserve the opacity settings, as well as ensure render transforms are printed (assuming you apply them) etc. It's not the best approach for printing a report, but it's the highest-fidelity approach for printing visuals when you want to do the equivalent of a print-screen.

The resolution of the bitmap sent is set to the selected printer resolution, typically 600dpi.

Efficient Printing

So, for the most efficient printing of multi-page reports, you'll want to make sure you do the following:

  • Have a PostScript-compatible printer with an appropriate PostScript driver (typically ends with " PS")
  • Avoid Opacity other than 1.0 in your elements to be printed (or use the appropriate fallback settings)
  • Leave out perspective transforms, 3d, and other things not compatible with PostScript printing.


European Silverlight 5 Hosting - Amsterdam :: Performance Enhancements for Silverlight 5

clock August 21, 2013 07:53 by author Scott

Silverlight boasts several performance enhancements that will improve its speed and scale within the enterprise. The first is the ability to run animations on the composition thread instead of the UI thread.

The UI thread is a dedicated thread that handles input and output for the user interface. It is where much of the rendering computations and actions take place as well as polling for mouse movements and keyboard input. Heavy computations on the UI thread will cause other operations to become blocked and the application to become unresponsive.

The composition thread is a separate thread that was introduced to provide rendering for 3D graphics in Silverlight 5. It can also be used to run animations. This is important because animations usually run on the UI thread. Not only do they take resources from other processes competing for this thread, but also can degrade when there is massive work performed on the thread. By moving certain animations to the composition thread, they can run independently and remain fluid despite processing on the UI thread. Animations are run on this thread when the UI element that is targeted has the cache mode set to BitmapCache and GPU acceleration is enabled for the Silverlight application.

A second enhancement is the provision of a multi-core Just-in Time compile (JIT). This means the Silverlight runtime can generate code more quickly and provide a faster response time on multi-core machines. Additional optimizations of the networking stack have led to reduced network latency, which means better responsiveness when connecting to remote systems. Add to that speed improvements that were made to the XAML parser and you end up with a well performing system that should run faster on the same hardware as compared to its predecessor. According to Microsoft, improvements to the networking thread alone reduce latency by up to 90 percent.


European Silverlight 5 Hosting - Amsterdam :: ICustomTypeProvider in Silverlight 5

clock July 19, 2013 06:51 by author Scott

Why would I want to trick Silverlight into treating Dictionary values like real Properties?

There are scenarios when complex, data-intensive applications will need to data bind to keys/value pairs or generally determine the properties of a Class at runtime.  In cases where there could be large numbers of keys or the keys could change without an application re-deploy, this is a tricky problem to solve. 

In Silverlight 5, however, you can use ICustomTypeProvider to achieve the same goal in a clean fashion.

Data Facets

Some systems, such as Pivot Viewer, allow you to specify any number of pseudo-Properties about interesting items, which we’ll call Facets.  Using a structure like a Dictionary, we could specify any number of Facets.  Two-way data binding to these is problematic however since they aren’t real CLR properties.  In the full .NET Framework you can do tricks with ICustomTypeDescriptor, and now in Silverlight 5 we have System.Reflection.ICustomTypeProvider.
Let’s create a simple Facet class to represent data about the Facet we’d like to data bind to.

/// <summary>
/// Some facet of a dynamic type
/// </summary>
public class Facet
{
    /// <summary>
    /// Must be a valid CLR property name
    /// </summary>
    public string PropertyName { get; set; }

    public Type PropertyType { get; set; }

    //Couple of demo Facets

    public static Facet DynamicDemo0 = new Facet
    {
        PropertyName = "DynamicPropZero",
        PropertyType = typeof(string)
    };

    public static Facet DynamicDemo1 = new Facet
    {
        PropertyName = "DynamicPropOne",
        PropertyType = typeof(double)
    };
}

Next we’ll create an object with a regular CLR property and a dictionary to store key/value pairs.  These key value pairs will be made binding-friendly.

/// <summary>
/// An Class with normal properties, but also supporting dynamic properties
/// </summary>
public class FacetedObject : ICustomTypeProvider, INotifyPropertyChanged,
INotifyDataErrorInfo
{
    Dictionary<string, object> _facetValues;

    public object this[string key]
    {
        get
        {
            if (!_facetValues.ContainsKey(key))
            {
                return null;
            }
            return _facetValues[key];
        }
        set
        {
            _facetValues[key] = value;
            OnPropertyChanged(key);
        }
    }

The interesting thing here is the ICustomTypeProvider interface implementation. 

ICustomTypeProvider Implementation

On any CLR object you can call GetType().  If you’ve ever done any reflection programming you’re aware of all the rich runtime metadata about your classes that System.Type can provide.  System.Type is also an abstract class, and ICustomTypeProvider requires only a single method implementation:

public Type GetCustomType()
{
    return new FacetedObjectType<FacetedObject>(_currentFacets);
}

So, we can create a class that extends System.Type and do some interesting things.  We can trick the Silverlight runtime into thinking our Facets are real CLR Properties.  While my FacetObjectType<TSource> implementation is about 300 lines long, here’s the most interesting part:

/// <summary>
/// A custom System.Type implementation that can provide different Properties at runtime.
 All operations except those related to
/// Property logic delegated to the type of TSource
/// </summary>
/// <typeparam name="TSource"></typeparam>
public class FacetedObjectType<TSource> : System.Type
{
//snip…


    public override System.Reflection.PropertyInfo[] GetProperties(BindingFlags bindingAttr)
    {
        var properties = ProxyTargetType.GetProperties(bindingAttr);

        if (
           BindingFlags.Instance == (bindingAttr & BindingFlags.Instance)
        && BindingFlags.Public == (bindingAttr & BindingFlags.Public)
        )
        {
            var dynamicProperties = GetPublicDynamicProperties();
            var allprops = new List<PropertyInfo>();
            allprops.AddRange(properties);
            allprops.AddRange(dynamicProperties);
            return allprops.ToArray();
        }
        return properties;
    }
//snip…

So, for system types that implement ICustomTypeProvider, we can intercept important requests for reflection information and supplement that information.  In our case here, we can claim that properties exist that aren’t really on our class at compile time.  In terms of telling the runtime how to actually Get and Set these dynamic properties, we need to create a class that extends PropertyInfo.  Here’s a type called DynamicPropertyInfo, and the two most interesting methods:

public class DynamicPropertyInfo : PropertyInfo
{
    public DynamicPropertyInfo(Type propertyType, Type declaringType, string propertyName)
    {
        _propertyType = propertyType;
        _declaringType = declaringType;
        _name = propertyName;
    }

    public override object GetValue(object obj, BindingFlags invokeAttr, Binder binder,
        object[] index, System.Globalization.CultureInfo culture
    {
        var fo = obj as FacetedObject;
        return fo[Name];
    }

    public override void SetValue(object obj, object value, BindingFlags invokeAttr, Binder binder,
        object[] index, System.Globalization.CultureInfo culture)
    {
        var fo = obj as FacetedObject;
        fo[Name] = value;
    }

In here, we can just use the this[] indexer of our FacetedObject class to get and set values.

Demo App

To show how this concept works, let’s create a Silverlight 5 application with a DataGrid.  We’re going to get the datagrid to display “properties” that technically speaking are not there.  First we’ll create a couple of Facets assigned to FacetedObject by default called “DynamicPropZero” and “DynamicPropOne”.  For these two we can create DataGridColumns along with an actual compile-time Property of FacetedObject.

            <sdk:DataGrid.Columns>
                <
sdk:DataGridTextColumn Header="Id" IsReadOnly="True" Binding="{Binding Id}" />
                <
sdk:DataGridTemplateColumn Header="Dynamic Property 0">
                    <
sdk:DataGridTemplateColumn.CellTemplate>
                        <
DataTemplate>
                            <
TextBox Text="{Binding DynamicPropZero, Mode=TwoWay,
                               
NotifyOnValidationError=True,
                               
ValidatesOnNotifyDataErrors=True,                              ValidatesOnDataErrors=True,ValidatesOnExceptions=True}"/>
                        </
DataTemplate>
                    </
sdk:DataGridTemplateColumn.CellTemplate>
                </
sdk:DataGridTemplateColumn>
                <
sdk:DataGridTextColumn Header="Dynamic Property 1"
                                       
Binding="{Binding DynamicPropOne, Mode=TwoWay}" />
            </
sdk:DataGrid.Columns>

Here’s the code we’re using to create the sample data in our main ViewModel.  Note that we're going to explose the dictionary values as properties.

public class ShellViewModel : INotifyPropertyChanged
{
    public ShellViewModel()
    {
        Items = new ObservableCollection<FacetedObject>();
        var d0 = new FacetedObject();
        d0[Facet.DynamicDemo0.PropertyName] = "I'm a property!";
        d0[Facet.DynamicDemo1.PropertyName] = 42.42;

        var d1 = new FacetedObject();
        d1[Facet.DynamicDemo0.PropertyName] = "Would you like to be a property too?";
        Items.Add(d0);
        Items.Add(d1);

And as you can see, it works:
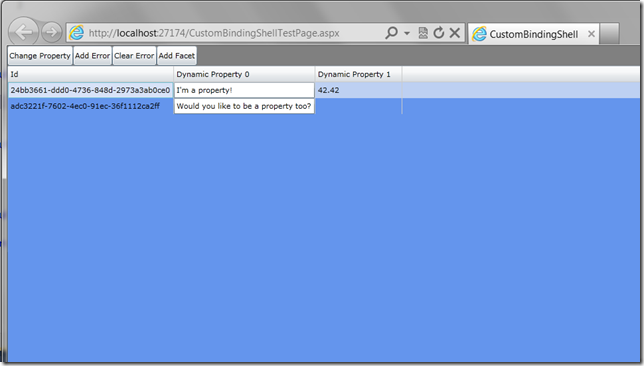
Notice the buttons above the DataGrid.  These dynamic properties wouldn’t be very useful unless they are first-class citizens, and they are.  Note that FacetedObject also implements INotifyPropertyChanged and INotifyDataErrorInfo.  By clicking the buttons we fire commands that affect changes in code, and the UI reflects the changes for the dynamic properties.
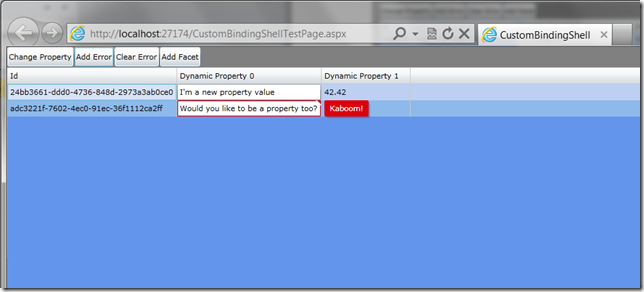
Now, recall at the beginning that I said this could be completely dynamic and that we could actually create both the Facet data and visuals in a data driven fashion at runtime.  Clicking on the Add Facet button demonstrates this.
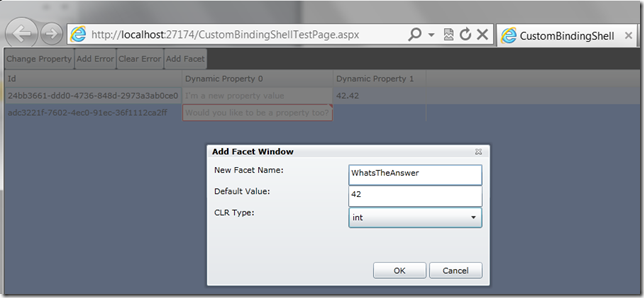
After clicking OK, we can do some work to add this Fact to the items on the ViewModel, and also dynamically create a new DataGridColumn to display the data.

public void AddNewFacet(string name, object defaultValue, string clrType)
{
    var typeDict = new Dictionary<string, Type>();
    typeDict["string"] = typeof(string);
    typeDict["int"] = typeof(int);
    typeDict["double"] = typeof(double);

    //1. Create a new Facet
    var newFacet = new Facet
    {
        PropertyName = name,
        PropertyType = typeDict[clrType]
    };

    //2. Tell objects to clear out cached state
    //3. Assign a default value we can see in the UI
    var vm = DataContext as ShellViewModel;   

    foreach (var item in vm.Items)
    {
        item.AddFacet(newFacet);
        item[newFacet.PropertyName] = defaultValue;
    }

    //4. create visuals to bind to new facet
    var sb = new StringBuilder("<DataTemplate
xmlns=\"http://schemas.microsoft.com/winfx/2006/xaml/presentation\" >")
    .Append("<TextBox Text=\"{Binding  ")
    .Append(name)
    .Append(", Mode=TwoWay}\" />")
    .Append("</DataTemplate>");

    var dt = (DataTemplate)XamlReader.Load(sb.ToString());
    var column = new DataGridTemplateColumn();
    column.Header = name;
    column.CellTemplate = dt;
    FacetGrid.Columns.Add(column);
}

Our new DynamicProperty is now shown in the DataGrid and we can edit it with two-way binding support:
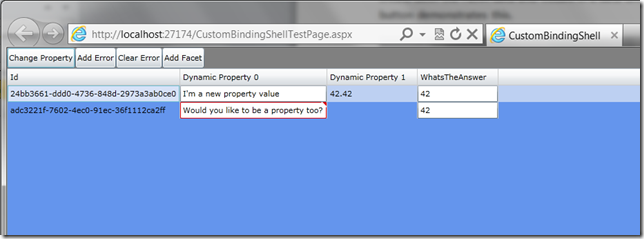
For some, this last piece of code will look like the worst kind of voodoo, but there are cases where your requirements will dictate this level of flexibility and this combination of techniques will help you get there.


European Silverlight 5 Hosting - Amsterdam :: Animation in Silverlight 5 Using VisualStateManager.LoadTransition

clock July 5, 2013 06:24 by author Scott

I was quite happy to see the all those sleek new additions to silverlight 5. I will be addressing all of them one by one. For the timebeing i will show how to give that nice and smooth initial animation when a control is loading. Before silverlight 5, this was pretty time consuming as you required to write all those custom animation codes and have their triggers in place. Now all you need to do is the following :

<Grid>
<VisualStateManager.LoadTransition>
<LoadTransition StartXOffset="300" GeneratedDuration="0:0:1.0" StartOpacity="0.2">
<LoadTransition.GeneratedEasingFunction>
<CircleEase/>
</LoadTransition.GeneratedEasingFunction>
</LoadTransition>
</VisualStateManager.LoadTransition>
</Grid>

As we can see above, its a very simple usage. All we need to do is add the VisualStateManager.LoadTransition to our Grid. The parameters are quite self explanatory :

  • StartXOffset : The intial x co-ordinate from which to start the transition
  • GeneratedDuration : The amount of time it would animate
  • StartOpacity : The initial Opacity. Here it start with an initial opacity of 20%
  • Also notice that we have added an easing function of type CircleEase. (More details on it at : http://msdn.microsoft.com/en-us/library/ee308751.aspx)


European Silverlight Hosting - Amsterdam :: Silverlight Watermark TextBox Behavior

clock April 29, 2013 10:48 by author Scott

Maybe there is a working solution for this already out there, but I created my own Silverlight Behavior for a basic TextBox Watermark which might be useful.

I wanted to use it like this in my XAML (look at the behaviors tag):

<TextBlock Margin="5">Watermarked textbox:</TextBlock>
<TextBox Margin="5">
    <Interactivity:Interaction.Behaviors>
        <local:Watermark Text="Watermark" Foreground="LightGray" />
    </Interactivity:Interaction.Behaviors>
</TextBox>

The result should be something like this:

To create a Behavior for Silverlight, you must get hold of the System.Windows.Interactivity assembly which ships with Expression Blend. In my system it’s located at:

c:\Program Files (x86)\Microsoft SDKs\Expression\Blend\Silverlight\v4.0\Libraries\System.Windows.Interactivity.dll

And the code for the Behavior:

public class Watermark : Behavior<TextBox>
{
    private bool _hasWatermark;
    private Brush _textBoxForeground;
 
    public String Text { get; set; }
    public Brush Foreground { get; set; }
 
    protected override void OnAttached()
    {
        _textBoxForeground = AssociatedObject.Foreground;
 
        base.OnAttached();
        if (Text != null)
            SetWatermarkText();
        AssociatedObject.GotFocus += GotFocus;
        AssociatedObject.LostFocus += LostFocus;
    }
 
    private void LostFocus(object sender, RoutedEventArgs e)
    {
        if (AssociatedObject.Text.Length == 0)
            if (Text != null)
                SetWatermarkText();
    }
 
    private void GotFocus(object sender, RoutedEventArgs e)
    {
        if (_hasWatermark)
            RemoveWatermarkText();
    }
 
    private void RemoveWatermarkText()
    {
        AssociatedObject.Foreground = _textBoxForeground;
        AssociatedObject.Text = "";
        _hasWatermark = false;
    }
 
    private void SetWatermarkText()
    {
        AssociatedObject.Foreground = Foreground;
        AssociatedObject.Text = Text;
        _hasWatermark = true;
    }
 
    protected override void OnDetaching()
    {
        base.OnDetaching();
        AssociatedObject.GotFocus -= GotFocus;
        AssociatedObject.LostFocus -= LostFocus;
    }
}

Like so many Watermark-solutions out there I’m hooking into the GotFocus/LostFocus events and to the work there. Works for me.


European Silverlight Hosting - Amsterdam :: Silverlight BlurEffect Example

clock March 11, 2013 07:12 by author Scott

In this article we will be seeing how to create Silverlight BlurEffect using Visual studio 2010.

Pixel shader effects in Silverlight allows you to add effects, such as gray scale, red eye removal, pixel brightness, and shadows, to rendered objects. There are two types of Pixel Shader effects in Silverlight. They are BlurEffect and DropShadowEffect. In this we will be seeing about BlurEffect and its properties.

Namespace: System.Windows.Media. Effects

Assembly: System.Windows

BlurEffect:

BlurEffect is used to represent an effect that we can apply to an object that simulates looking at the object through an out-of-focus lens. It is defined by the Radius property.

Radius:

This property is used to specify the amount of blur to apply to an object.

Without BlurEffect:

<Canvas Height="200" Width="200" Background="white">
        <Rectangle Height="50" Width="50" Fill="Orange" Canvas.Left="25" Canvas.Top="75"></Rectangle>
        <Rectangle Height="50" Width="50" Fill="White" Canvas.Left="75" Canvas.Top="75"></Rectangle>
        <Rectangle Height="50" Width="50" Fill="Green" Canvas.Left="125" Canvas.Top="75"></Rectangle>
</Canvas>

With BlurEffect:

<Canvas Height="200" Width="200" Background="white">
        <Canvas.Effect>
            <BlurEffect Radius="120"></BlurEffect>
        </Canvas.Effect>   
        <Rectangle Height="50" Width="50" Fill="Orange" Canvas.Left="25" Canvas.Top="75"></Rectangle>
        <Rectangle Height="50" Width="50" Fill="White" Canvas.Left="75" Canvas.Top="75"></Rectangle>
        <Rectangle Height="50" Width="50" Fill="Green" Canvas.Left="125" Canvas.Top="75"></Rectangle>
</Canvas>

Steps Involved:

Creating a Silverlight Application:

-
Open Visual Studio 2010. 
-
Go to File => New => Project. 
-
Select Silverlight from the Installed templates and choose the Silverlight Application template. 
-
Enter the Name and choose the location. 
-
Click OK. 
-
In the New Silverlight Application wizard check the "Host the Silverlight Application in a new Web site". 
-
Click OK.

Creating the UI:

Open MainPage.xaml file and replace the code with the following.

<UserControl x:Class="SilverlightBlurEffect.MainPage"
    xmlns=http://schemas.microsoft.com/winfx/2006/xaml/presentation
    xmlns:x=http://schemas.microsoft.com/winfx/2006/xaml
    xmlns:d=http://schemas.microsoft.com/expression/blend/2008
    xmlns:mc=http://schemas.openxmlformats.org/markup-compatibility/2006
    mc:Ignorable="d"
    d:DesignHeight="300" d:DesignWidth="400">
    <Canvas Height="200" Width="200" Background="white">
        <Canvas.Effect>
            <BlurEffect Radius="120"></BlurEffect>
        </Canvas.Effect>   
        <Rectangle Height="50" Width="50" Fill="Orange" Canvas.Left="25" Canvas.Top="75"></Rectangle>
        <Rectangle Height="50" Width="50" Fill="White" Canvas.Left="75" Canvas.Top="75"></Rectangle>
        <Rectangle Height="50" Width="50" Fill="Green" Canvas.Left="125" Canvas.Top="75"></Rectangle>
    </Canvas>
</UserControl>

To test it, please just build the solution and hit CTRL+F5


European Silverlight Hosting - Amsterdam :: Working with Isolated Storage in Silverlight

clock November 29, 2012 07:46 by author Scott

Isolated storage gives you access to a small segment of hard-disk space, with certain limitations. For example we don't know exactly where our files are being stored. We also can't read the files left by another Silverlight application or recorded for another user. In essence, isolated storage provides carefully restricted, tamperproof file access for applications that need to store permanent information in the local PC, so that information can be retrieved the next time the user runs the application.

How it works:

Isolated storage provides a virtual file system that lets you write data to a small, user-specific and application-specific slot of space. There's no way to know beforehand exactly where the data will be written, and the default space limit is a mere 1 MB (although you can request that the user grant you more).

Is it similar to browser Cookie?

  1. Essentially, isolated storage is the Silverlight equivalent of persistent cookies in an ordinary web page. It allows small bits of information to be stored in a dedicated location that has specific controls in place to prevent malicious attacks.
     
  2. Isolated storage is persistent–unlike the browser cache, it never expires, and it's not removed if the user chooses to explicitly delete temporary Internet files.
     
  3. Isolated storage isn't a good storage place for important documents, because they're never backed up, are easily deleted, and can be even more easily lost.
     
  4. Isolated storage is intended to be a limited-size storage location for data, not a handcrafted replacement for HTTP Caching.


Scope of Isolated Storage:


With isolated storage, a unique storage location is created for every combination of user and application. In other words, the same computer can have multiple isolated storage locations for the same application, assuming each one is for a different user. Similarly, the same user can have multiple isolated storage locations, one for each Silverlight application. Isolated storage isn't affected by browser, so a Windows user switching from Internet Explorer to Firefox will get the same isolated storage location in both browsers.

What all can we store in an Isolated Storage: Good choices include user-specific details, user preferences, and information about recent user actions. Isolated storage is also great temporary storage.

So now we are ready to create a application which will demonstrate how it works.

Step 1: Create a Silverlight Application project and name it IsolatedStorage.

Step 2: Now we will try to understand how to write data and read data from these storages Medias. We will also see if we want to increase the space on the handdisk; how can we do that as well.

So we created a simple xmal like this:

<Grid x:Name="LayoutRoot"  Margin="10"  Background="WhiteSmoke" Width="340" Height="200" HorizontalAlignment="Center" VerticalAlignment="Center">
        <Grid.RowDefinitions>
            <RowDefinition Height="Auto"></RowDefinition>
            <RowDefinition Height="Auto"></RowDefinition>         

        </Grid.RowDefinitions>

            <Grid.ColumnDefinitions>
            <ColumnDefinition Width="Auto" ></ColumnDefinition>
            <ColumnDefinition Width="Auto" ></ColumnDefinition>           

        </Grid.ColumnDefinitions>

            <TextBlock Text="Enter Your Name" Margin="3" Padding="5" HorizontalAlignment="Left" 
                       VerticalAlignment="Center" Grid.Row="0" Grid.Column="0">               
           
</TextBlock>

            <TextBox x:Name="txtname" Margin="3" Padding="5"
                        HorizontalAlignment="Left" VerticalAlignment="Center"
                        Grid.Row="0" Grid.Column="1" Height="30" Width="200" ></TextBox>          

            <Grid Grid.Column="1" Grid.Row="1"  Margin="5" >
                <Grid.RowDefinitions>
                    <RowDefinition Height="50" ></RowDefinition>
                    <RowDefinition ></RowDefinition>
                    <RowDefinition ></RowDefinition>
            </Grid.RowDefinitions>

                <Grid.ColumnDefinitions>
                    <ColumnDefinition ></ColumnDefinition>
                    <ColumnDefinition ></ColumnDefinition>
                </Grid.ColumnDefinitions>

            <Button x:Name="btnWrite"  Margin="5" Padding="5" Width="90" Height="30"
                    Content="Click to Write" HorizontalAlignment="Center" VerticalAlignment="Top"
                    Click="btnWrite_Click">
            </Button>

            <Button x:Name="btnRead"  Margin="5" Padding="5" Width="90" Height="30"
                    Content="Click to Read"
                    HorizontalAlignment="Center" VerticalAlignment="Top" Click="btnRead_Click"
                    Grid.Row="0" Grid.Column="1">
            </Button>

            <Button x:Name="btnSize"  Padding="5" Width="180" Height="30"
                    Content="Click to Increase Disk Storage Space"
                     HorizontalAlignment="Center" VerticalAlignment="Top"
                    Click="btnSize_Click" Grid.Row="1" Grid.Column="0" Grid.ColumnSpan="2">
            </Button>

            <TextBlock x:Name="lblData" Margin="5"  HorizontalAlignment="Center" VerticalAlignment="Top"                       
                    Grid.Row="2" Grid.Column="0" Grid.ColumnSpan="2"></TextBlock>

        </Grid>

Step 3: Now come to Code Behind and write handler for btnWrite_Click.

Also add this Isolated storage namespace.

using System.IO.IsolatedStorage;

private void btnWrite_Click(object sender, RoutedEventArgs e)
        {
            // Write to isolated storage.
            try
            {               
                //this gives you exactly what you want: an application-specific, user-specific
                //location where you can store data.

               IsolatedStorageFile store = IsolatedStorageFile.GetUserStoreForApplication();

                 //If we would have used
                //IsolatedStorageFile.GetUserStoreForSite ,
                //then a storage site that's accessible to all the Silverlight applications on the same website domain.
                using (IsolatedStorageFileStream fs = store.CreateFile("data.txt"))
                {
                    StreamWriter sw = new StreamWriter(fs);                  
                    sw.Write(txtname.Text);                  
                    sw.Close();
                }
                txtname.Text = string.Empty;

            }
            catch
            {

            }
        }


Let us concentrate on this line.

IsolatedStorageFile
store = IsolatedStorageFile.GetUserStoreForApplication();

Silverlight creates isolated stores automatically. To interact with an isolated store, you use the IsolatedStorageFile class. You get the IsolatedStorageFile object for the current user and application by calling the static IsolatedStorageFile.GetUserStoreForApplication() method, as shown here:

Step 4: Press F5 and test write and read buttons.

Step 5: Now let's concentrate on how disk storage works. Initially, each Silverlight application gets 1 MB of space in it's isolated store. You can examine the IsolatedStorageFile.AvailableFreeSpace property to find out how much free space remains. If your application needs more space, you can use an option: the IsolatedStorageFile IncreaseQuotaTo() method.

We must request a value that's higher than the current quota. Otherwise, you'll receive an exception. That means you can't use the IncreaseQuotaTo() method to ensure that there's a certain level of free space.

If everything goes well, you will be presented with something such as shown in the figure below.


European Silverlight 4 Hosting - Amsterdam :: HTTP Error 404.0 - Not Found (MapRequestHandler / StaticFile) when deploying WCF Web API on IIS 7.x

clock February 15, 2012 07:12 by author Scott

If you’re deploying a WCF Web API application to your IIS 7.x you might receive a HTTP Error 404.0 (MapRequestHandler / StaticFile):


As you know, WCF Web API relies on .NET Framework 4.0.

So lets take a look into the application pool for our application:


Everything looks fine here.

So lets dig a little bit deeper – namely inspect the ISAPI Filters:


Looks like ASP.NET 4 is missing here… so lets fix it:

PS C:\Windows\Microsoft.NET\Framework64\v4.0.30319> .\aspnet_regiis.exe -i
Start installing ASP.NET (4.0.30319).
........
Finished installing ASP.NET (4.0.30319).


Now hit F5 in your browser:


(If it’s not working after installing ASP.NET 4.0.x please review the version in your application pools settings again and fix it if necessary).


European Silverlight Hosting - Amsterdam :: Data Driven Example Using Silverlight Business Application

clock February 13, 2012 07:36 by author Scott

This post discusses how to displays data from the AdventureWorks Database on to Silverlight pages. In this walkthrough you will find the page that displays the data from customer table in adventure database and allows the user to traverse the records. You need to have Visual Studio 2010 SP1 installed on your machine.

Silverlight business application contains two projects a Silverlight application and an ASP.NET Web application which hosts the Silverlight application.

To change the application string value that displaying in the page

1. Expand the assets folder and expand the resources

2. Change the application name as shown below and run the application


3. Creating a data model for the application, right click the Silverlight web application click add new item and select the ADO.NET Entity Data model as shown below


In choose model content page, click generate content from database option as shown in the below dialogue


Select the database object that you want to display the data in Silverlight pages


Customer table appear in the entity designer as shown below


Build the solution.

Adding a domain service

A domain service exposes the data model to client. You can add the domain service to the server project as shown below

Right click the ASP.NET web application  and add new item, select the domain service class from project dialogue box


Select the Customers table and Enable Editing checking boxes, and then click ok


Build the solution

Creating a Silverlight page to display data

1. In solution explorer right click the Views folder Silverlight client application, Add New Item dialogue box , select the Silverlight Category and then click the Silverlight Page template.


2.  To display the data in data grid, click the datasources and then click the Show Data Sources

The data source window displays the customer entity, drag the customer node to the designer


3. Add a navigation button to the page that we created above in Homepage as shown below

   1: <Rectangle x:Name="Divider3" Style="{StaticResource DividerStyle}"/>
   2: <HyperlinkButton x:Name="Link3" Content="Customer List"
       Style="{StaticResource LinkStyle}"
   3: NavigateUri="/Customers" TargetName="ContentFrame"/>

4.  Run the application. You will notice Customer List button in navigation bar as shown below


About HostForLIFE.eu

HostForLIFE.eu is European Windows Hosting Provider which focuses on Windows Platform only. We deliver on-demand hosting solutions including Shared hosting, Reseller Hosting, Cloud Hosting, Dedicated Servers, and IT as a Service for companies of all sizes.

We have offered the latest Windows 2016 Hosting, ASP.NET Core 2.2.1 Hosting, ASP.NET MVC 6 Hosting and SQL 2017 Hosting.


Tag cloud

Sign in