European Silverlight 4 & Silverlight 5 Hosting BLOG

BLOG about Silverlight 5 Hosting and Its Techologies - Dedicated to European Windows Hosting Customer

Silverlight 6 Hosting Denmark - HostForLIFE.eu :: How to Get and Set the Control's Coordinate

clock April 29, 2015 06:40 by author Rebecca

Unlike normal C#, in Silverlight, you can't access a control's coordinate through the object.Location.X and object.Location.Y. Instead, it is more troublesome to get and set the values. So this tutorial will tell you wow to get and set the control's coordinate/location/position.

For example, if you want to add Label on the GUI through the code instead of XAML, you have to do the following codes:

          Label[] arrayScores = new Label[MAX_PLAYERS]; //MAX_PLAYERS = 4
          for (int i = 0; i < arrayScores.Length; i++)
                {
                    arrayScores[i] = new Label();
                    arrayScores[i].Name = "Scores" + i;
                    arrayScores[i].Width = 50;
                    arrayScores[i].Height = 30;
                }

But that's not enough, you haven't set the coordinates of the Labels. You might think that adding the remaining codes at anywhere can do the job. However, it does not. Remember to put the coordinates setting code 'AFTER' the page is loaded.

Step 1

Add this.Loaded event in the constructor after the InitializeComponent()

    public MainPage()
            {
                InitializeComponent();
                ...
                ...
                this.Loaded += new RoutedEventHandler(MainPage_Loaded);
            }

Step 2

Set coordinates using CANVAS: set position, then add into canvas.

void MainPage_Loaded(object sender, RoutedEventArgs e)
        {
            Canvas.SetLeft(arrayScores[0], SCORE_OFFSET_LEFT);
            Canvas.SetLeft(arrayScores[1], SCORE_OFFSET_LEFT);
            Canvas.SetLeft(arrayScores[2], SCORE_OFFSET_LEFT);
            Canvas.SetLeft(arrayScores[3], SCORE_OFFSET_LEFT);
            canvas1.Children.Add(arrayScores[0]);
            canvas2.Children.Add(arrayScores[1]);
            canvas3.Children.Add(arrayScores[2]);
            canvas4.Children.Add(arrayScores[3]);
        }

That's all! And you're done!

HostForLIFE.eu Silverlight 6 Hosting
HostForLIFE.eu is European Windows Hosting Provider which focuses on Windows Platform only. We deliver on-demand hosting solutions including Shared hosting, Reseller Hosting, Cloud Hosting, Dedicated Servers, and IT as a Service for companies of all sizes. We have customers from around the globe, spread across every continent. We serve the hosting needs of the business and professional, government and nonprofit, entertainment and personal use market segments.


Silverlight with Free ASP.NET Hosting - HostForLIFE.eu :: How to Make Silverlight Overlay Notification

clock April 22, 2015 07:01 by author Rebecca

Most of us do not like applications that continuosly bothering with popup messages to make us aware that something happened. Sometimes, a message box coming up saying "Changes were saved succesfully" right after pressing the save button, this condition is so bothering because our work can be interrupted by the unimportant notification box. Maybe, we better would like to be told that it worked if it allows us to keep going or you'd better be told if something went wrong.

For example, during Christmas a lot of messages full of best wishes are going around. You can sent one of those to one friend and after a while an Overlay Notification appeared at the bottom of your screen saying "Message received by [contact]". So, in this post, I will tell you how to make that kind of notification in Silverlight which isn't keep bothering you while you were working on something.

Step 1

First, let us create a User Control. The control will be the already mentioned Overlay Notification. You canl make it appear and disappear after a while without user interaction. This could be the XAML code:

 <UserControl x:Class="SilverlightTestApp.Controls.OverlayNotification"
    xmlns="http://schemas.microsoft.com/winfx/2006/xaml/presentation"
    xmlns:x="http://schemas.microsoft.com/winfx/2006/xaml"
    xmlns:d="http://schemas.microsoft.com/expression/blend/2008"
    xmlns:mc="http://schemas.openxmlformats.org/markup-compatibility/2006"
    mc:Ignorable="d">
   
    <UserControl.Resources>
        <Storyboard x:Name="ShowMessage" Completed="ShowMessage_Completed">
            <DoubleAnimation
            Duration="00:00:06"
            From="0.00"
            To="1.00"
            AutoReverse="True"
            Storyboard.TargetName="Popup"
            Storyboard.TargetProperty="Opacity"/>           
        </Storyboard>       
    </UserControl.Resources>
   
    <Grid x:Name="LayoutRoot" Background="White" HorizontalAlignment="Center" >
        <Border BorderBrush="Black" BorderThickness="1" MinWidth="150" MaxWidth="550" MaxHeight="75"
                   CornerRadius="4" Background="Transparent" Visibility="Collapsed" Opacity="0" x:Name="Popup">
            <TextBlock x:Name="lblMessage" HorizontalAlignment="Center" TextWrapping="Wrap" MaxWidth="400" MaxHeight="75"></TextBlock>
        </Border>
    </Grid>   

</UserControl>

Step 2

You have a Storyboard that will be triggered whenever you want to show the Notification. It will last 6 seconds (plus another 6 because of the AutoReverse=true). And will change the Opacity of our notification area to give the impression that it fades in and out.

Then you already had a Border with rounded corners. You'll have to make it visible whenever you want to show the message and hide it when the Storyboard is done. Inside of this Border, you will have a Textblock where your message will be displayed.

Let's take a look at the code behind:

using System.Windows;
using System.Windows.Controls;
using System.Windows.Media;

namespace SilverlightTestApp.Controls
{
    public partial class OverlayNotification : UserControl
    {
        private string _message;
        public string Message
        {
            get
            {
                return _message;
            }
            set
            {
                _message = value;
                lblMessage.Text = value;
                Popup.Visibility = Visibility.Visible;
                ShowMessage.Begin();
            }
        }

        private System.Windows.Media.Color _color;
        public System.Windows.Media.Color Color
        {
            get
            {
                return _color;
            }
            set
            {
                _color = value;
                var newBrush = new SolidColorBrush();
                newBrush.Color = value;
                lblMessage.Foreground = newBrush;
            }
        }

        public OverlayNotification()
        {
            InitializeComponent();
        }

        private void ShowMessage_Completed(object sender, System.EventArgs e)
        {
            Popup.Visibility = Visibility.Collapsed;
        }
    }
}

You will expose at least the Message property (you also have the Color property for the font). Notice that everytime you set the Message property we update the Textblock's text, make the Border visible and trigger the Storyboard. Also noticed that you can handle the Storyboard's completed event to hide the Border.

To use it, just add this new User Control into the view where you want to use it in the same way that you would place a Textbox or any other control:

<my:OverlayNotification x:Name="myOverlayNotification"/>

Then, whenever you want to show a Notification, just set the Message property with the message you want to display:

 myOverlayNotification.Color = Colors.Red;
 myOverlayNotification.Message = "This is a test notification";

Feel free to play around with it modifying the layout and appeareance of the control in the XAML or adding more properties to be able to customize it more, for example, adding a BackgroundColor property.

Silverlight 6 with Free ASP.NET Hosting
Try our Silverlight 6 with Free ASP.NET Hosting today and your account will be setup soon! You can also take advantage of our Windows & ASP.NET Hosting support with Unlimited Domain, Unlimited Bandwidth, Unlimited Disk Space, etc. You will not be charged a cent for trying our service. Once your trial period is complete, you decide whether you'd like to continue.


Silverlight with Free ASP.NET Hosting - HostForLIFE.eu :: How to Create Simple Navigation in Silverlight ?

clock April 21, 2015 08:08 by author Peter

Navigation Framework is absolutely good however in some cases we have a tendency to don't need to use the Navigation Framework. This navigation technique may be used instead that provides simple Navigation. Add the following code in App.xaml:

private static Grid root    
public static void Navigate(UserControl newPage)
{
UserControl oldPage = root.Children[0] as UserControl;
root.Children.Add(newPage);
root.Children.Remove(oldPage);
}

Now, Edit the App.xaml as shown below:
Previous code: 
private void Application_Startup(object sender, StartupEventArgs e)
{
 this.RootVisual = new MainPage();
 }

Modified code:

private void Application_Startup(object sender, StartupEventArgs e)
{
root = new Grid();
root.Children.Add(new MainPage());
this.RootVisual = root;     
}


Create a new usercontrol NewPage . Add Button to the Page inorder to navigate to the home. equally produce a button within the MainPage.xaml as well inorder to navigate to the NewPage. within the Button Click event add the following code:
       App app = (App)Application.Current;
        App.Navigate(new NewPage());


Application.Current gets the System.Windows.Application object for this application. The new instance of the Page is passed to the Navigate method of App class. When we run the code we are able to navigate between the MainPage and also the NewPage.xaml.


Silverlight 6 with Free ASP.NET Hosting

Try our Silverlight 6 with Free ASP.NET Hosting today and your account will be setup soon! You can also take advantage of our Windows & ASP.NET Hosting support with Unlimited Domain, Unlimited Bandwidth, Unlimited Disk Space, etc. You will not be charged a cent for trying our service. Once your trial period is complete, you decide whether you'd like to continue.


Silverlight 6 with Free ASP.NET Hosting - HostForLIFE.eu :: How to Create a Progress Bar while Uploading File

clock April 15, 2015 06:04 by author Rebecca

When you worked with Silverlight to create an GUI to let the user to upload the file, it is important to create a progress bar to make the user aware of the uploading progress.Today, I will show you how to create a progress bar while uploading a file.

Here is the sample of the progress bar that I've created:
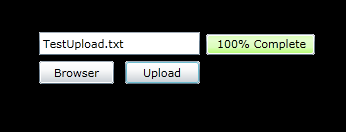
Several resources can be obtained online, but the explaination is either not clear enough, or there are redundant codes confusing people. Here, the code is as simplest as possible, with the assumption that,
a) there is no connection lost between the client and the server during the process
b) there is no data corrupted during the transmission
c) small file size (can be edited)

Before we go with code, first you can observe that there are 4 UI components:
a) Browser button
b) Textbox shows file name (can be disabled)
c) Upload button
d) Progress bar + labels

Browser Button

Here's the code to create the browser button:

    OpenFileDialog dialog = new OpenFileDialog(); //OpenFileDialog will open a file dialog which allows the use to browser the wanted file.
    if ((bool)dialog.ShowDialog())
    {
          globalFileStream = dialog.File.OpenRead();
          ....
          ....
    }

Upload Button

An always updating progress bar means that, the upload progress has to be done 'Chunk' by 'Chunk'. To achieve this, we read the file stream 'Chunk' by 'Chunk and upload it.

Step 1 : Send First Chunck

    int steps = (int)(fileLength / (long)CHUNK_SIZE);
    progressBar1.Minimum = 0;               //set prograssbar info
    progressBar1.Maximum = steps;
    int read = 0;
    byte[] buffer = null;                                                                //buffer to store the file stream chunk by chunk
    if (globalFileStream.Length <= CHUNK_SIZE)                            //consider if the file size is smaller than the predefined chunk size
    {
          buffer = new byte[(int)globalFileStream.Length];
    }
    else
    {
          buffer = new byte[CHUNK_SIZE];
    }
    read = globalFileStream.Read(buffer, 0, buffer.Length);
    filePosition += read;
    myUpload.BeginUploadAsync(fileName, destinationFolder, buffer);       //begin upload the first chunk

Step 2: Sends second and subsequent chunk

    UpdateProgressBar(); //Update progress bar
    if (filePosition < fileLength)
    {
         int read = 0;
         int readSize = CHUNK_SIZE;
         byte[] buffer = null;
         long diff = fileLength - filePosition;
         if (diff < CHUNK_SIZE)
         {
               readSize = (int)diff;
         }
         buffer = new byte[readSize];
         globalFileStream.Seek(filePosition, SeekOrigin.Begin);
         read = globalFileStream.Read(buffer, 0, readSize);
         filePosition += read;
         myUpload.ContinueUploadAsync(theFileName, "here", buffer);

For your information, progress bar provided by Silverlight doesn't have the percentage displayed. Hence, I additionally put a label on top of the progress bar. The label contents are the percentage of the file stream sent to the server.

Silverlight 6 with Free ASP.NET Hosting
Try our Silverlight 6 with Free ASP.NET Hosting today and your account will be setup soon! You can also take advantage of our Windows & ASP.NET Hosting support with Unlimited Domain, Unlimited Bandwidth, Unlimited Disk Space, etc. You will not be charged a cent for trying our service for the next 3 days. Once your trial period is complete, you decide whether you'd like to continue.


Silverlight 6 with Free ASP.NET Hosting - HostForLIFE.eu :: How to Align Text in DataGrid Cell in Xaml and in Code Behind ?

clock April 14, 2015 07:46 by author Peter

Hi friends, in this short article I will tell you about How to Align Text in DataGrid Cell in Xaml and in Code Behind with Silverlight 6. First, take a look the following code:

DataGridTextColumn textColumn = new DataGridTextColumn();
textColumn.Header = "Result";
textColumn.Binding = new Binding("Result");
dataGrid1.Columns.Add(textColumn);

How I will set RESULT alignment right? Here is what you've got to try to to, I'll show you this in each ways that like doing it in Xaml Page and doing it in code behind. First add the style in your User control Resource:
<UserControl.Resources>
      <Style x:Key="AlignRight" TargetType="Data:DataGridCell">
          <Setter Property="HorizontalContentAlignment" Value="Right" />
     </Style>
</UserControl.Resources>

I'm doing this for Right Align however you'll be able to change it in keeping with your requirement. Next, the way to do this in Xaml Page? Its terribly straightforward, apply this style to whichever column you would like, like this:

<Data:DataGridTextColumn Header="Amount" Width="90" Binding="{Binding Amount}" IsReadOnly="True" CellStyle="{StaticResource AlignRight}"></Data:DataGridTextColumn>

Now how to do this in code behind:
DataGridTextColumn textColumn = new DataGridTextColumn();
textColumn.Header = "Result";
textColumn.Binding = new Binding("Result");
textColumn.CellStyle = Resources["AlignRight"] as Style;
dataGrid1.Columns.Add(textColumn);

Hope it works for you!

Silverlight 6 with Free ASP.NET Hosting

Try our Silverlight 6 with Free ASP.NET Hosting today and your account will be setup soon! You can also take advantage of our Windows & ASP.NET Hosting support with Unlimited Domain, Unlimited Bandwidth, Unlimited Disk Space, etc. You will not be charged a cent for trying our service for the next 3 days. Once your trial period is complete, you decide whether you'd like to continue.


Silverlight 5 Hosting Germany - HostForLIFE.eu :: How to Get and Set the Control's Coordinate

clock April 11, 2015 06:48 by author Rebecca

Unlike normal C#, in Silverlight, you cannot access a control's coordinate through the object.Location.X and object.Location.Y. Instead, it is more troublesome to get and set the values. An in this article, I'm gonna tell you how to get and set the control's coordinate/location/position.

For example, if you want to add Label on the GUI through the code instead of XAML, you need to do have the following codes:

          Label[] arrayScores = new Label[MAX_PLAYERS]; //MAX_PLAYERS = 4
          for (int i = 0; i < arrayScores.Length; i++)
                {
                    arrayScores[i] = new Label();
                    arrayScores[i].Name = "Scores" + i;
                    arrayScores[i].Width = 50;
                    arrayScores[i].Height = 30;
                }

But that's not nough, you haven't set the coordinates of the Labels. You might think that adding the remaining codes at anywhere can do the job. However, it does not. Remember to put the coordinates setting code AFTER the page is loaded.

1. Add this.Loaded event in the constructor after the InitializeComponent()

    public MainPage()
            {
                InitializeComponent();
                ...
                ...
                this.Loaded += new RoutedEventHandler(MainPage_Loaded);
            }

2. Set coordinates using CANVAS: set position, then add into canvas.


            void MainPage_Loaded(object sender, RoutedEventArgs e)
            {
                Canvas.SetLeft(arrayScores[0], SCORE_OFFSET_LEFT);
                Canvas.SetLeft(arrayScores[1], SCORE_OFFSET_LEFT);
                Canvas.SetLeft(arrayScores[2], SCORE_OFFSET_LEFT);
                Canvas.SetLeft(arrayScores[3], SCORE_OFFSET_LEFT);
                canvas1.Children.Add(arrayScores[0]);
                canvas2.Children.Add(arrayScores[1]);
                canvas3.Children.Add(arrayScores[2]);
                canvas4.Children.Add(arrayScores[3]);
            }

Happy coding!

HostForLIFE.eu Silverlight 5 Hosting
HostForLIFE.eu is European Windows Hosting Provider which focuses on Windows Platform only. We deliver on-demand hosting solutions including Shared hosting, Reseller Hosting, Cloud Hosting, Dedicated Servers, and IT as a Service for companies of all sizes. We have customers from around the globe, spread across every continent. We serve the hosting needs of the business and professional, government and nonprofit, entertainment and personal use market segments.


About HostForLIFE.eu

HostForLIFE.eu is European Windows Hosting Provider which focuses on Windows Platform only. We deliver on-demand hosting solutions including Shared hosting, Reseller Hosting, Cloud Hosting, Dedicated Servers, and IT as a Service for companies of all sizes.

We have offered the latest Windows 2016 Hosting, ASP.NET Core 2.2.1 Hosting, ASP.NET MVC 6 Hosting and SQL 2017 Hosting.


Tag cloud

Sign in