European Silverlight 4 & Silverlight 5 Hosting BLOG

BLOG about Silverlight 5 Hosting and Its Techologies - Dedicated to European Windows Hosting Customer

Silverlight 6 Hosting Romania - HostForLIFE.eu :: How to Create Storyboard Animation using Expression Blend in Silverlight

clock June 30, 2015 06:11 by author Rebecca

There are two ways to animate in Silverlight, through storyboards and through code. Expression Blend offers extensive help in creating storyboard animations. Silverlight animation is time based not frame based, this means that your animation will benefit from running at the maximum frame rate that the users machine will allow. Multiple storyboards can be created and run at the same time, but for the purpose of this basic tutorial, you'll be shown how to create a single storyboard.

Follow these simple steps to create storyboard animation using expression blend in Silverlight:

Step 1

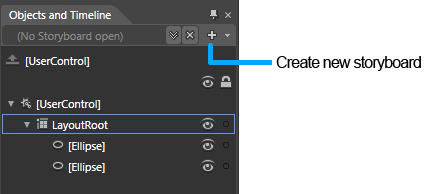
To create a new storyboard, go to the Objects and Timeline tab then click on the ‘plus’ icon.

If you are using the default UI layout in Blend, you may want to hit the ‘F6‘ key to switch the layout from design mode to animation mode, this will give you a better layout for working with storyboards.

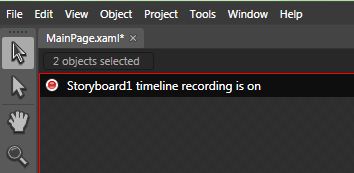
Notice that after adding a storyboard a red circle will be displayed in the top right of the screen, this indicates that you are in record mode. When in record mode, every change you make is treated as an animation and will be tied to a Keyframe. To turn record mode on or off click on the red circle in the top right of the screen, it should toggle from red to grey.

Step 2

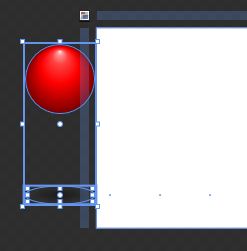
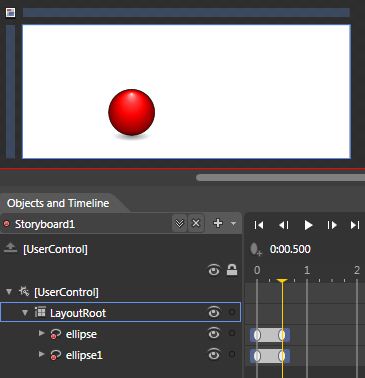
For the purpose of this tutorial I have created a ball graphic and a shadow graphic as shown below. You can use any objects thay you like to make your own animation project.  I have placed them off the page to the left so that they start out of site.

Step 3

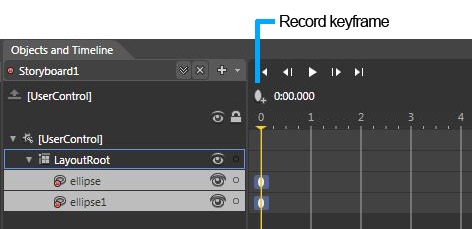
Storyboard animation is based on Keyframes set to specific times. To add a Keyframe, go back to the ‘Objects and Timeline‘ tab, select the objects that you want to animate and click the Record Keyframe button as highlighted below. You will see that a new Keyframe is added by each object at zero seconds.

Step 4

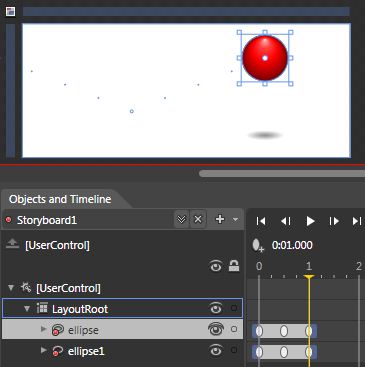
To add a Keyframe at a specific point along your timeline, drag the yellow time bar to the required point and then hit the Record Keyframe button. To make our ball graphic animate I have selected a time stamp of 0.5 seconds and moved the ball to the position shown below:

Step 5

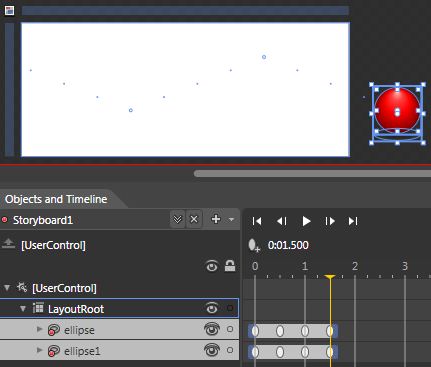
Then you can animate the ball and shadow graphics again at 1 second.

And once more at 1.5 seconds to finish the animation.

Step 6

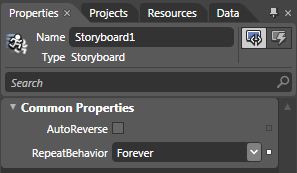
Now that we have completed the animation we may want to loop it multiple times or loop it forever. To make the animation loop, make sure you have the storyboard selected under the ‘Objects and Timeline‘ tab, then go to your ‘Properties‘ tab and scroll down to the ‘Common Properties‘ section. Here you have an option to repeat the animation several times, for this tutorial, you have to set it to ‘Forever‘.

Step 7

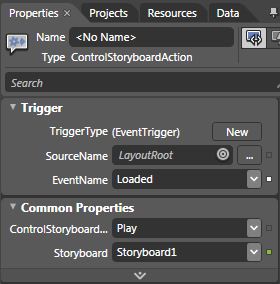
Finally, you need to tell the storyboard to play. Sometimes you will need a storyboard to be called by the code behind file, but you can use ‘Behaviors’ to start a storyboard instead. ‘Behaviors’ are pre-set actions that can be dropped onto objects in Blend, they are an easy way to achieve functionality without requiring knowledge of C# or alternative languages. To tell the storyboard to autoplay, go to the ‘Assets‘ button on the main tool bar (the last icon), select ‘Behaviors‘ from the list on the left to bring up the selection of behaviors. Find the behavior titled ‘ControlStoryboardAction‘ and drag it onto your ‘LayoutRoot‘. See how the behavior is indented below the ‘LayoutRoot‘. Select the behavior and go to the ‘Properties‘ tab, scroll down to the ‘Triggers‘ section and set the following settings:

EventName = Loaded

ControlStoryboard… = Play

Storyboard = Storyboard1 (the name of your storyboard)

You are done with your storyboard animation!

HostForLIFE.eu Silverlight 6 Hosting
HostForLIFE.eu is European Windows Hosting Provider which focuses on Windows Platform only. We deliver on-demand hosting solutions including Shared hosting, Reseller Hosting, Cloud Hosting, Dedicated Servers, and IT as a Service for companies of all sizes. We have customers from around the globe, spread across every continent. We serve the hosting needs of the business and professional, government and nonprofit, entertainment and personal use market segments.


Silverlight 5 Hosting France - HostForLife.eu :: How to Use Silverlight to Run an Elevated Trust Applications

clock June 23, 2015 06:39 by author Rebecca

In this article, you will see how to run an Elevated Trust Application within the Browser using Silverlight 5 Beta. For this demonstration, you will first create a Silverlight application by using Visual Studio 2010 with Silverlight Version 5.

Step 1

We will rename the application as 'TrustedAppsInBrowser' as shown below:

Step 2

Make sure you choose Silverlight version 5.0. Now let's add a reference of a API 'Microsoft.CSharp.dll' to our Silverlight application. Browse this API from the path 'C:\Program Files (x86)\Microsoft SDKs\Silverlight\v4.0\Libraries\Client'. Then, design the MainPage.xaml. and replace <Grid></Grid> with following code:

<Grid x:Name="LayoutRoot" Background="Black">         <Grid.RowDefinitions>             <RowDefinition Height="44*" />             <RowDefinition Height="44*" />             <RowDefinition Height="44*" />             <RowDefinition Height="170*" />         </Grid.RowDefinitions>         <StackPanel Orientation="Horizontal" Grid.Row="0">             <TextBlock Text="TO - :" Foreground="Yellow" FontSize="14"         HorizontalAlignment="Center" VerticalAlignment="Center"/>             <TextBox x:Name="txtTO" Width="350" Height="30"/>         </StackPanel>         <StackPanel Orientation="Horizontal" Grid.Row="1">             <TextBlock Text="CC - :" Foreground="Yellow" FontSize="14"         HorizontalAlignment="Center" VerticalAlignment="Center"/>             <TextBox x:Name="txtCC" Width="350" Height="30"/>         </StackPanel>         <StackPanel Orientation="Horizontal" Grid.Row="2">             <TextBlock Text="Subject - :" Foreground="Yellow" FontSize="14"         HorizontalAlignment="Center" VerticalAlignment="Center"/>             <TextBox x:Name="txtsubject" Width="315" Height="30"/>         </StackPanel>         <StackPanel Orientation="Vertical" Grid.Row="3">             <TextBox x:Name="txtmessage" Width="400" Height="120"         HorizontalAlignment="Left" VerticalAlignment="Top" />             <StackPanel Orientation="Horizontal" HorizontalAlignment="Center">                 <Button x:Name="btnSend" Content="Send" Height="30" Width="100"          Click="btnSend_Click"/>                 <Button x:Name="btncancel" Content="Cancel" Height="30" Width="100" />             </StackPanel>         </StackPanel> </Grid>

Step 3

Now let's import a namespace to our code behind:

using System.Runtime.InteropServices.Automation;

Step 4

Now run your application and click on the 'Send' button. You will get an exception as shown below:

The operation is not supported in this context. You cannot call COM components directly from the browser due to security reasons. However you can achieve the same by making this Silverlight Application as an Out-Of-Browser application with Elevated Trust. You have to run this application in the Browser. To run this application in the browser, you must set this application to run Out-Of-Browser with Elevated Trust. Right click the Silverlight Application and go to Properties. Choose checkbox 'Enable running application Out of the browser' and click on 'Out of browser settings' button. From the setting window, chose a checkbox 'Require Elevated trust when running outside the browser'.

Step 5

Now you will have to follow the steps given below for enabling our Silverlight application to run within the browser, with Elevated trust.

1: Go to Start and click on Run.  Type 'RegEdit'. This will open the 'Registry Editor' window. Now the most important thing is that If you running the app on a 32 bit machine, you will have to find:

· HKEY_LOCAL_MACHINE\Software\Microsoft\Silverlight\

and if you are running on a 64-bit machine, you will have to find:

· HKEY_LOCAL_MACHINE\Software\Wow6432Node\Microsoft\Silverlight\

I took the reference of MSDN for this path. My computer is 64-bit, so I have chosen the second option. Once you find the above path in the registry, make a change to 'UpdateConsentMode' from '0' to '1' as shown below:

2: Now the second step is to Sign the .XAP file of our Silverlight application with code signing certificate. Right click t Sheilverlight application and go to properties. Choose ‘Signing from the left hand side’ and check the checkbox 'Sign the .XAP file' as shown below:

Now click on the button 'Create Test Certificate'. Enter the password and confirm password and click 'OK' button.

3: Now click on the 'More Details' button highlighted in blue colour. This will show you a 'Certificate' window. Click on the 'Install Certificate' button as shown below:

Clicking on the button brings up the 'Certificate Import wizard'. Click on the 'Next' button and choose 'Place all certificates in the following store'. Click on the Browse button. This will show you a 'Certificate Store'. Choose 'Trusted Publisher' and finish the wizard. Now repeat the same step to install this certificate in 'Trusted Root Certification Authorities'.

That's it! You are done with the configuration. Now hit 'F5' to launch the Silverlight application in a browser. Fill the details and click on the 'Send' button. This will show you a Internet Security dialog box. Click on the 'Allow' button and you will see the output as shown below:

HostForLIFE.eu Silverlight 5 Hosting
HostForLIFE.eu is European Windows Hosting Provider which focuses on Windows Platform only. We deliver on-demand hosting solutions including Shared hosting, Reseller Hosting, Cloud Hosting, Dedicated Servers, and IT as a Service for companies of all sizes. We have customers from around the globe, spread across every continent. We serve the hosting needs of the business and professional, government and nonprofit, entertainment and personal use market segments.


Silverlight 6 with Free ASP.NET Hosting - HostForLIFE.eu :: How to Get User's Geo Location

clock June 3, 2015 06:19 by author Rebecca

In this tutorial, I'm going to tell you about getting the Geo-location of the user of your Silverlight Application. We will use Javascript as the core of our scenario.

Step 1

You will be calling following JavaScript API here in the aspx page:

 <script language="JavaScript" type="text/javascript" src="http://j.maxmind.com/app/geoip.js"></script>

Now there are functions in that API that will return the Latitude, Longitude, country name and whatever we demand. Some of the function are viz:

  •     geoip_country_code()
  •     geoip_country_name()
  •     geoip_latitude()
  •     geoip_longitude()

Instead of just calling these functions directly in Silverlight, we will write our functions that will call these functions and return whatever these functions return. For example here is the custom script written just beneath the API call:

<script type="text/javascript">

   function GetCountryCode() {

   return geoip_country_code();

      }

  function GetCountryName() {

  return geoip_country_name();

      }       

  function GetLatitude() {

  return geoip_latitude();

       }

   function GetLongitude() {

   return geoip_longitude();

        }
 </script>

So finally, here is what the aspx page with API call and the scripts that you have written:

 <script type="text/javascript" src="Silverlight.js"></script>

 <script language="JavaScript" type="text/javascript" src="http://j.maxmind.com/app/geoip.js"></script>

 <script type="text/javascript">

 function GetCountryCode() {

 return geoip_country_code();

   }

 function GetCountryName() {

 return geoip_country_name();

   }

 function GetLatitude() {

 return geoip_latitude();

    }

 function GetLongitude() {

return geoip_longitude();

      }   
 </script>

Step 2

Now let's move toward your mainpage. You must make the JavaScript function call from the main page. As you all know, it is a simple method call:

HtmlPage.Window.Invoke("<JavaScriptMethod>");

The XAML of the main page consists of four Text Blocks, each to pursue the respective value for Country code, Country Name, Latitude and Longitude.

 <Grid x:Name="LayoutRoot" Background="White">

 <TextBlock x:Name="txtCountryCode" Margin="20 20 0 0"/>

 <TextBlock x:Name="txtCountryName" Margin="20 40 0 0"/>

 <TextBlock x:Name="txtLatitude" Margin="20 60 0 0"/>

  <TextBlock x:Name="txtLongitude" Margin="20 80 0 0"/>

  </Grid>


For giving the corresponding values to the Blocks, you need to write some C# in the code behind and in the constructor of the main page.

    public MainPage()

    {

   InitializeComponent();

  txtCountryCode.Text = HtmlPage.Window.Invoke("GetCountryCode").ToString();

  txtCountryName.Text = HtmlPage.Window.Invoke("GetCountryName").ToString();

  txtLatitude.Text = HtmlPage.Window.Invoke("GetLatitude").ToString();

  txtLongitude.Text = HtmlPage.Window.Invoke("GetLongitude").ToString();  


That's it. Just hit F5 and run the project. It will provide you all the information you've requested in the code.

Happy coding!

Silverlight 6 with Free ASP.NET Hosting
Try our Silverlight 6 with Free ASP.NET Hosting today and your account will be setup soon! You can also take advantage of our Windows & ASP.NET Hosting support with Unlimited Domain, Unlimited Bandwidth, Unlimited Disk Space, etc.


HostForLIFE.eu Proudly Launches Drupal 7.37 Hosting

clock June 1, 2015 09:41 by author Peter

European Windows and ASP.NET Spotlight Hosting Partner in Europe, HostForLIFE.eu, has announced the availability of new hosting plans that are optimized for the latest update of the Drupal 7.37 hosting technology.

HostForLIFE.eu hosts its servers in top class data centers that is located in Amsterdam (NL), London (UK), Paris (FR), Frankfurt(DE) and Seattle (US) to guarantee 99.9% network uptime. All data center feature redundancies in network connectivity, power, HVAC, security, and fire suppression. All hosting plans from HostForLIFE.eu include 24×7 support and 30 days money back guarantee. The customers can start hosting our Drupal site on our environment from as just low €3.00/month only.

Drupal is an open source content management platform powering millions of websites and applications. Thousands of add-on modules and designs let you build any site you can imagine. Drupal 7.37 Includes bug fixes and small API/feature improvements only (no major new functionality); major, non-backwards-compatible new features are only being added to the forthcoming Drupal 8.0 release. If you are looking for the right Windows ASP.NET Hosting provider that support Drupal 7.37, we are the right choice for you.

The 7.37 update also includes fixed a regression in Drupal 7.36 which caused certain kinds of content types to become disabled if we were defined by a no-longer-enabled module, removed a confusing description regarding automatic time zone detection from the user account form (minor UI and data structure change), allowed custom HTML tags with a dash in the name to pass through filter_xss() when specified in the list of allowed tags, allowed hook_field_schema() implementations to specify indexes for fields based on a fixed-length column prefix (rather than the entire column), as was already allowed in hook_schema() implementations, fixed PDO exceptions on PostgreSQL when accessing invalid entity URLs, added a sites/all/libraries folder to the codebase, with instructions for using it and added a description to the "Administer text formats and filters" permission on the Permissions page (string change).

HostForLIFE have hosted large numbers of websites and blogs until now. Our clients come from diverse backgrounds from all sectors of the economy. HostForLIFE.eu clients are specialized in providing supports for Drupal for many years. We are glad to provide support for European Drupal 7.37 hosting users with advices and troubleshooting for our client website when necessary.

HostForLIFE.eu is a popular online Windows based hosting service provider catering to those people who face such issues. The company has managed to build a strong client base in a very short period of time. It is known for offering ultra-fast, fully-managed and secured services in the competitive market. Our powerful servers are especially optimized and ensure Drupal 7.37 performance. We have best data centers on three continent, unique account isolation for security, and 24/7 proactive uptime monitoring.

For more information about this new product, please visit http://hostforlife.eu/European-Drupal-737-Hosting

About HostForLIFE.eu
HostForLIFE.eu is an European Windows Hosting Provider which focuses on the Windows Platform only. HostForLIFE.eu deliver on-demand hosting solutions including Shared hosting, Reseller Hosting, Cloud Hosting, Dedicated Servers, and IT as a Service for companies of all sizes.

HostForLIFE.eu is awarded Top No#1 SPOTLIGHT Recommended Hosting Partner by Microsoft (see http://www.asp.net/hosting/hostingprovider/details/953). Our service is ranked the highest top #1 spot in several European countries, such as: Germany, Italy, Netherlands, France, Belgium, United Kingdom, Sweden, Finland, Switzerland and other European countries. Besides this award, we have also won several awards from reputable organizations in the hosting industry and the detail can be found on our official website.


About HostForLIFE.eu

HostForLIFE.eu is European Windows Hosting Provider which focuses on Windows Platform only. We deliver on-demand hosting solutions including Shared hosting, Reseller Hosting, Cloud Hosting, Dedicated Servers, and IT as a Service for companies of all sizes.

We have offered the latest Windows 2016 Hosting, ASP.NET Core 2.2.1 Hosting, ASP.NET MVC 6 Hosting and SQL 2017 Hosting.


Tag cloud

Sign in