In this article, you will see how to run an Elevated Trust Application within the Browser using Silverlight 5 Beta. For this demonstration, you will first create a Silverlight application by using Visual Studio 2010 with Silverlight Version 5.
Step 1
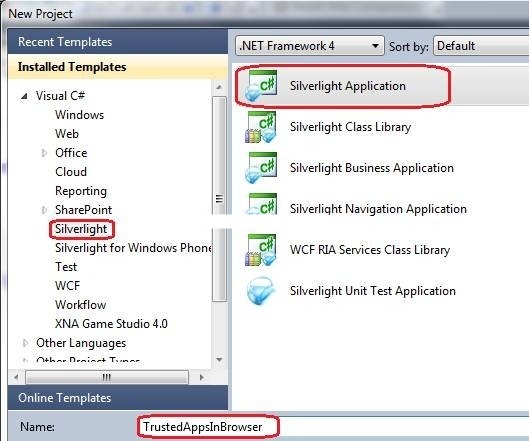
We will rename the application as 'TrustedAppsInBrowser' as shown below:

Step 2
Make sure you choose Silverlight version 5.0. Now let's add a reference of a API 'Microsoft.CSharp.dll' to our Silverlight application. Browse this API from the path 'C:\Program Files (x86)\Microsoft SDKs\Silverlight\v4.0\Libraries\Client'. Then, design the MainPage.xaml. and replace <Grid></Grid> with following code:
<Grid x:Name="LayoutRoot" Background="Black"> <Grid.RowDefinitions> <RowDefinition Height="44*" /> <RowDefinition Height="44*" /> <RowDefinition Height="44*" /> <RowDefinition Height="170*" /> </Grid.RowDefinitions> <StackPanel Orientation="Horizontal" Grid.Row="0"> <TextBlock Text="TO - :" Foreground="Yellow" FontSize="14" HorizontalAlignment="Center" VerticalAlignment="Center"/> <TextBox x:Name="txtTO" Width="350" Height="30"/> </StackPanel> <StackPanel Orientation="Horizontal" Grid.Row="1"> <TextBlock Text="CC - :" Foreground="Yellow" FontSize="14" HorizontalAlignment="Center" VerticalAlignment="Center"/> <TextBox x:Name="txtCC" Width="350" Height="30"/> </StackPanel> <StackPanel Orientation="Horizontal" Grid.Row="2"> <TextBlock Text="Subject - :" Foreground="Yellow" FontSize="14" HorizontalAlignment="Center" VerticalAlignment="Center"/> <TextBox x:Name="txtsubject" Width="315" Height="30"/> </StackPanel> <StackPanel Orientation="Vertical" Grid.Row="3"> <TextBox x:Name="txtmessage" Width="400" Height="120" HorizontalAlignment="Left" VerticalAlignment="Top" /> <StackPanel Orientation="Horizontal" HorizontalAlignment="Center"> <Button x:Name="btnSend" Content="Send" Height="30" Width="100" Click="btnSend_Click"/> <Button x:Name="btncancel" Content="Cancel" Height="30" Width="100" /> </StackPanel> </StackPanel> </Grid>
Step 3
Now let's import a namespace to our code behind:
using System.Runtime.InteropServices.Automation;

Step 4
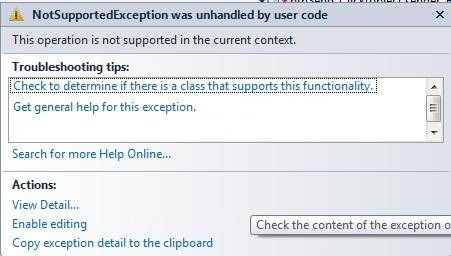
Now run your application and click on the 'Send' button. You will get an exception as shown below:

The operation is not supported in this context. You cannot call COM components directly from the browser due to security reasons. However you can achieve the same by making this Silverlight Application as an Out-Of-Browser application with Elevated Trust. You have to run this application in the Browser. To run this application in the browser, you must set this application to run Out-Of-Browser with Elevated Trust. Right click the Silverlight Application and go to Properties. Choose checkbox 'Enable running application Out of the browser' and click on 'Out of browser settings' button. From the setting window, chose a checkbox 'Require Elevated trust when running outside the browser'.
Step 5
Now you will have to follow the steps given below for enabling our Silverlight application to run within the browser, with Elevated trust.
1: Go to Start and click on Run. Type 'RegEdit'. This will open the 'Registry Editor' window. Now the most important thing is that If you running the app on a 32 bit machine, you will have to find:
· HKEY_LOCAL_MACHINE\Software\Microsoft\Silverlight\
and if you are running on a 64-bit machine, you will have to find:
· HKEY_LOCAL_MACHINE\Software\Wow6432Node\Microsoft\Silverlight\
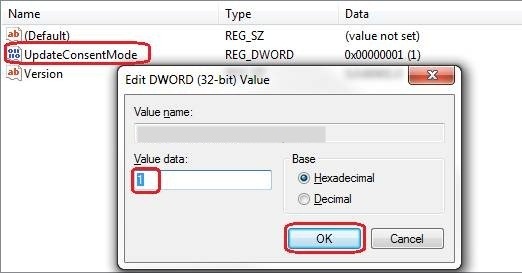
I took the reference of MSDN for this path. My computer is 64-bit, so I have chosen the second option. Once you find the above path in the registry, make a change to 'UpdateConsentMode' from '0' to '1' as shown below:

2: Now the second step is to Sign the .XAP file of our Silverlight application with code signing certificate. Right click t Sheilverlight application and go to properties. Choose ‘Signing from the left hand side’ and check the checkbox 'Sign the .XAP file' as shown below:

Now click on the button 'Create Test Certificate'. Enter the password and confirm password and click 'OK' button.
3: Now click on the 'More Details' button highlighted in blue colour. This will show you a 'Certificate' window. Click on the 'Install Certificate' button as shown below:

Clicking on the button brings up the 'Certificate Import wizard'. Click on the 'Next' button and choose 'Place all certificates in the following store'. Click on the Browse button. This will show you a 'Certificate Store'. Choose 'Trusted Publisher' and finish the wizard. Now repeat the same step to install this certificate in 'Trusted Root Certification Authorities'.
That's it! You are done with the configuration. Now hit 'F5' to launch the Silverlight application in a browser. Fill the details and click on the 'Send' button. This will show you a Internet Security dialog box. Click on the 'Allow' button and you will see the output as shown below:

HostForLIFE.eu Silverlight 5 Hosting
HostForLIFE.eu is European Windows Hosting Provider which focuses on Windows Platform only. We deliver on-demand hosting solutions including Shared hosting, Reseller Hosting, Cloud Hosting, Dedicated Servers, and IT as a Service for companies of all sizes. We have customers from around the globe, spread across every continent. We serve the hosting needs of the business and professional, government and nonprofit, entertainment and personal use market segments.
