European Silverlight 4 & Silverlight 5 Hosting BLOG

BLOG about Silverlight 5 Hosting and Its Techologies - Dedicated to European Windows Hosting Customer

Silvelight 6 Hosting - HostForLIFE.eu :: How to pass init parameters in Silverlight?

clock March 7, 2024 07:27 by author Peter
In your aspx page where object tag is present..Add init param tag of your own.

<object data="data:application/x-silverlight-2,"  ID="Silverlight2"  type="application/x-silverlight-2" width="100%" height="100%">
          <param name="source" value="ClientBin/ProductProDemo.xap"/>
          <param name="onError" value="onSilverlightError" />
          <param name="background" value="white" />
          <param name="minRuntimeVersion" value="4.0.41108.0" />
          <param name="autoUpgrade" value="true" />  
                    
          <param name="initParams"  value="startPage='<asp:Literal id="id" runat="server"/>'"></param>
           
          <a href="http://go.microsoft.com/fwlink/?LinkID=149156&v=4.0.41108.0" style="text-decoration:none">
               <img src="http://go.microsoft.com/fwlink/?LinkId=161376" alt="Get Microsoft Silverlight" style="border-style:none"/>
          </a>
        </object>

In the code behind file of the same aspx page ie aspx.cs file..

On page load provide the value to your init param
protected void Page_Load(object sender, EventArgs e)
{        
    id.Text = "Page1".ToString();        
}


In your App.xaml.cs file you can access the value as 
private void Application_Startup(object sender, StartupEventArgs e)
{
    string startPage = e.InitParams["startPage"];             
    this.RootVisual = new MainPage();
}


Silvelight 6 Hosting - HostForLIFE.eu :: Implementing INotifyPropertyChanged in Silverlight

clock May 26, 2023 08:15 by author Peter

Data binding is one of the best features the human race has ever devised. Binding a property of a UI Element to a property in the code behind can accomplish any task. It is magic, in a nutshell. Once the properties are bound, we must continue to notify the UI whenever the property's value is modified in the code. INotifyPropertyChanged is useful in this situation.


Because it is an interface, it must first be implemented. However, the procedure is not arduous. Here is the code for my primary page in my new Silverlight project:

publicpartialclassMainPage : UserControl
{
    privatestring _names;
     publicstring Names
    {
        get
        {
            return _names;
        }
        set
        {
            _names = value;
        }
    }

    public MainPage()
    {
        InitializeComponent();
    }

    privatevoid MainPage_OnLoaded(object sender, RoutedEventArgs e)
    {
        Names = "This is the Text";
    }
}


The property "Name" I have here is bound with the textblock in XAML, here is the code:
<UserControlx:Class="PropertyChangedDescribed.MainPage"
 xmlns="http://schemas.microsoft.com/winfx/2006/xaml/presentation"
 xmlns:x="http://schemas.microsoft.com/winfx/2006/xaml"
 xmlns:d="http://schemas.microsoft.com/expression/blend/2008"
 xmlns:mc="http://schemas.openxmlformats.org/markup-compatibility/2006"
  mc:Ignorable="d"
 Loaded="MainPage_OnLoaded"
 x:Name="TestingPropertyChanged"
 d:DesignHeight="300"d:DesignWidth="400">

 <Gridx:Name="LayoutRoot"Background="White">
  <TextBlockText="{Binding Names, ElementName=TestingPropertyChanged}"/>
  </Grid>

</UserControl>

As you can see, the textblock has it's "text" property bound with our code behind's property "Name". Right now, no matter what you set the value of "Name", it will never be reflected onto the UI. So, what we want is, every time we change the value of our property "Name," the text block has its value changed too. In order to do this, we need to implement the interface INotifyPropertyChanged. Here is the modified main page's code to do so:
publicpartialclassMainPage : UserControl, INotifyPropertyChanged
{
    privatestring _names;
    publicstring Names
    {
        get
        {
            return _names;
        }
        set
        {
            _names = value;
            OnPropertyChanged("Names");
        }
    }
    public MainPage()
    {
        InitializeComponent();

    }

    privatevoid MainPage_OnLoaded(object sender, RoutedEventArgs e)
    {
        Names = "This is the Text";

    }

    publicevent PropertyChangedEventHandler PropertyChanged;
    privatevoid OnPropertyChanged(string propertyName)

    {
        if (this.PropertyChanged != null)
        {
            PropertyChanged(this,new PropertyChangedEventArgs(propertyName));
        }
    }
}


So this is how you can implement INotifyPropertyChanged in Silverlight.


Silvelight 6 Hosting - HostForLIFE.eu :: How to Move Image or Object in Silverlight ?

clock December 18, 2020 08:25 by author Peter

The control that you just like drag or move with the mouse is embedded among a Border control then handle the mouse down, up and move events to create the object move among your layout panel.

See sample .xaml code:
<Canvas x:Name="LayoutRoot" Background="White">
<Border x:Name="border1"
Canvas.Top="100"
Canvas.Left="10"
MouseLeftButtonDown="border1_MouseLeftButtonDown"
MouseLeftButtonUp="border1_MouseLeftButtonUp"
MouseMove="border1_MouseMove"> 
<Image x:Name="MyImage" Source="images/Basket.png" Stretch="Uniform" ></Image>           
</Border>
</Canvas>


In the above code, a Border control is placed within the Canvas. The foremost necessary code to notice is:
MouseLeftButtonDown="border1_MouseLeftButtonDown"
MouseLeftButtonUp="border1_MouseLeftButtonUp"
MouseMove="border1_MouseMove"


The above lines outline 3 events that we tend to like to handle. because the name indicates, we are handling the mouse button down, mouse button up and mouse move events for the left mouse.

In the code behind, once the left button is pressed, we are going to set a global variable to point that user has started moving. within the mouse move event, we are going to get the current location of the mouse pointer and then set the new position for the border control. once the left mouse button is discharged, we are going to reset the global variable in order that we are going to not move the item from now on.
See the code for the code behind class:
public partial class Page : UserControl
{
// Global variable to indicate if user has clicked border
// and started/stopped moving.
private bool moving = false;
private double offSetX;
private double offSetY;
public Page()
{
InitializeComponent();
}

private void border1_MouseLeftButtonDown(object sender, MouseButtonEventArgs e)
{
// Left mouse button clicked within border. start moving.
moving = true;

Point offset = e.GetPosition(border1);
offSetX = offset.X;
offSetY = offset.Y;
}

private void border1_MouseLeftButtonUp(object sender, MouseButtonEventArgs e)
{
// Left mouse button release. Stop moving.
moving = false;
}

private void border1_MouseMove(object sender, MouseEventArgs e)
{
if (moving)
{
    // Get the new mouse pointer position
    Canvas parent = (Canvas)this.border1.Parent;
    Point p = e.GetPosition(parent);
    double x = p.X - offSetX;
    double y = p.Y - offSetY;
    // Set the new position for the border control.
    this.border1.SetValue(Canvas.LeftProperty, x);
    this.border1.SetValue(Canvas.TopProperty, y);
}
}
}

HostForLIFE.eu Silverlight 6 Hosting
HostForLIFE.eu is European Windows Hosting Provider which focuses on Windows Platform only. We deliver on-demand hosting solutions including Shared hosting, Reseller Hosting, Cloud Hosting, Dedicated Servers, and IT as a Service for companies of all sizes. We have customers from around the globe, spread across every continent. We serve the hosting needs of the business and professional, government and nonprofit, entertainment and personal use market segments.


Silverlight 6 Hosting - HostForLIFE.eu :: Code to download pdf file in silverlight

clock July 26, 2019 11:08 by author Peter

Hi, I want to download a pdf file form silverlight application , the pdf file is in a folder in my solution , i want to give the path of the pdf to the method and it should download the pdf to the local system. i am happy to say that i achieved it with the following code:
SaveFileDialog dialog = new SaveFileDialog();
                dialog.Filter = "pdf Files|*.pdf";
                dialog.DefaultFileName = "BeneficiaryDesignation.pdf";
                if (dialog.ShowDialog() ?? false)
                {


                    WebClient webClient = new WebClient();
                    webClient.OpenReadCompleted += (s, e2) =>
                    {
                        try
                        {
                            using (Stream fs = (Stream)dialog.OpenFile())
                            {
                                e2.Result.CopyTo(fs);
                                fs.Flush();
                                fs.Close();
                            }
                           
                        }
                        catch (Exception ex)
                        {
                            MessageBox.Show(ex.ToString());
                        }
                    };
                    string str = App.Current.Host.Source.AbsoluteUri;
                    string path = App.appConfiguration.GetPDFPath("BeneficiaryDesignation.pdf");
                    str = str.Replace("/ClientBin/ProjectDemo.xap", path);                    
                   
                    webClient.OpenReadAsync(new Uri(str), UriKind.RelativeOrAbsolute);
                }

HostForLIFE.eu Silverlight 6 Hosting
HostForLIFE.eu is European Windows Hosting Provider which focuses on Windows Platform only. We deliver on-demand hosting solutions including Shared hosting, Reseller Hosting, Cloud Hosting, Dedicated Servers, and IT as a Service for companies of all sizes. We have customers from around the globe, spread across every continent. We serve the hosting needs of the business and professional, government and nonprofit, entertainment and personal use market segments.


Silverlight 6 Hosting - HostForLIFE.eu :: Print Document In Silverlight

clock May 23, 2019 05:30 by author Peter

How we can print the document in a Silverlight application.

Step 1
We have the PrintDocument Class which defines a reusable object that sends output to a printer.
    PrintDocument
    The PrintDocument object encapsulates all the information needed to print a page. They associate with the control which content can be print. They handle the events and operations of printing.
    Namespace - System.Drawing.Printing.PrintDocument

    [C#]

    public class PrintDocument : Component

    
We can create an instance of the PrintDocument class, set the properties that describe how to print, and call the Print method to start the printing process. Handle the PrintPage event where you specify the output to print, by using the Graphics included in the PrintPageEventArgs.
    Associate control to Print document
        private void printDoc_PrintPage(object sender, PrintPageEventArgs e) { 
            // print current page 
            e.PageVisual = printPage; 
        } 


Step 2
Create one user control page name as PrintPage.Xaml and design header and footer in this user control page like as following.
    <Grid x:Name="LayoutRoot" Background="White"> 
        <Grid.RowDefinitions> 
            <RowDefinition Height="Auto" /> 
            <RowDefinition /> 
            <RowDefinition Height="Auto" /> 
        </Grid.RowDefinitions> 
        <!--Header--> 
        <Grid> 
            <TextBlock Text="HEADER" /> 
        </Grid> 
        <!--Body--> 
        <ItemsControl Name="BodyItemsControl" Grid.Row="1" Margin="0,24" /> 
        <ItemsControl Name="TemplateItemsControl"> 
            <ItemsControl.ItemTemplate> 
                <DataTemplate> 
                    <Grid> 
                        <Grid.ColumnDefinitions> 
                            <ColumnDefinition Width="Auto" /> 
                            <ColumnDefinition Width="Auto" /> 
                            <ColumnDefinition Width="*" /> 
                        </Grid.ColumnDefinitions> 
                        <TextBlock Text="{Binding ID}" Margin="2" /> 
                        <TextBlock Text=" - " Grid.Column="1" Margin="2" /> 
                        <TextBlock Text="{Binding Description}" Grid.Column="2" TextWrapping="Wrap" MaxWidth="500" HorizontalAlignment="Left" Margin="2" /> 
                    </Grid> 
                </DataTemplate> 
            </ItemsControl.ItemTemplate> 
        </ItemsControl> 
        <Grid Grid.Row="2"> 
            <TextBlock Text="FOOTER" /> 
        </Grid> 

Step 3
In MainPage.Xaml create an instance of PrintDocument like as following.
    public MainPage() { 
        InitializeComponent(); 
        this.Loaded += new RoutedEventHandler(MainPage_Loaded); 
    } 
    void MainPage_Loaded(object sender, RoutedEventArgs e) { 
        GetItems(); 
        printDoc.PrintPage += newEventHandler < PrintPageEventArgs > (printDoc_PrintPage); 
    } 
    //following items for printing. 
    privatevoid GetItems() { 
        for (int i = 0; i < 100; i++) { 
            items.Add(newItem() { 
                ID = i, 
                    Description = "This is Print Document " + i 
            }); 
        } 
    } 
    //Handling the event when we're printing: 
    private void printDoc_PrintPage(object sender, PrintPageEventArgs e) { 
        PrintPage printPage = new PrintPage(); 
        // print current page 
        e.PageVisual = printPage; 
        e.HasMorePages = true; 
        break; 
    } 
 

Step 4
Add a button to the MainPage.Xaml and print the document when the button is clicked,
    <Button Content="Button" Grid.Row="1" Height="23" HorizontalAlignment="Left" Margin="42,56,0,0" Name="button1" VerticalAlignment="Top" Width="75" Click="button1_Click" /> 
    private void Button_Click(object sender, RoutedEventArgs e) 
    { 
        printDoc.Print("Printing A Page"); 
    } 


Step 5

Output look like as following,

HostForLIFE.eu Silverlight 6 Hosting
HostForLIFE.eu is European Windows Hosting Provider which focuses on Windows Platform only. We deliver on-demand hosting solutions including Shared hosting, Reseller Hosting, Cloud Hosting, Dedicated Servers, and IT as a Service for companies of all sizes. We have customers from around the globe, spread across every continent. We serve the hosting needs of the business and professional, government and nonprofit, entertainment and personal use market segments.


Silverlight 6 Hosting - HostForLIFE.eu :: Create an Analog Clock application in Silverlight

clock March 22, 2019 11:17 by author Peter

Today, I will explain you how to create an analog clock apps in Silverlight 6. Of course open new projectin visual studio and select a Silverlight project. In Mainpage.xaml  draw an ellipse which will serve as background for our Analog clock. The code looks as following:


<Grid x:Name="LayoutRoot" Background="White">
        <Ellipse Margin="165,67,145,83" Fill="Goldenrod" Width="330"
         Height="330" Opacity="0.7"/>
    </Grid>

Then, draw another ellipse in the same grid which will serve as Outer Rim for our analog clock. The Complete code looks on the below:
<Ellipse Height="330" Margin="156,58,154,92" Width="330" 
Stroke="Goldenrod">
            <Ellipse.Fill>
<LinearGradientBrush EndPoint="0.84,0.87" Opacity="0.9"  
StartPoint="0.164,0.129">
                    <GradientStop Color="Goldenrod"/>
                    <GradientStop Color="Gold" Offset="0.7"/>
                </LinearGradientBrush>
            </Ellipse.Fill>
        </Ellipse>              


Next, I want to draw another ellipse in the same grid which will serve as Bevel for our analog clock. And this is the code that I used:
        <Ellipse Height="290" Margin="156,58,154,92" Width="290" Stroke="Goldenrod">
            <Ellipse.Fill>
                    <LinearGradientBrush EndPoint="0.84,0.87" Opacity="0.5" StartPoint="0.164,0.129">
                    <GradientStop Color="Goldenrod"/>
                    <GradientStop Color="Goldenrod" Offset="0.987"/>
                </LinearGradientBrush>
            </Ellipse.Fill>
        </Ellipse>     

Now draw another ellipse in the same grid which will serve as a Face for our analog clock. This is the code snippet:
<Ellipse Height="270" Margin="176,78,174,112" Width="270"
         Stroke="Goldenrod" Fill="Yellow" Opacity="0.3"/>

Now we are going to draw the hour,minute and seconds hand. Then draw a rectangle in the same grid which will serve as a Hour hand for our analog clock with the code below:
<Rectangle x:Name="hourHand" Height="59" Margin="315.75,180,314.25,0"
        VerticalAlignment="Top" Fill="Black" Stroke="Black" Width="10" RenderTransformOrigin="0.525,1.428">
            <Rectangle.RenderTransform>
                <RotateTransform x:Name="hourHandAnimation"/>
            </Rectangle.RenderTransform>
        </Rectangle>


Now draw another rectangle in the same grid which will serve as a Minute hand for our analog clock. And this is the code that I used:
<Rectangle x:Name="minuteHand" Height="80" Margin="316.75,160,315.25,0"       
VerticalAlignment="Top" Fill="Black" Stroke="Black" Width="8"
        RenderTransformOrigin="0.5,1.312" >
            <Rectangle.RenderTransform>
                <RotateTransform x:Name="minuteHandAnimation"/>
            </Rectangle.RenderTransform>
        </Rectangle>

Now we are going to draw another rectangle in the same grid which will serve as a Seconds hand for our analog clock. And this is the code that I used:
<Rectangle Height="80" Margin="318.25,160,316.75,0"
        VerticalAlignment="Top" Fill="#FFFF0000" Stroke="#FF000000"
        Width="5" RenderTransformOrigin="0.10,1.312" >
            <Rectangle.RenderTransform>
                <RotateTransform x:Name="secondHandAnimation"/>
            </Rectangle.RenderTransform>
        </Rectangle>

Now, our design part is complete. Now we have to give animations to our hour, minute and second’s hands. For this, let us take a storyboard. We should write the code for storyboard outside the Grid.  The complete code for all the three animations is as follows.
<UserControl.Resources>
        <Storyboard x:Name="silverlightClock">
            <DoubleAnimation x:Name="hourAnimation"                            
                             Storyboard.TargetName="hourHandAnimation"
                             Storyboard.TargetProperty="Angle"
                             Duration="12:0:0" RepeatBehavior="Forever" To="360"/>          
            <DoubleAnimation x:Name="minuteAnimation"
                             Storyboard.TargetName="minuteHandAnimation"
                             Storyboard.TargetProperty="Angle"
                             Duration="1:0:0" RepeatBehavior="Forever"/>                                                                
            <DoubleAnimation x:Name="secondAnimation"                            
                             Storyboard.TargetName="secondHandAnimation"
                             Storyboard.TargetProperty="Angle"
                             Duration="0:1:0" RepeatBehavior="Forever"/>                                   
 </Storyboard>
 </UserControl.Resources>

Now we have to write the code for these 3 animations (hourAnimation, minuteAnimation  and secondAnimation ) in MainPage.xaml.cs. The code looks as follows.
private void startClock(object sender, RoutedEventArgs e)
        {
            System.DateTime currentTime = DateTime.Now;
double hourAngle = ((float)currentTime.Hour) / 12 * 360 +                 
currentTime.Minute/2;          
hourAnimation.From = hourAngle;
            hourAnimation.To = hourAngle + 360;         
           double minuteAngle = ((float)currentTime.Minute) / 60 * 360;
            minuteAnimation.From = minuteAngle;
            minuteAnimation.To=minuteAngle+360;
           double secondAngle = ((float)currentTime.Second) / 60 * 360;
            secondAnimation.From = secondAngle;
            secondAnimation.To = secondAngle + 360;
            silverlightClock.Begin();
        }                          

We need to call the method “startClock” in our grid control and assign it to “Loaded” property of the grid control. The code for this looks as follows.
  <Grid x:Name="LayoutRoot" Background="White" Loaded="startClock"> 
</Grid>


Finally! Our Analog clock is ready. Now you should refresh and see it.

HostForLIFE.eu Silverlight 6 Hosting
HostForLIFE.eu is European Windows Hosting Provider which focuses on Windows Platform only. We deliver on-demand hosting solutions including Shared hosting, Reseller Hosting, Cloud Hosting, Dedicated Servers, and IT as a Service for companies of all sizes. We have customers from around the globe, spread across every continent. We serve the hosting needs of the business and professional, government and nonprofit, entertainment and personal use market segments.


Silverlight 6 Hosting UK - HostForLIFE.eu :: INotifyPropertyChanged in Silverlight

clock January 9, 2019 11:35 by author Peter

Data binding is one of the coolest gimmicks that have ever existed in Silverlight. Binding a UI Element's property with a property in the code behind, has the ability to do any sort of trap. It's wizardry, basically. Once the properties are bound, we have to continue telling the UI if the property's estimation has been adjusted in the code. INotifyPropertyChanged is helpful for this.

You see, since it is an interface, we have to first actualize it. The procedure is not exceptionally extreme however. In the new Silverlight project, here is the code of my main page:
publicpartialclassMainPage : UserControl
{
    privatestring _names; 
    publicstring Names
    {
        get
        {
           return _names;
        }
        set
        {
            _names = value;
        }
   } 
    public MainPage()
    {
        InitializeComponent();
    } 
    privatevoid MainPage_OnLoaded(object sender, RoutedEventArgs e)
    {
        Names = "This is the Text";
    }
}


The property "Name" I have here is bound with the textblock in XAML. Now write the following code:
<UserControlx:Class="PropertyChangedDescribed.MainPage"
 xmlns=http://schemas.microsoft.com/winfx/2006/xaml/presentation
 xmlns:x=http://schemas.microsoft.com/winfx/2006/xaml
 xmlns:d=http://schemas.microsoft.com/expression/blend/2008
 xmlns:mc=http://schemas.openxmlformats.org/markup-compatibility/2006
  mc:Ignorable="d"
 Loaded="MainPage_OnLoaded"
 x:Name="TestingPropertyChanged"
 d:DesignHeight="300"d:DesignWidth="400">
 <Gridx:Name="LayoutRoot"Background="White">
  <TextBlockText="{Binding Names, ElementName=TestingPropertyChanged}"/>
  </Grid>
</UserControl>

As should be obvious, the textblock has its "text" property bound with our code behind's property "Name". At this moment, regardless of what you set the estimation of "Name", it will never be reflected onto the UI. Thus, what we need is, each time we change the estimation of our property "Name," the content piece has its esteem changed as well. To do this, we have to actualize the interface INotifyPropertyChanged. Here is the changed primary page's code to do as such:
publicpartialclassMainPage : UserControl, INotifyPropertyChanged
{
    privatestring _names;
     publicstring Names
    {
        get
        {
            return _names;
        }
        set
        {
            _names = value;
            OnPropertyChanged("Names");
        }
    } 
    public MainPage()
    {
        InitializeComponent();
    } 
    privatevoid MainPage_OnLoaded(object sender, RoutedEventArgs e)
    {
        Names = "This is the Text";
    } 
    publicevent PropertyChangedEventHandler PropertyChanged;
     privatevoid OnPropertyChanged(string propertyName)
    {
        if (this.PropertyChanged != null)
        {
            PropertyChanged(this,new PropertyChangedEventArgs(propertyName));
        }
    }
}

HostForLIFE.eu Silverlight 6 Hosting
HostForLIFE.eu is European Windows Hosting Provider which focuses on Windows Platform only. We deliver on-demand hosting solutions including Shared hosting, Reseller Hosting, Cloud Hosting, Dedicated Servers, and IT as a Service for companies of all sizes. We have customers from around the globe, spread across every continent. We serve the hosting needs of the business and professional, government and nonprofit, entertainment and personal use market segments.


Silverlight 6 Hosting - HostForLIFE.eu :: How to Create Pop Up Notifications

clock October 15, 2015 17:11 by author Rebecca

In this post, I will tell you how to create pop up notification in Silverlight. I will separate the kinds of notification into: Alert, Prompt and Confirm popup box.

There is a class called System.Windows.Browsers that comes with Silverlight. Also, there are lots of methods to create alert, prompt and confirm box using JavaScript. Let’s look further into each notification one by one:

1. Alert

HtmlPage.Window.Alert("Alert from Silverlight screen");

Same thing can be achieved using the Silverlight MessageBox. The only difference is that in case of MessageBox, you don't have the alert symbol. But at the same time with MessageBox you have the option to display appropriate title for the pop up.

MessageBox.Show("MessageBox for Silverlight", "AlertMessageBox", MessageBoxButton.OK)

2. Confirm

HtmlPage.Window.Confirm("Do you know how to call Alert from Silverlight");

The confirm method returns bool value, this can be used to perfrom further action depending upon if user clicks OK or Cancel button. Below code display how to handle the same.

bool isConfirmed = HtmlPage.Window.Confirm("Do you know how to call Alert from Silverlight");

if (isConfirmed)

 {

   //Perform some action;

 }
This thing can also be achieved using the Silverlight MessageBox. The only difference is that in case of MessageBox return type is not bool but Enum of type MessageBoxResult. Also the 3rd parameter which is of enum type MessageBoxButton should be MessageBoxButton.OkCancel

MessageBox.Show("MessageBox for Silverlight", "AlertMessageBox", MessageBoxButton.OKCancel);

MessageBoxResult isConfirmed = MessageBox.Show("MessageBox for Silverlight", "Alert MessageBox", MessageBoxButton.OKCancel);

if (isConfirmed == MessageBoxResult.OK)

 {

   //Perfrom some Action;

 }

3. Prompt

HtmlPage.Window.Prompt("whatis name of site?");

Prompt method returns string method. The input provided can be used to perform further action

string inputValue = HtmlPage.Window.Prompt("what is name of site?");

if (inputValue.Trim() == "Experts Comment")

 {

   //Perfrom some action;

 }


HostForLIFE.eu Silverlight 6 Hosting

HostForLIFE.eu is European Windows Hosting Provider which focuses on Windows Platform only. We deliver on-demand hosting solutions including Shared hosting, Reseller Hosting, Cloud Hosting, Dedicated Servers, and IT as a Service for companies of all sizes. We have customers from around the globe, spread across every continent. We serve the hosting needs of the business and professional, government and nonprofit, entertainment and personal use market segments.


Silverlight 6 Hosting - HostForLIFE.eu :: How to Create a Similar List like Mac using Silverlight

clock October 8, 2015 13:09 by author Rebecca

In this tutorial, we will create the standard Silverlight ListBox will be customized to be functionally similar to a ListBox you would find on a Mac.

The XAML for this tutorial contains a custom style that we use to disable the scrollbar:

<UserControl x:Class="CustomListBox.Page"
    xmlns="http://schemas.microsoft.com/winfx/2006/xaml/presentation"
    xmlns:x="http://schemas.microsoft.com/winfx/2006/xaml"
    Width="400" Height="300">
    <Grid x:Name="LayoutRoot" Background="White">
        <Grid.Resources>
            <Style x:Key="ListBoxStyle1" TargetType="ListBox">
                <Setter Property="Template">
                    <Setter.Value>
                        <ControlTemplate TargetType="ListBox">
                            <Grid x:Name="LayoutRoot">
                                <Border Padding="5" BorderBrush="#000000" BorderThickness="1" Background="#ffffff" CornerRadius="0">
                                    <ScrollViewer x:Name="ScrollViewer" VerticalScrollBarVisibility="Hidden" Padding="{TemplateBinding Padding}" Background="{TemplateBinding Background}" BorderBrush="Transparent" BorderThickness="0">
                                        <ItemsPresenter />
                                    </ScrollViewer>
                                </Border>
                            </Grid>
                        </ControlTemplate>
                    </Setter.Value>
                </Setter>
            </Style>
        </Grid.Resources>
        <StackPanel Margin="4" HorizontalAlignment="Left">
            <RepeatButton Width="200" Height="22" Click="Up_Click">
                <Polygon Points="5,0 10,10 0,10 5,0" Fill="#222222" />
            </RepeatButton>
            <ListBox x:Name="listbox" Width="200" Height="150" Style="{StaticResource ListBoxStyle1}">
                <ListBoxItem Content="Item 1" />
                <ListBoxItem Content="Item 2" />
                <ListBoxItem Content="Item 3" />
                <ListBoxItem Content="Item 4" />
                <ListBoxItem Content="Item 5" />
                <ListBoxItem Content="Item 6" />
                <ListBoxItem Content="Item 7" />
                <ListBoxItem Content="Item 8" />
                <ListBoxItem Content="Item 9" />
                <ListBoxItem Content="Item 10" />
                <ListBoxItem Content="Item 11" />
                <ListBoxItem Content="Item 12" />
            </ListBox>
            <RepeatButton Width="200" Height="22" Click="Down_Click">
                <Polygon Points="5,10 10,0 0,0 5,10" Fill="#222222" />
            </RepeatButton>
        </StackPanel>
    </Grid>
</UserControl>

In XAML, just apply the custom style and populate it with some test data.  There are also two repeat buttons, an up and down that will handle the scrolling for us:

using System;
using System.Collections.Generic;
using System.Linq;
using System.Net;
using System.Windows;
using System.Windows.Controls;
using System.Windows.Documents;
using System.Windows.Input;
using System.Windows.Media;
using System.Windows.Media.Animation;
using System.Windows.Shapes;

namespace CustomListBox
{
    public partial class Page : UserControl
    {
        public Page()
        {
            InitializeComponent();
        }

        private void Up_Click(object sender, RoutedEventArgs e)
        {
            if (listbox.Items.Count > 0)
            {
                int newIndex = listbox.SelectedIndex - 1;

                if (newIndex < 0)
                {
                    newIndex = 0;
                }
                listbox.SelectedIndex = newIndex;
            }
        }

        private void Down_Click(object sender, RoutedEventArgs e)
        {
            if (listbox.Items.Count > 1)
            {
                int newIndex = listbox.SelectedIndex + 1;

                if (newIndex >= listbox.Items.Count)
                {
                    newIndex = listbox.Items.Count - 1;
                }
                listbox.SelectedIndex = newIndex;
            }
        }
    }
}

And now we're done!

HostForLIFE.eu Silverlight 6 Hosting
HostForLIFE.eu is European Windows Hosting Provider which focuses on Windows Platform only. We deliver on-demand hosting solutions including Shared hosting, Reseller Hosting, Cloud Hosting, Dedicated Servers, and IT as a Service for companies of all sizes. We have customers from around the globe, spread across every continent. We serve the hosting needs of the business and professional, government and nonprofit, entertainment and personal use market segments.


Silverlight 6 Hosting - HostForLIFE.eu :: How to Control Playback in A Video

clock September 17, 2015 11:07 by author Rebecca

Using videos in a Silverlight based application is a very exciting feature. In this article, we will learn how we can control the playback of movie using some coding in code-behind. Let's see how!

Dealing with Automatic Start

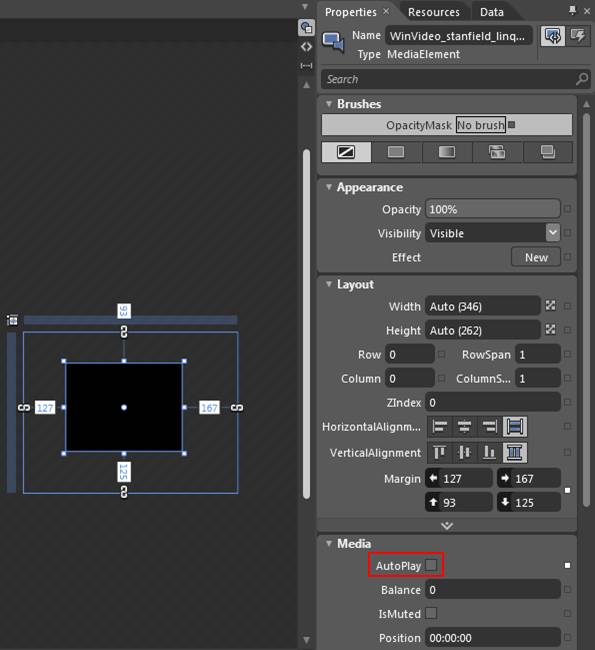
By default videos automaticall get started when we run the project, it is distracting feature from the users point of view. To change auto start false, select the video on stage and in properties uncheck the 'AutoPlay' option.

Dealing with Endless Playback

By default, when the video reaches the end then it stops and does not start again. To change such a setting follow the steps:

1. Select the video on stage

2. In Properties, switch the mode from 'Properties' to 'Events'.

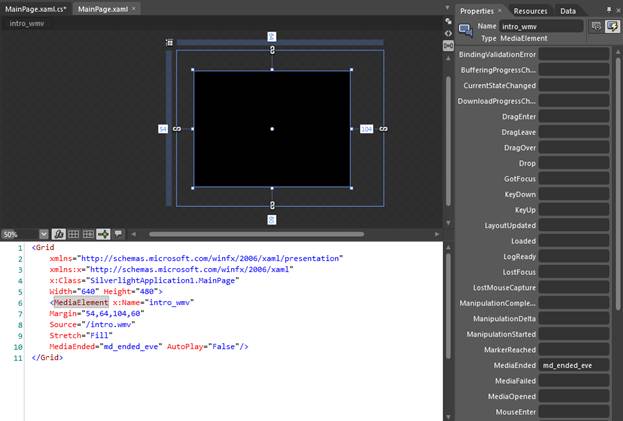
3. In the Event list, point to 'MediaEnded' label and type the event handler name (I will be using md_ended_eve) and then press tab to apply it and it automatically switches you to code-behind with a new event.

4. Now type the following code inside event handler:

(intro_wmv).Stop();
(intro_wmv).Play();

In above code 'intro_wmv' is my media fine name.

5. Now test the application.

XAML Code
<Grid
          xmlns="http://schemas.microsoft.com/winfx/2006/xaml/presentation"
          xmlns:x="http://schemas.microsoft.com/winfx/2006/xaml"
          x:Class="SilverlightApplication1.MainPage"
          Width="640" Height="480">
          <MediaElement x:Name="intro_wmv"
          Margin="54,64,104,60"
          Source="/intro.wmv"
          Stretch="Fill"
          MediaEnded="md_ended_eve" AutoPlay="False"/>
</Grid>

XAML.CS Code
using System;
using System.Windows;
using System.Windows.Controls;
using System.Windows.Documents;
using System.Windows.Ink;
using System.Windows.Input;
using System.Windows.Media;
using System.Windows.Media.Animation;
using System.Windows.Shapes;
namespace SilverlightApplication1
{
       public partial class MainPage : Grid
       {
              public MainPage()
              {
                     // Required to initialize variables
                     InitializeComponent();
              }
              private void md_ended_eve(object sender, System.Windows.RoutedEventArgs e)
              {
                     // TODO: Add event handler implementation here.
                     (intro_wmv).Stop();
                     (intro_wmv).Play();
              }
       }
}

Control Video Playback by Pause and Play

By default in Silverlight video plays and we can't control it by pausing and playing. But by writing some lines in code-behind we can control this playback. For this we have to create the event as we saw in above example. Let's follow the steps:

1. Open the event explorer by switching the property (look above image).

2. Type the event name in 'MouseLeftButtonDown', I will be using here 'pause_start_evn' and press tab to switch in event handler mode.

3. In the appeared event type the following code:

private bool IsPaused=true;
private void pause_start_evn(object sender, System.Windows.Input.MouseButtonEventArgs e)
              {
                     // TODO: Add event handler implementation here.
                     if(IsPaused)
                     {
                           (intro_wmv as MediaElement).Play();
                           IsPaused=false;
                     }
                     else
                     {
                           (intro_wmv as MediaElement).Pause();
                           IsPaused=true;
                     }
   }

4. Now test the application and check by right mouse click on video surface.

XAML Code
<Grid
          xmlns="http://schemas.microsoft.com/winfx/2006/xaml/presentation"
          xmlns:x="http://schemas.microsoft.com/winfx/2006/xaml"
          x:Class="SilverlightApplication1.MainPage"
          Width="640" Height="480">
          <MediaElement x:Name="intro_wmv"
          Margin="54,64,104,60"
          Source="/intro.wmv"
          Stretch="Fill"
          MediaEnded="md_ended_eve"
          MouseLeftButtonDown="pause_start_evn"/>
</Grid>

XAXM.CS Code

using System;
using System.Windows;
using System.Windows.Controls;
using System.Windows.Documents;
using System.Windows.Ink;
using System.Windows.Input;
using System.Windows.Media;
using System.Windows.Media.Animation;
using System.Windows.Shapes;

namespace SilverlightApplication1
{
       public partial class MainPage : Grid
       {
              public MainPage()
              {
                     // Required to initialize variables
                     InitializeComponent();
              }

              private void md_ended_eve(object sender, System.Windows.RoutedEventArgs e)
              {
                     // TODO: Add event handler implementation here.
                     (intro_wmv).Stop();
                     (intro_wmv).Play();
              }
              private bool IsPaused=true;
              private void pause_start_evn(object sender, System.Windows.Input.MouseButtonEventArgs e)
              {
                     // TODO: Add event handler implementation here.
                     if(IsPaused)
                     {
                           (intro_wmv as MediaElement).Play();
                           IsPaused=false;
                     }
                     else
                     {
                           (intro_wmv as MediaElement).Pause();
                           IsPaused=true;
                     }
              }
       }
}

Now, that's all about the controlling of video playback in a Silverlight based application. Happy coding!

HostForLIFE.eu Silverlight 6 Hosting
HostForLIFE.eu is European Windows Hosting Provider which focuses on Windows Platform only. We deliver on-demand hosting solutions including Shared hosting, Reseller Hosting, Cloud Hosting, Dedicated Servers, and IT as a Service for companies of all sizes. We have customers from around the globe, spread across every continent. We serve the hosting needs of the business and professional, government and nonprofit, entertainment and personal use market segments.


About HostForLIFE.eu

HostForLIFE.eu is European Windows Hosting Provider which focuses on Windows Platform only. We deliver on-demand hosting solutions including Shared hosting, Reseller Hosting, Cloud Hosting, Dedicated Servers, and IT as a Service for companies of all sizes.

We have offered the latest Windows 2016 Hosting, ASP.NET Core 2.2.1 Hosting, ASP.NET MVC 6 Hosting and SQL 2017 Hosting.


Tag cloud

Sign in