Let's talk about listbox control today using a few example studies. If we want to display a list of things in a listbox with a button for each list box, using a data template is the obvious approach. Alternatively, you may design your own user control and insert it within the list box as a list box item. Let's see how we can satisfy the requirements using both the data template and custom user control.

Setting Up Silverlight Project
Let's create a Silverlight project; let's name it UseOfListBox.
Then we will place a ListBox on the XAML and let's name it personListBox.
Let's create an item template of the list box which will look like the following:
<ListBox x:Name="personListBox" Height="241" HorizontalAlignment="Left" Margin="42,24,0,0" VerticalAlignment="Top" Width="280">
<ListBox.ItemTemplate>
<DataTemplate>
<StackPanel>
<TextBlock FontFamily="Verdana" Text="{Binding ID}" Margin="0,0,5,0"></TextBlock>
<TextBlock FontFamily="Verdana" Text="{Binding Name}" Margin="0,0,5,0"></TextBlock>
<TextBlock FontFamily="Verdana" Text="{Binding Designation}" Margin="0,0,5,0"></TextBlock>
</StackPanel>
</DataTemplate>
</ListBox.ItemTemplate>
So this is the item template that will represent the data.
Create a collection of objects to bind to this list box. So let's create a class such as:
public class Person {
public int ID { get; set; }
public string Name { get; set; }
public string Designation { get; set; }
}
Finally bind the data to the list box like this:
List < Person > personList = new List < Person > () {
new Person { ID = 1, Name = "Peter", Designation = "Developer" },
new Person { ID = 2, Name = "Scott", Designation = "Developer" },
new Person { ID = 3, Name = "Greg", Designation = "Developer" },
new Person { ID = 4, Name = "David", Designation = "Developer" },
new Person { ID = 5, Name = "Ryan", Designation = "Developer" },
new Person { ID = 6, Name = "Mike", Designation = "Developer" }
};
personListBox.ItemsSource = personList;
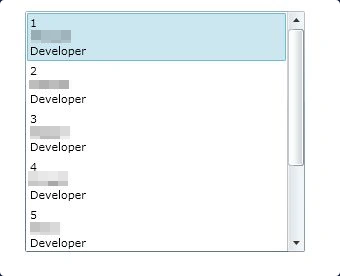
This was simple and easy.
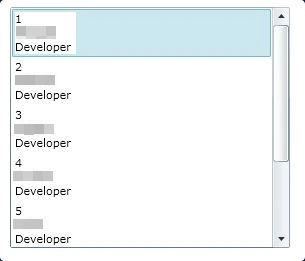
But there is another way we can create a custom user control which will be integrated as a ListBoxItem. So let's move in that way:
Let's create another page; let's say CustomListBox.xaml. Exactly in the same way, we will place the listBox with the same name. After that, let's create a UserControl named personControl which will look like as follows:
<UserControl x:Class="UseOfListBox.PersonControl" xmlns="http://schemas.microsoft.com/winfx/2006/xaml/presentation" xmlns:x="http://schemas.microsoft.com/winfx/2006/xaml" xmlns:d="http://schemas.microsoft.com/expression/blend/2008" xmlns:mc="http://schemas.openxmlformats.org/markup-compatibility/2006" mc:Ignorable="d" Height="Auto" Width="Auto">
<Grid x:Name="LayoutRoot" Background="White">
<StackPanel DataContext="{Binding}">
<TextBlock FontFamily="Verdana" Text="{Binding ID}" Margin="0,0,5,0"></TextBlock>
<TextBlock FontFamily="Verdana" Text="{Binding Name}" Margin="0,0,5,0"></TextBlock>
<TextBlock FontFamily="Verdana" Text="{Binding Designation}" Margin="0,0,5,0"></TextBlock>
</StackPanel>
</Grid>
</UserControl>
The very important part of this user control is DataContext="{Binding}" which will help it to bind from the parent control. And then we will do a final change in the listbox item template and it will look like:
<ListBox.ItemTemplate>
<DataTemplate>
<CustomControl:PersonControl />
</DataTemplate>
</ListBox.ItemTemplate>
Add the namespace xmlns:CustomControl="clr-namespace:UseOfListBox".
And finally, bind the data:
List < Person > personList = new List < Person > () {
new Person { ID = 1, Name = "Peter", Designation = "Developer" },
new Person { ID = 2, Name = "Scott", Designation = "Developer" },
new Person { ID = 3, Name = "Greg", Designation = "Developer" },
new Person { ID = 4, Name = "David", Designation = "Developer" },
new Person { ID = 5, Name = "Ryan", Designation = "Developer" },
new Person { ID = 6, Name = "Mike", Designation = "Developer" }
};
personListBox.ItemsSource = personList;
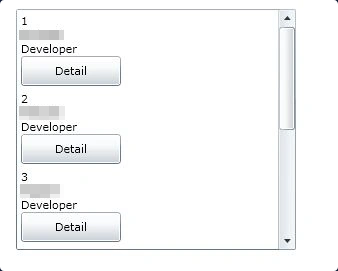
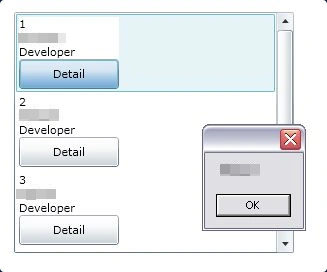
Let's go a bit into depth about that. Let us say we have a requirement that we want a button to be the part of the listbox item and on its click event, we will show the Name of the selected person in a message box from the parent page. So let's add a button to the custom control and then XAML will look like the following:
<Grid x:Name="LayoutRoot" Background="White">
<StackPanel DataContext="{Binding}">
<TextBlock FontFamily="Verdana" Text="{Binding ID}"></TextBlock>
<TextBlock FontFamily="Verdana" Text="{Binding Name}"></TextBlock>
<TextBlock FontFamily="Verdana" Text="{Binding Designation}"></TextBlock>
<Button Width="100" Height="30" Content="Detail" x:Name="detailButton" />
</StackPanel>
</Grid>
And now we will take advantage of the event handler and create an event handler which will track the button click. So in the code behind of the user control we will add the following:
public event EventHandler buttonClicked;
public PersonControl() {
InitializeComponent();
detailButton.Click += new RoutedEventHandler(DetailButton_Click);
}
void DetailButton_Click(object sender, RoutedEventArgs e) {
if (buttonClicked != null) {
buttonClicked(this, e);
}
}
Finally we have to receive the information in the parent page (that is CustomListBox.xaml) so we will do a bit of modification. And then the data template for the ListBox will look like:
<DataTemplate>
<CustomControl:PersonControl buttonClicked="ButtonClickedUp" />
</DataTemplate>
And the event will do the following :
void ButtonClickedUp(object sender, EventArgs e) {
Person selectedPerson = (Person)((PersonControl) sender).DataContext;
MessageBox.Show(selectedPerson.Name);
}
So the final output will be:
And when clicking on the button there will be a pop up like these:
Hope this will help!
HostForLIFE.eu Silverlight 5 Hosting
HostForLIFE.eu is European Windows Hosting Provider which focuses on Windows Platform only. We deliver on-demand hosting solutions including Shared hosting, Reseller Hosting, Cloud Hosting, Dedicated Servers, and IT as a Service for companies of all sizes. We have customers from around the globe, spread across every continent. We serve the hosting needs of the business and professional, government and nonprofit, entertainment and personal use market segments.
