European Silverlight 4 & Silverlight 5 Hosting BLOG

BLOG about Silverlight 5 Hosting and Its Techologies - Dedicated to European Windows Hosting Customer

Silverlight 6 Hosting - HostForLIFE.eu :: Implementing the HTTP Request/Response Model inside of Silverlight

clock June 24, 2025 08:50 by author Peter

The user interface (UI) may be made incredibly rich with Silverlight, but what about the server? In what ways can I use Silverlight to gain basic access to a server, be it a Windows or Linux web server? What happens if I wish to contact my server via REST? A few namespaces are included in Silverlight for making basic requests to and responses from the server: System.Net.Browser and System.Net. The classes listed below are included in these assemblies and will enable online communication with our server:

Class Description
WebRequestCreator Allows us to create a web request given a URI
HttpWebRequest A web request in which we can set our request
HttpWebResponse The web response coming back from the server

With the help of just these three classes, we can do everything we need to do to push data from the Silverlight client to the web server and retrieve information from the web server into our Silverlight client.
The Client Access Policy

In order to have authorization to use Silverlight against the web server, the web server must have a client access policy file installed in the root.  Without this policy in place on the web server, Silverlight will continue to throw authorization exceptions anytime it tries to contact a server on another domain with the classes listed above.  Listing 1 shows a typical client access policy.  This policy allows all headers to go through on a request and allows requests from all domains.  It also allows you to use any of the http methods: GET, PUT, POST, and delete.  You can restrict any of the access by simply replacing the wildcard asterisk in each tag with a more specific value.  

Listing 1 - Typical Client Access Policy 
<?xml version="1.0" encoding="utf-8"?>
<access-policy>
  <cross-domain-access>
<!--Enables Silverlight 3 all methods functionality-->
    <policy>
      <allow-from http-methods="*" http-request-headers="*">           
        <domain uri="*"/>
      </allow-from>      
      <grant-to>      
        <resource path="/resources" include-subpaths="true"/>
      </grant-to>      
    </policy>
<!--Enables Silverlight 2 clients to continue to work normally -->
    <policy>
      <allow-from >      
        <domain uri="*"/>
      </allow-from>      
      <grant-to>      
        <resource path="/api" include-subpaths="true"/>
      </grant-to>      
    </policy>
  </cross-domain-access>
</access-policy>


Now  that we got that out of the way, we can do some real work on the client.  Let's start with a simple http GET method.  Everything done in Silverlight is asynchronous.  Initially the asynchronous world is a difficult planet to live on, but eventually you start to get the hang of residing on it and may even enjoy it.  To implement a GET we first create a web request and then call it.  The web request is created with the the convenient WebRequestCreator.  You can think of the WebRequestCreator as a factory that churns out HttpWebRequest objects.  Just feed it a uri and out spills a web request.  Keep in mind that you still need to populate the request with the methods, headers, and data.   Once you have your web request ready, just call the asynchronous BeginGetResponse and wait.  Listing 2 shows an example of creating the request and making the asynchronous call.

Listing  2 - Calling BeginGetResponse
var request = WebRequestCreator.ClientHttp.Create(uri) as HttpWebRequest;
request.Method = "GET";
request.Headers[AUTHORIZATION_HEADER] = token;
request.BeginGetResponse(onGetResponse, request);


How long do we wait?  We don't care, because we send the BeginGetResponse a callback that the Silverlight framework will call when it is good and ready.  The callback has the signature  MyMethod(IAsyncResult  asyncResult).  You can pass in your own delegate into BeginGetResponse with this signature and handle the response when Silverlight calls the delegate. 

In listing 3, is our callback onGetResponse  that we passed into  BeginGetResponse.  Inside of this method, we can extract our response from the IAsyncResult by calling EndGetResponse.   Calling EndGetResponse retrieves the HttpWebResponse for us.  

private string onGetResponse (IAsyncResult asyncResult)
{
    var request = asyncResult.AsyncState as HttpWebRequest;
    var response = request.EndGetResponse(asyncResult) as HttpWebResponse;
    var reader = new StreamReader(response.GetResponseStream());
    string responseBody = reader.ReadToEnd();
}

One thing I noticed while working with Silverlight 3 is that your response never really comes back until you actually call EndGetResponse.  This is not the behavior I would have expected, because if you ever wanted to block after BeginGetResponse, you can't because you'd never get the response.  Not sure if this is what Microsoft intended, but I haven't seen this behavior in other technologies.  Maybe it has changed  in Silverlight 4?  In any case, once your call EndGetResponse to get the response, you can read the results of the body by retrieving the response stream.  For something like reading json from the body, you can simply use a StreamReader since for all intents and purposes json is a string.

Calling Multiple Gets

What if I wanted to do something a bit more interesting?  What if I wanted to chain multiple gets together and produce a list of responses?  In a synchronous world this would just require calling a for loop around each GET, but in an asynchronous world, this will not really work, especially if you want to be able to control the order of the results coming back.  So what we would need to do in the asynchronous world, is wait for the response to come back for each http GET in the callback, and then fire off the next http GET inside the callback.  Listing 4 illustrates this technique of batching http GETS. The method takes a list of uris representing the different GET requests.   It uses a recursive call to call back on itself with the next uri (http GET request) every time the callback is called.  Each time a new call is made, the uri is removed from the uri  list and the next result is added to the list of results .  When the uri list becomes empty, we make the final callback to the silverlight application.

Listing 3 - Batching Multiple Gets Asynchronously
protected void BatchingMultipleGetMethods(List<Uri> uris, IList<JsonObject> results, ActionCallback<IList<JsonObject>> onFinalCallback)
{
    if (uris.Count > 0)
    {
        var request = WebRequestCreator.ClientHttp.Create(uris[0]) as HttpWebRequest;
        request.Method = "GET";
        request.BeginGetResponse(x =>
        {
            var response = GetResponseBody(x);
            results.Add(JsonValue.Parse(response) as JsonObject);
            if (uris.Count > 0)
            {
                uris.RemoveAt(0);
                ExecuteMultipleGetMethods(uris, results, onFinalCallback);
            }
        }, request);
    }
    else
    {
        onFinalCallback(new CallbackResult<IList<JsonObject>>(results));
    }
}
protected string GetResponseBody(IAsyncResult asyncResult)
{
    try
    {
        var request = asyncResult.AsyncState as HttpWebRequest;
        var response = request.EndGetResponse(asyncResult) as HttpWebResponse;
        var reader = new StreamReader(response.GetResponseStream());
        return reader.ReadToEnd();
    }
    catch (Exception ex)
    {
        return "{\"ERROR\":\"" + ex.Message + "\"}";
    }
}

Posting Data In Silverlight
Posting data to the server via http is a bit more convoluted.   It is more of a three step process. To post data, we use the BeginGetRequestStream method on the HttpWebRequest class.   Listing 4 shows how we wrap the request with the data in a PostData class that we create.  Inside the post wrapper we include the request, the data, and the callback we wish to return to the user.  Inside the callback CreatePostCallback, we call EndGetRequestStream, write the data to the stream, and then kick off the BeginGetResponse.  Then in the response callback (OnFinalCallback), passed from the BeginGetResponse call, we unwrap the post  wrapper and call EndGetResponse to get the response from the post. Confusing?  Yeah, that's what I thought.  It would be a lot simpler to just execute a post with the data and retrieve the data in the response, but unfortunately, this is not the case in Silverlight.  The ExecutePostMethod listing 4 simplifies your life by wrapping  all the complicated mess.

Listing 4 - Implementing an Http Post in Silverlight
private void ExecutePostMethod(Uri uri, JsonObject json, Action<string> onGetResponse)
{
    var request = WebRequestCreator.ClientHttp.Create(uri) as HttpWebRequest;
    request.Method = "POST";
    request.ContentType = "text/json";
    var res = new PostData <string>()
    {
        Request = request,
        Data = json.ToString(),
        ResponseCallback = onGetResponse
    };
    request.BeginGetRequestStream(CreatePostCallback, res);
}
private void CreatePostCallback(IAsyncResult ar)
{
    var requestData = ar.AsyncState as PostData <string>;
    var request = requestData.ContextCall;
    Stream requestStream = request.EndGetRequestStream(ar);
    StreamWriter sw = new StreamWriter(requestStream);
    sw.Write(requestData.Data);
    sw.Flush();
    requestStream.Close();
    request.BeginGetResponse(OnFinalCallback, requestData);
}
private static void OnFinalCallback (IAsyncResult result)
{
    var userStateWrapper = result.AsyncState as PostData <string>;
    string ret;
    try
    {
        var resp = (HttpWebResponse)userStateWrapper. Request.EndGetResponse(result);
        var streamReader = new StreamReader(resp.GetResponseStream());
        string resultString = streamReader.ReadToEnd();
        var jObj = JsonObject.Parse(resultString) as JsonObject;
        ret = resultString;
    }
    catch (Exception ex)
    {
        ret = "{\"ERROR\":\"" + ex.Message + "\"}";
    }
    userStateWrapper.ResponseCallback (ret);
}
public class PostData<T>
{
    public HttpWebRequest Request { get; set; }
    public string Data { get; set; }
    public Action<T> ResponseCallback { get; set; }
}


Conclusion
Entering the asynchronous world of Silverlight when talking to web servers can be quite an adventure, so it can be useful to create helpers that wrap the common http requests.  This article has shown you how you can wrap two of the 4 methods: GET and POST.  It turns out your implement PUT, very similarly to how you would implement a POST and you would implement an http DELETE very similarly to how you would implement a GET.  You just need to change the method string in request.Method to the appropriate method name.  Note that this article is particularly applicable to ASP.NET MVC , because you can use the silverlight requests to make REST calls to your Controller methods inside of your Windows Web Server assemblies.  

Anyway, have fun using Silverlight to talk to the web world.  Sit back, take a REST, and enjoy the window to the world that Silverlight opens up to you on the internet using C# and .NET


Silverlight Hosting - HostForLIFE.eu :: Slide In Transition Effect

clock March 14, 2025 09:30 by author Peter

In this article we are going to see how we can create a Slide in Transition Effect using Visual State Manager. We would be using few Blend Dlls . so make sure you have Blend 4 Sdk downloaded and installed from the Net.


Create a new Project and add reference to the Dlls as shown below :

Adding the Required Namespaces :
Make sure you add the following Namespaces in the xaml code .
xmlns:ei="http://schemas.microsoft.com/expression/2010/interactions"
xmlns:ee="http://schemas.microsoft.com/expression/2010/effects"


Creating the Visual State Manager:
Below is the code for creating a Visual State Manager . Have created a VisualStateGroup . Have added two states namely Start and New.

In our case Start refers to the Initial State and New refers to the Modified State . Here I have created an example to demonstrate the Slide in Transition Effect.
   <!-- Visual State Created -->
        <VisualStateManager.VisualStateGroups>
         
      <VisualStateGroup x:Name="PageTrans">
               
  <VisualStateGroup.Transitions>
                    <VisualTransition GeneratedDuration="0:0:1">
                        <ei:ExtendedVisualStateManager.TransitionEffect>
                            <ee:SlideInTransitionEffect/>
                        </ei:ExtendedVisualStateManager.TransitionEffect>
                        <VisualTransition.GeneratedEasingFunction>
                            <CubicEase EasingMode="EaseInOut"/>
                        </VisualTransition.GeneratedEasingFunction>
                    </VisualTransition>
                </VisualStateGroup.Transitions>

                <VisualState x:Name="Start"/>

                <VisualState x:Name="New"/>
            </VisualStateGroup>

        </VisualStateManager.VisualStateGroups>
        <VisualStateManager.CustomVisualStateManager>
            <ei:ExtendedVisualStateManager/>
        </VisualStateManager.CustomVisualStateManager>

        <!-- Visual State End-->


Swapping between the Visual States:
bool state;  // A boolean variable

The following code will help us swap between the states . You can place the code in a Button Event Handler to visually make the effect appealing . I just place it in the Constructor of the MainPage.xaml.cs.
if (state = state ^ true)
{
         VisualStateManager.GoToState(this, "Start", true);
}

else
{
         VisualStateManager.GoToState(this, "New", true);
}

Go ahead and Modify the Color of the Grid in the MainPage to Black.

Run the code and experience the Slide In Transition Effect . The same effect can be created using the Blend instead of Visual Studio with much lesser effect. We will check that out in the Blend series .

HostForLIFE.eu Silverlight 6 Hosting
HostForLIFE.eu is European Windows Hosting Provider which focuses on Windows Platform only. We deliver on-demand hosting solutions including Shared hosting, Reseller Hosting, Cloud Hosting, Dedicated Servers, and IT as a Service for companies of all sizes. We have customers from around the globe, spread across every continent. We serve the hosting needs of the business and professional, government and nonprofit, entertainment and personal use market segments.


Silvelight 6 Hosting - HostForLIFE.eu :: PopUp Control In Silverlight

clock February 14, 2025 07:02 by author Peter

Silverlight has a Visual Prompt Control called Pop Up Control. There are instances in which you must truly capture the user's interest. Perhaps you need to show information about a serious mistake. You may then just use this control. The purpose of this visual prompt is to mimic a dialog box.
All we shall do in our Sample Application is show you how to use it.


Make a Silverlight Project

Figure 1.1 Creating Silverlight Project
Designing the Application
Here is an idea, we will add three images (ImageControls) to our application and on theirs LeftMouseButtonDown Event we will display the PopUp. So I have taken the help of Blend 3 to design the application. It will have 3 Images as Home, Search and Reports. The following figure displays our application.

Figure 1.2 Designing our Application
Adding a PopUp Control
This is actually disturbing; you can't find the control in the toolbox. But if you start typing the control name it will satisfy you. So I have added some controls like Border, StackPanel and Displaying Text and Button to close the PupUp.
    <Popup x:Name="myPopup" Margin="-34,0,-31,0" Grid.Row="2" Grid.Column="1" Height="78" VerticalAlignment="Bottom"  >    <Border CornerRadius="10" Background="Silver" BorderThickness="2" BorderBrush="Black">  
        <StackPanel Margin="10">  
                    <TextBlock x:Name="PopUpText"/>  
                    <Button x:Name="PopUpButton" Height="30" Width="90" Content="Close" Click="PopUpButton_Click" />  
        </StackPanel>  
        </Border>  
    </Popup>  


PopUp Control has a unique property called IsOpen which returns a boolean value of either true or false. The default value is always false. With this concept in mind let's add some events and use this property to control the show of the PopUp.

Calling the PopUp Control
As we discussed earlier we can handle the display of the PopUp by using the property IsOpen. Now we will see how we have used in our sample application.
    private void PopUpButton_Click(object sender, RoutedEventArgs e)  
    {  
          myPopup.IsOpen = false;  
    }  
      
    private void Home_MouseLeftButtonDown(object sender, MouseButtonEventArgs e)  
    {  
          PopUpText.Text = "You Clicked Home";  
          myPopup.IsOpen = true;  
    }  
      
    private void Search_MouseLeftButtonDown(object sender, MouseButtonEventArgs e)  
    {  
          PopUpText.Text = "You Clicked Search";  
          myPopup.IsOpen = true;  
    }  
      
    private void Reports_MouseLeftButtonDown(object sender, MouseButtonEventArgs e)  
    {  
          PopUpText.Text = "You Clicked Reports";  
          myPopup.IsOpen = true;  
    }  


Running the Application
When you click different images you will be notified by the PopUp Control.


Figure 1.3 PopUp is displayed
That's it, we have successfully used the PopUp Control. Enjoy Coding.

HostForLIFE.eu Silverlight 6 Hosting
HostForLIFE.eu is European Windows Hosting Provider which focuses on Windows Platform only. We deliver on-demand hosting solutions including Shared hosting, Reseller Hosting, Cloud Hosting, Dedicated Servers, and IT as a Service for companies of all sizes. We have customers from around the globe, spread across every continent. We serve the hosting needs of the business and professional, government and nonprofit, entertainment and personal use market segments.


Silverlight Hosting - HostForLIFE.eu :: Analog Clock Using .NET Silverlight

clock August 2, 2024 08:11 by author Peter

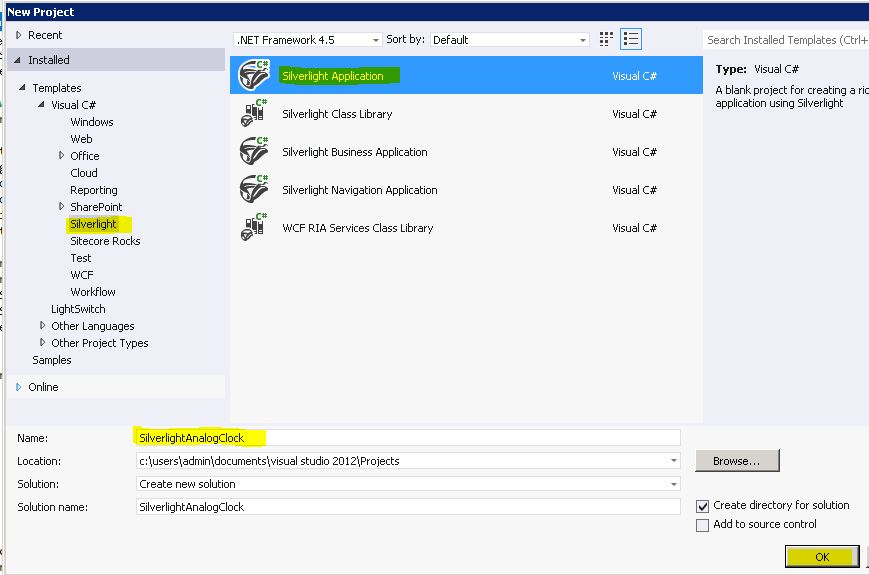
Step 1
Create a new project in Visual Studio and select "Silverlight Application".
Step 2
Open MainPage.xaml and add the following code.
    <UserControl x:Class="SilverlightAnalogClock.MainPage"  
        xmlns="http://schemas.microsoft.com/winfx/2006/xaml/presentation"  
        xmlns:x="http://schemas.microsoft.com/winfx/2006/xaml"  
        xmlns:d="http://schemas.microsoft.com/expression/blend/2008"  
        xmlns:mc="http://schemas.openxmlformats.org/markup-compatibility/2006"  
        mc:Ignorable="d"  
        d:DesignHeight="300" d:DesignWidth="400">  
      
        <Grid x:Name="LayoutRoot" Background="White">  
             
        </Grid>  
    </UserControl>  

Step 3
Open MainPage.xaml.cs and add the following code.
    using System;  
    using System.Collections.Generic;  
    using System.Linq;  
    using System.Net;  
    using System.Windows;  
    using System.Windows.Controls;  
    using System.Windows.Documents;  
    using System.Windows.Input;  
    using System.Windows.Media;  
    using System.Windows.Media.Animation;  
    using System.Windows.Media.Imaging;  
    using System.Windows.Shapes;  
      
    namespace SilverlightAnalogClock  
    {  
        public partial class MainPage : UserControl  
        {  
      
            public Canvas ClockArea = null;  
            public Rectangle secondHand = null;  
            public Rectangle minuteHand = null;  
            public Rectangle hourHand = null;  
      
            public RotateTransform secondHandRotate = null;  
            public RotateTransform minuteHandRotate = null;  
            public RotateTransform hourHandRotate = null;  
      
            public Ellipse outerCircle = null;  
      
            public Point centerPoint;  
            public double HEIGHT  = 0;  
            public double WIDTH  = 0;  
            public double RADIUS = 0;  
      
            public MainPage()  
            {  
                InitializeComponent();  
      
                ClockArea = new Canvas()  
                {  
      
                    Width = 300,  
                    Height = 300,  
                    HorizontalAlignment = HorizontalAlignment.Left,  
                    VerticalAlignment = VerticalAlignment.Top  
      
                };  
      
                ClockArea.SetValue(Grid.RowProperty, 0);  
                ClockArea.SetValue(Grid.ColumnProperty, 0);  
                ClockArea.Margin = new Thickness(0, 0, 0, 0);  
                this.LayoutRoot.Children.Add(ClockArea);  
      
                WIDTH = ClockArea.Width;  
                HEIGHT = ClockArea.Height;  
                centerPoint.X = (WIDTH/2);  
                centerPoint.Y = (HEIGHT/2);  
                       
                RADIUS = 400;  
                DrawClockFace();  
      
                Point TOPPOINT = new Point(0, 0);  
      
                DrawMinuteHand();  
                DrawSecondHand();  
                DrawHourHand();  
                DrawCenterCircle();  
      
      
                //Start the Clock  
                ClockStart();  
                  
      
            }  
      
            public void ClockStart()  
            {  
                // Create and Start the Thread Timer  
                System.Windows.Threading.DispatcherTimer clockTimer = new System.Windows.Threading.DispatcherTimer();  
                clockTimer.Interval = new TimeSpan(0, 0, 0, 0, 1000);  
                clockTimer.Tick += new EventHandler(Clock_Tick);  
                clockTimer.Start();  
            }  
      
            // Get and Set the Angles of Each Hand at every Clock Ticks  
            public void Clock_Tick(object o, EventArgs sender)  
            {  
                double hourRotateValue = Convert.ToDouble(DateTime.Now.Hour.ToString());  
                double minuteRotateValue = Convert.ToDouble(DateTime.Now.Minute.ToString());  
                double secondRotateValue = Convert.ToDouble(DateTime.Now.Second.ToString());  
                hourRotateValue = (hourRotateValue + minuteRotateValue / 60) * 30;  
                minuteRotateValue = (minuteRotateValue + secondRotateValue / 60) * 6;  
                secondRotateValue = Convert.ToDouble(DateTime.Now.Second.ToString()) * 6;  
                minuteHandRotate.Angle = minuteRotateValue;  
                hourHandRotate.Angle = hourRotateValue;  
                secondHandRotate.Angle = secondRotateValue;  
            }  
      
            // Draw Center Circle  
            public void DrawCenterCircle()  
            {              
                Ellipse centerCircle = new Ellipse()  
                {  
      
                    Width = 10,  
                    Height = 10,  
                    Stroke = new SolidColorBrush(Colors.Red),  
                    Fill = new SolidColorBrush(Colors.Red),  
                    HorizontalAlignment = HorizontalAlignment.Center,  
                    VerticalAlignment = VerticalAlignment.Center  
      
                };  
      
                centerCircle.SetValue(Grid.RowProperty, 0);  
                centerCircle.SetValue(Grid.ColumnProperty, 0);  
                Canvas.SetLeft(centerCircle, (WIDTH / 2) - (centerCircle.Width / 2));  
                Canvas.SetTop(centerCircle, (HEIGHT / 2) - (centerCircle.Height / 2));  
                ClockArea.Children.Add(centerCircle);  
            }  
      
            // Draw Clock Face  
            public void DrawClockFace()  
            {  
                          
                int smallCircle = 5;  
      
                Color c = Colors.Blue;  
                int p = 0;  
      
                // Draw Shadow of Outer Circle  
                Ellipse outerCircleShadow = new Ellipse()  
                {  
                    Width = (WIDTH),  
                    Height = (WIDTH),  
                    Stroke = new SolidColorBrush(Colors.Gray),  
                    StrokeThickness = 5,  
                    HorizontalAlignment = HorizontalAlignment.Center,  
                    VerticalAlignment = VerticalAlignment.Center  
                      
                };  
                 
                outerCircleShadow.SetValue(Grid.RowProperty, 0);  
                outerCircleShadow.SetValue(Grid.ColumnProperty, 0);  
                Canvas.SetLeft(outerCircleShadow, (WIDTH / 2) - (outerCircleShadow.Width / 2) + 6.5);  
                Canvas.SetTop(outerCircleShadow, (HEIGHT / 2) - (outerCircleShadow.Height / 2) + 6.5);  
                ClockArea.Children.Add(outerCircleShadow);  
                 
                //  Draw Outer Circle  
                outerCircle = new Ellipse()  
                {  
                    Width = (WIDTH ),  
                    Height = (WIDTH),  
                    Stroke = new SolidColorBrush(Colors.Black),  
                    StrokeThickness = 5,  
                    HorizontalAlignment = HorizontalAlignment.Center,  
                    VerticalAlignment = VerticalAlignment.Center  
                };              
                outerCircle.SetValue(Grid.RowProperty, 0);  
                outerCircle.SetValue(Grid.ColumnProperty, 0);  
                Canvas.SetLeft(outerCircle, (WIDTH / 2) - (outerCircle.Width / 2) + 4.5);  
                Canvas.SetTop(outerCircle, (HEIGHT / 2) - (outerCircle.Height / 2) + 4.5);  
                ClockArea.Children.Add(outerCircle);  
      
      
                outerCircle.Fill = new LinearGradientBrush()  
                    {  
                        EndPoint = new Point(1, 0),  
                        GradientStops = new GradientStopCollection()  
                        {  
                                new GradientStop() { Color = Colors.White, Offset = 0 },  
                                new GradientStop() { Color = Colors.Gray, Offset = 0.5 },  
                                 new GradientStop() { Color = Colors.White, Offset = 1 }  
                        }  
                    };  
      
                int clockDigits = 3;  
                double rad = (WIDTH/2) - 10.0f;  
                // 60 Innner Dots as Small Circle  
                for (double i = 0.0; i < 360.0; i += 6)   
                {   
      
                double angle = i * System.Math.PI / 180;  
      
                int x = (int)(centerPoint.X + rad * System.Math.Cos(angle));  
                int y = (int)(centerPoint.Y + rad * System.Math.Sin(angle));  
      
                if (p % 5 == 0)  
                {  
                    smallCircle = 10;  
                    c = Colors.Orange;                  
                }  
                else  
                {  
                    smallCircle = 5;  
                    c = Colors.Blue;  
                }  
                if (p % 15 == 0)  
                {  
                    TextBlock tb = new TextBlock();  
                    tb.Text = clockDigits.ToString();  
                    tb.FontSize = 24;  
                      
                    tb.SetValue(Grid.RowProperty, 0);  
                    tb.SetValue(Grid.ColumnProperty, 0);  
                    Canvas.SetLeft(tb, x );  
                    Canvas.SetTop(tb, y);  
                    if (clockDigits == 3)  
                    {  
                        Canvas.SetLeft(tb, x - 20);  
                        Canvas.SetTop(tb, y - 10);  
                    }  
                    if (clockDigits == 6)  
                    {  
                        Canvas.SetLeft(tb, x);  
                        Canvas.SetTop(tb, y - 30);  
                    }  
                    if (clockDigits == 9)  
                    {  
                        Canvas.SetLeft(tb, x + 15);  
                        Canvas.SetTop(tb, y - 10);  
                    }  
                    if (clockDigits == 12)  
                    {  
                        Canvas.SetLeft(tb, x - 10);  
                        Canvas.SetTop(tb, y + 5 );  
                    }   
                    
                      
                    ClockArea.Children.Add(tb);  
                    clockDigits = clockDigits + 3;  
                }  
      
                p++;  
                 
                            Ellipse innerPoints = new Ellipse()  
                            {  
                                Width = smallCircle,  
                                Height = smallCircle,  
                                Stroke = new SolidColorBrush(c),  
                                Fill = new SolidColorBrush(c),  
                                HorizontalAlignment = HorizontalAlignment.Center,  
                                VerticalAlignment = VerticalAlignment.Center  
                            };  
                            innerPoints.SetValue(Grid.RowProperty, 0);  
                            innerPoints.SetValue(Grid.ColumnProperty, 0);  
                            Canvas.SetLeft(innerPoints, x);  
                            Canvas.SetTop(innerPoints, y);  
                            ClockArea.Children.Add(innerPoints);  
      
                }  
      
                  
            }  
            // Draw the Second Hand  
            public void DrawSecondHand()  
            {  
      
                double handLength = (HEIGHT / 2) - 20;  
                secondHand = new Rectangle()  
                {  
                    Width = 1,  
                    Height = handLength,  
                    Stroke = new SolidColorBrush(Colors.Red),  
                    Fill = new SolidColorBrush(Colors.Red),  
                    HorizontalAlignment = HorizontalAlignment.Center,  
                    VerticalAlignment = VerticalAlignment.Center  
                };  
                  
                secondHand.SetValue(Grid.RowProperty, 0);  
                secondHand.SetValue(Grid.ColumnProperty, 0);  
                //Add Rotate Transformation  
                secondHandRotate = new RotateTransform();  
                secondHandRotate.Angle = 0;  
                //Set Center for Rotation  
                secondHandRotate.CenterX = Canvas.GetLeft(secondHand);  
                secondHandRotate.CenterY = secondHand.Height;  
                secondHand.RenderTransform = secondHandRotate;  
                //Set Initial Position of Hand  
                Canvas.SetTop(secondHand, centerPoint.Y - handLength);  
                Canvas.SetLeft(secondHand, WIDTH/2);             
                ClockArea.Children.Add(secondHand);  
                 
            }  
      
            public void DrawMinuteHand()  
            {  
                double handLength = (HEIGHT / 2) - 50;  
                minuteHand = new Rectangle()  
                {  
                    Width = 4,  
                    Height = handLength,  
                    Stroke = new SolidColorBrush(Colors.Black),  
                    Fill = new SolidColorBrush(Colors.Black),  
                    HorizontalAlignment = HorizontalAlignment.Center,  
                    VerticalAlignment = VerticalAlignment.Center  
                };  
      
                minuteHand.SetValue(Grid.RowProperty, 0);  
                minuteHand.SetValue(Grid.ColumnProperty, 0);  
      
                minuteHandRotate = new RotateTransform();  
                minuteHandRotate.Angle = 0;  
                minuteHandRotate.CenterX = Canvas.GetLeft(minuteHand);  
                minuteHandRotate.CenterY = minuteHand.Height;  
                minuteHand.RenderTransform = minuteHandRotate;  
                Canvas.SetTop(minuteHand, centerPoint.Y - handLength);  
                Canvas.SetLeft(minuteHand, WIDTH / 2);  
                ClockArea.Children.Add(minuteHand);  
      
            }  
            public void DrawHourHand()  
            {  
                double handLength = (HEIGHT / 2) - 80;  
                hourHand = new Rectangle()  
                {  
                    Width = 4,  
                    Height = handLength,  
                    Stroke = new SolidColorBrush(Colors.Black),  
                    Fill = new SolidColorBrush(Colors.Black),  
                    HorizontalAlignment = HorizontalAlignment.Center,  
                    VerticalAlignment = VerticalAlignment.Center  
                };  
      
                hourHand.SetValue(Grid.RowProperty, 0);  
                hourHand.SetValue(Grid.ColumnProperty, 0);  
      
                hourHandRotate = new RotateTransform();  
                hourHandRotate.Angle = 0;  
                hourHandRotate.CenterX = Canvas.GetLeft(hourHand);  
                hourHandRotate.CenterY = hourHand.Height;  
                hourHand.RenderTransform = hourHandRotate;  
                Canvas.SetTop(hourHand, centerPoint.Y - handLength);  
                Canvas.SetLeft(hourHand, WIDTH / 2);     
                ClockArea.Children.Add(hourHand);  
      
            }  
      
        }  
    }  

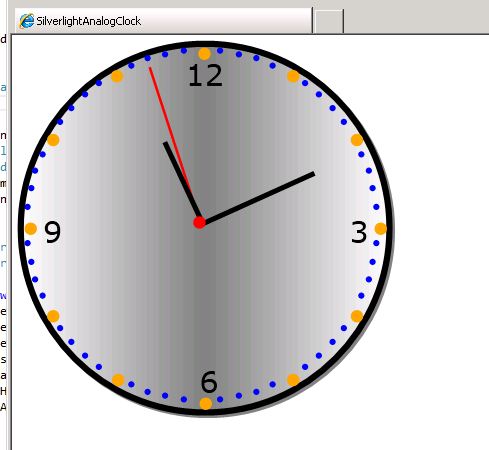
Output

Now execute and you will get a fully drawn Analog Clock.


Silverlight 6 Hosting - HostForLIFE.eu :: How to pass init parameters in Silverlight?

clock March 7, 2024 07:27 by author Peter
In your aspx page where object tag is present..Add init param tag of your own.

<object data="data:application/x-silverlight-2,"  ID="Silverlight2"  type="application/x-silverlight-2" width="100%" height="100%">
          <param name="source" value="ClientBin/ProductProDemo.xap"/>
          <param name="onError" value="onSilverlightError" />
          <param name="background" value="white" />
          <param name="minRuntimeVersion" value="4.0.41108.0" />
          <param name="autoUpgrade" value="true" />  
                    
          <param name="initParams"  value="startPage='<asp:Literal id="id" runat="server"/>'"></param>
           
          <a href="http://go.microsoft.com/fwlink/?LinkID=149156&v=4.0.41108.0" style="text-decoration:none">
               <img src="http://go.microsoft.com/fwlink/?LinkId=161376" alt="Get Microsoft Silverlight" style="border-style:none"/>
          </a>
        </object>

In the code behind file of the same aspx page ie aspx.cs file..

On page load provide the value to your init param
protected void Page_Load(object sender, EventArgs e)
{        
    id.Text = "Page1".ToString();        
}


In your App.xaml.cs file you can access the value as 
private void Application_Startup(object sender, StartupEventArgs e)
{
    string startPage = e.InitParams["startPage"];             
    this.RootVisual = new MainPage();
}


Silverlight 6 Hosting - HostForLIFE.eu :: Implementing INotifyPropertyChanged in Silverlight

clock May 26, 2023 08:15 by author Peter

Data binding is one of the best features the human race has ever devised. Binding a property of a UI Element to a property in the code behind can accomplish any task. It is magic, in a nutshell. Once the properties are bound, we must continue to notify the UI whenever the property's value is modified in the code. INotifyPropertyChanged is useful in this situation.


Because it is an interface, it must first be implemented. However, the procedure is not arduous. Here is the code for my primary page in my new Silverlight project:

publicpartialclassMainPage : UserControl
{
    privatestring _names;
     publicstring Names
    {
        get
        {
            return _names;
        }
        set
        {
            _names = value;
        }
    }

    public MainPage()
    {
        InitializeComponent();
    }

    privatevoid MainPage_OnLoaded(object sender, RoutedEventArgs e)
    {
        Names = "This is the Text";
    }
}


The property "Name" I have here is bound with the textblock in XAML, here is the code:
<UserControlx:Class="PropertyChangedDescribed.MainPage"
 xmlns="http://schemas.microsoft.com/winfx/2006/xaml/presentation"
 xmlns:x="http://schemas.microsoft.com/winfx/2006/xaml"
 xmlns:d="http://schemas.microsoft.com/expression/blend/2008"
 xmlns:mc="http://schemas.openxmlformats.org/markup-compatibility/2006"
  mc:Ignorable="d"
 Loaded="MainPage_OnLoaded"
 x:Name="TestingPropertyChanged"
 d:DesignHeight="300"d:DesignWidth="400">

 <Gridx:Name="LayoutRoot"Background="White">
  <TextBlockText="{Binding Names, ElementName=TestingPropertyChanged}"/>
  </Grid>

</UserControl>

As you can see, the textblock has it's "text" property bound with our code behind's property "Name". Right now, no matter what you set the value of "Name", it will never be reflected onto the UI. So, what we want is, every time we change the value of our property "Name," the text block has its value changed too. In order to do this, we need to implement the interface INotifyPropertyChanged. Here is the modified main page's code to do so:
publicpartialclassMainPage : UserControl, INotifyPropertyChanged
{
    privatestring _names;
    publicstring Names
    {
        get
        {
            return _names;
        }
        set
        {
            _names = value;
            OnPropertyChanged("Names");
        }
    }
    public MainPage()
    {
        InitializeComponent();

    }

    privatevoid MainPage_OnLoaded(object sender, RoutedEventArgs e)
    {
        Names = "This is the Text";

    }

    publicevent PropertyChangedEventHandler PropertyChanged;
    privatevoid OnPropertyChanged(string propertyName)

    {
        if (this.PropertyChanged != null)
        {
            PropertyChanged(this,new PropertyChangedEventArgs(propertyName));
        }
    }
}


So this is how you can implement INotifyPropertyChanged in Silverlight.

HostForLIFE.eu Silverlight 6 Hosting
HostForLIFE.eu is European Windows Hosting Provider which focuses on Windows Platform only. We deliver on-demand hosting solutions including Shared hosting, Reseller Hosting, Cloud Hosting, Dedicated Servers, and IT as a Service for companies of all sizes. We have customers from around the globe, spread across every continent. We serve the hosting needs of the business and professional, government and nonprofit, entertainment and personal use market segments.


Silverlight 6 Hosting - HostForLIFE.eu :: How to Move Image or Object in Silverlight ?

clock December 18, 2020 08:25 by author Peter

The control that you just like drag or move with the mouse is embedded among a Border control then handle the mouse down, up and move events to create the object move among your layout panel.

See sample .xaml code:
<Canvas x:Name="LayoutRoot" Background="White">
<Border x:Name="border1"
Canvas.Top="100"
Canvas.Left="10"
MouseLeftButtonDown="border1_MouseLeftButtonDown"
MouseLeftButtonUp="border1_MouseLeftButtonUp"
MouseMove="border1_MouseMove"> 
<Image x:Name="MyImage" Source="images/Basket.png" Stretch="Uniform" ></Image>           
</Border>
</Canvas>


In the above code, a Border control is placed within the Canvas. The foremost necessary code to notice is:
MouseLeftButtonDown="border1_MouseLeftButtonDown"
MouseLeftButtonUp="border1_MouseLeftButtonUp"
MouseMove="border1_MouseMove"


The above lines outline 3 events that we tend to like to handle. because the name indicates, we are handling the mouse button down, mouse button up and mouse move events for the left mouse.

In the code behind, once the left button is pressed, we are going to set a global variable to point that user has started moving. within the mouse move event, we are going to get the current location of the mouse pointer and then set the new position for the border control. once the left mouse button is discharged, we are going to reset the global variable in order that we are going to not move the item from now on.
See the code for the code behind class:
public partial class Page : UserControl
{
// Global variable to indicate if user has clicked border
// and started/stopped moving.
private bool moving = false;
private double offSetX;
private double offSetY;
public Page()
{
InitializeComponent();
}

private void border1_MouseLeftButtonDown(object sender, MouseButtonEventArgs e)
{
// Left mouse button clicked within border. start moving.
moving = true;

Point offset = e.GetPosition(border1);
offSetX = offset.X;
offSetY = offset.Y;
}

private void border1_MouseLeftButtonUp(object sender, MouseButtonEventArgs e)
{
// Left mouse button release. Stop moving.
moving = false;
}

private void border1_MouseMove(object sender, MouseEventArgs e)
{
if (moving)
{
    // Get the new mouse pointer position
    Canvas parent = (Canvas)this.border1.Parent;
    Point p = e.GetPosition(parent);
    double x = p.X - offSetX;
    double y = p.Y - offSetY;
    // Set the new position for the border control.
    this.border1.SetValue(Canvas.LeftProperty, x);
    this.border1.SetValue(Canvas.TopProperty, y);
}
}
}

HostForLIFE.eu Silverlight 6 Hosting
HostForLIFE.eu is European Windows Hosting Provider which focuses on Windows Platform only. We deliver on-demand hosting solutions including Shared hosting, Reseller Hosting, Cloud Hosting, Dedicated Servers, and IT as a Service for companies of all sizes. We have customers from around the globe, spread across every continent. We serve the hosting needs of the business and professional, government and nonprofit, entertainment and personal use market segments.


Silverlight 6 Hosting - HostForLIFE.eu :: Code to download pdf file in silverlight

clock July 26, 2019 11:08 by author Peter

Hi, I want to download a pdf file form silverlight application , the pdf file is in a folder in my solution , i want to give the path of the pdf to the method and it should download the pdf to the local system. i am happy to say that i achieved it with the following code:
SaveFileDialog dialog = new SaveFileDialog();
                dialog.Filter = "pdf Files|*.pdf";
                dialog.DefaultFileName = "BeneficiaryDesignation.pdf";
                if (dialog.ShowDialog() ?? false)
                {


                    WebClient webClient = new WebClient();
                    webClient.OpenReadCompleted += (s, e2) =>
                    {
                        try
                        {
                            using (Stream fs = (Stream)dialog.OpenFile())
                            {
                                e2.Result.CopyTo(fs);
                                fs.Flush();
                                fs.Close();
                            }
                           
                        }
                        catch (Exception ex)
                        {
                            MessageBox.Show(ex.ToString());
                        }
                    };
                    string str = App.Current.Host.Source.AbsoluteUri;
                    string path = App.appConfiguration.GetPDFPath("BeneficiaryDesignation.pdf");
                    str = str.Replace("/ClientBin/ProjectDemo.xap", path);                    
                   
                    webClient.OpenReadAsync(new Uri(str), UriKind.RelativeOrAbsolute);
                }

HostForLIFE.eu Silverlight 6 Hosting
HostForLIFE.eu is European Windows Hosting Provider which focuses on Windows Platform only. We deliver on-demand hosting solutions including Shared hosting, Reseller Hosting, Cloud Hosting, Dedicated Servers, and IT as a Service for companies of all sizes. We have customers from around the globe, spread across every continent. We serve the hosting needs of the business and professional, government and nonprofit, entertainment and personal use market segments.


Silverlight 5 Hosting France - HostForLIFE.eu :: Create an Exception Logger in Silverlight

clock June 21, 2019 11:42 by author Peter

In this post I'll describe the way to handle the exceptions in Silverlight. Whereas running the Silverlight application, if any exception happens it'll attend Silverlight.js and show within the internet explorer as a javascript error. Within the debugging purpose of read typically it's cumbersome to see wherever truly the exception happened.

LogWindow.xaml
This is an easy user control that has an easy textbox:
<TextBox
AcceptsReturn="True"
TextAlignment="Left"
TextWrapping="NoWrap"
VerticalScrollBarVisibility="Visible"
x:Name="logText"
FontFamily="Courier New"
FontSize="12" IsReadOnly="True" HorizontalScrollBarVisibility="Auto" />

Logger.cs
This class are used to print the exception and notice the stacktrace. it's an enum for the exception types viz. DEBUG,INFO,WARN,ERROR and FATAL.This class contains an easy delegate to add text to the log window.
The static property _instance is about by the LogWindow.xaml.cs go in the load event as:
Logger._instance = logText;
So that it will print whatever exception happenes in your application. The LogException methodology expects exception object because the parameter and find the exception information using the StackFrame class.

StackFrame frame = new StackFrame(true);
callerSignature =  string.Format("@{0}:{1}:{2}", frame.GetMethod(), frame.GetFileName(), frame.GetFileLineNumber());


To use this method in your catch block you just simply need to call the static method as:
Catch(Exception ex)
{
Logger.LogException(ex);
}

Hope this tutorial works for you!


Silverlight 6 Hosting - HostForLIFE.eu :: Print Document In Silverlight

clock May 23, 2019 05:30 by author Peter

How we can print the document in a Silverlight application.

Step 1
We have the PrintDocument Class which defines a reusable object that sends output to a printer.
    PrintDocument
    The PrintDocument object encapsulates all the information needed to print a page. They associate with the control which content can be print. They handle the events and operations of printing.
    Namespace - System.Drawing.Printing.PrintDocument

    [C#]

    public class PrintDocument : Component

    
We can create an instance of the PrintDocument class, set the properties that describe how to print, and call the Print method to start the printing process. Handle the PrintPage event where you specify the output to print, by using the Graphics included in the PrintPageEventArgs.
    Associate control to Print document
        private void printDoc_PrintPage(object sender, PrintPageEventArgs e) { 
            // print current page 
            e.PageVisual = printPage; 
        } 


Step 2
Create one user control page name as PrintPage.Xaml and design header and footer in this user control page like as following.
    <Grid x:Name="LayoutRoot" Background="White"> 
        <Grid.RowDefinitions> 
            <RowDefinition Height="Auto" /> 
            <RowDefinition /> 
            <RowDefinition Height="Auto" /> 
        </Grid.RowDefinitions> 
        <!--Header--> 
        <Grid> 
            <TextBlock Text="HEADER" /> 
        </Grid> 
        <!--Body--> 
        <ItemsControl Name="BodyItemsControl" Grid.Row="1" Margin="0,24" /> 
        <ItemsControl Name="TemplateItemsControl"> 
            <ItemsControl.ItemTemplate> 
                <DataTemplate> 
                    <Grid> 
                        <Grid.ColumnDefinitions> 
                            <ColumnDefinition Width="Auto" /> 
                            <ColumnDefinition Width="Auto" /> 
                            <ColumnDefinition Width="*" /> 
                        </Grid.ColumnDefinitions> 
                        <TextBlock Text="{Binding ID}" Margin="2" /> 
                        <TextBlock Text=" - " Grid.Column="1" Margin="2" /> 
                        <TextBlock Text="{Binding Description}" Grid.Column="2" TextWrapping="Wrap" MaxWidth="500" HorizontalAlignment="Left" Margin="2" /> 
                    </Grid> 
                </DataTemplate> 
            </ItemsControl.ItemTemplate> 
        </ItemsControl> 
        <Grid Grid.Row="2"> 
            <TextBlock Text="FOOTER" /> 
        </Grid> 

Step 3
In MainPage.Xaml create an instance of PrintDocument like as following.
    public MainPage() { 
        InitializeComponent(); 
        this.Loaded += new RoutedEventHandler(MainPage_Loaded); 
    } 
    void MainPage_Loaded(object sender, RoutedEventArgs e) { 
        GetItems(); 
        printDoc.PrintPage += newEventHandler < PrintPageEventArgs > (printDoc_PrintPage); 
    } 
    //following items for printing. 
    privatevoid GetItems() { 
        for (int i = 0; i < 100; i++) { 
            items.Add(newItem() { 
                ID = i, 
                    Description = "This is Print Document " + i 
            }); 
        } 
    } 
    //Handling the event when we're printing: 
    private void printDoc_PrintPage(object sender, PrintPageEventArgs e) { 
        PrintPage printPage = new PrintPage(); 
        // print current page 
        e.PageVisual = printPage; 
        e.HasMorePages = true; 
        break; 
    } 
 

Step 4
Add a button to the MainPage.Xaml and print the document when the button is clicked,
    <Button Content="Button" Grid.Row="1" Height="23" HorizontalAlignment="Left" Margin="42,56,0,0" Name="button1" VerticalAlignment="Top" Width="75" Click="button1_Click" /> 
    private void Button_Click(object sender, RoutedEventArgs e) 
    { 
        printDoc.Print("Printing A Page"); 
    } 


Step 5

Output look like as following,

HostForLIFE.eu Silverlight 6 Hosting
HostForLIFE.eu is European Windows Hosting Provider which focuses on Windows Platform only. We deliver on-demand hosting solutions including Shared hosting, Reseller Hosting, Cloud Hosting, Dedicated Servers, and IT as a Service for companies of all sizes. We have customers from around the globe, spread across every continent. We serve the hosting needs of the business and professional, government and nonprofit, entertainment and personal use market segments.


About HostForLIFE.eu

HostForLIFE.eu is European Windows Hosting Provider which focuses on Windows Platform only. We deliver on-demand hosting solutions including Shared hosting, Reseller Hosting, Cloud Hosting, Dedicated Servers, and IT as a Service for companies of all sizes.

We have offered the latest Windows 2016 Hosting, ASP.NET Core 2.2.1 Hosting, ASP.NET MVC 6 Hosting and SQL 2017 Hosting.


Tag cloud

Sign in