Printing Basics
Just as it was in Silverlight 4, Printing is centered around the PrintDocument class, found in System.Windows.Printing. This class has three primary events: BeginPrint, EndPrint, and PrintPage, which are your hooks into the printing system. You do setup in BeginPrint, teardown in EndPrint, and all the actual page production in PrintPage.
Page Markup
Here's the simple test page XAML I used for this printing example.
<Grid x:Name="LayoutRoot" Background="White">
<Button Content="Print Bitmap"
Height="23"
HorizontalAlignment="Left"
Margin="141,79,0,0"
Name="PrintBitmap"
VerticalAlignment="Top"
Width="95"
Click="PrintBitmap_Click" />
<Button Content="Print Vector"
Height="23"
HorizontalAlignment="Left"
Margin="141,108,0,0"
Name="PrintVector"
VerticalAlignment="Top"
Width="95"
Click="PrintVector_Click" />
<Button Content="Force Vector"
Height="23"
HorizontalAlignment="Left"
Margin="141,137,0,0"
Name="PrintVectorForced
VerticalAlignment="Top"
Width="95"
Click="PrintVectorForced_Click" />
</Grid>
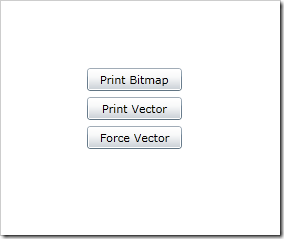
The application UI looks really simple, just three buttons on a page. This is one of my finest designs.

Next, I'll wire up an event handler for each button, and use it to demonstrate the behavior of the three different printing approaches.
Page Code for Basic Vector Printing
Here's the code for a basic vector print of 30 rows.
// Tests basic (not forced) vector printing
private void PrintVector_Click(object sender, RoutedEventArgs e)
{
PrintDocument doc = new PrintDocument();
doc.PrintPage += (s, ea) =>
{
StackPanel printPanel = new StackPanel();
Random rnd = new Random();
for (int i = 0; i < 30; i++)
{
TextBlock row = new TextBlock();
row.Text = "This is row " + i + " of the current page being printed in vector mode.";
printPanel.Children.Add(row);
}
ea.PageVisual = printPanel;
ea.HasMorePages = false;
};
PrinterFallbackSettings settings = new PrinterFallbackSettings();
doc.Print("Silverlight Vector Print");
}
Note that the PageVisual is assigned after the printPanel is populated. If you assign it prior, and do not force a recalculation of layout (in my example, the panel isn't in the visual tree, but layout is calculated with you assign PageVisual), you'll get a StackPanel with 30 items all piled on each other in the same row. The easiest way to fix this is to assign the PageVisual after the visual has all its children populated.

You could also point the PageVisual to an on-screen visual if you desire. If you're going to do that, you'll need to unhook the visual from the tree first, as a single element cannot have two parents.
If you have no more pages to print other than this one, set HasMorePages to false. If you have additional pages after this one, set it to true.
Printer Fallback Settings and Forcing Vector Printing Mode
New in Silverlight 5 is the PrinterFallbackSettings class. This class is used by one of the overloads of PrintDocument.Print to set two options: ForceVector and OpacityThreshold.
In the previous example, if you had any elements that had opacity other than 1.0, perspective transforms, or other things PostScript doesn't understand, Silverlight would silently fall back to bitmap-based printing.
ForceVector forces Silverlight to print in vector mode, assuming you have a PostScript-enabled printer driver, even when postscript-incompatible items exist in the element tree assigned to PageVisual. You use this in tandem with OpacityThreshold. The Opacity threshold sets the value over which Silverlight will treat an element's opacity as 1.0 to support PostScript printing.
// tests trying to force vector printing mode
private void PrintVectorForced_Click(object sender, RoutedEventArgs e)
{
PrintDocument doc = new PrintDocument();
doc.PrintPage += (s, ea) =>
{
StackPanel printPanel = new StackPanel();
Random rnd = new Random();
for (int i = 0; i < 30; i++)
{
TextBlock row = new TextBlock();
row.Opacity = (rnd.Next(3, 10)) / 10.0;
row.Text = "This is row " + i + " of the current page being printed. Opacity is " + row.Opacity;
printPanel.Children.Add(row);
}
ea.PageVisual = printPanel;
ea.HasMorePages = false;
};
PrinterFallbackSettings settings = new PrinterFallbackSettings();
settings.ForceVector = true;
settings.OpacityThreshold = 0.5;
doc.Print("Silverlight Forced Vector Print", settings);
}
If your content or your printer doesn't support PostScript printing, Silverlight automatically falls back to sending an uncompressed bitmap to the printer. If your printer doesn't support PostScript, you'll see the effect of opacity in the printed results (some items lighter colored than others, for example) as the fallback bitmap mode supports opacity.
Printing in Bitmap Mode
Sometimes you know you want to print in bitmap mode. Rather than let vector mode fall back to bitmap, you can simply force bitmap printing from the start. If you have a PostScript compatible printer and driver, this is quite a bit faster than it was in Silverlight 4, as the bitmap is compressed. If you don't have a PostScript driver, it sends a plain old uncompressed bitmap just like Silverlight 4.
// tests printing in bitmap mode
private void PrintBitmap_Click(object sender, RoutedEventArgs e)
{
PrintDocument doc = new PrintDocument();
doc.PrintPage += (s, ea) =>
{
StackPanel printPanel = new StackPanel();
Random rnd = new Random();
for (int i = 0; i < 30; i++)
{
TextBlock row = new TextBlock();
row.Opacity = (rnd.Next(3, 10)) / 10.0;
row.Text = "This is row " + i + " of the current page being printed in bitmap mode. Opacity is " + row.Opacity;
printPanel.Children.Add(row);
}
ea.PageVisual = printPanel;
ea.HasMorePages = false;
};
doc.PrintBitmap("Silverlight Bitmap Print");
}
Bitmap mode will preserve the opacity settings, as well as ensure render transforms are printed (assuming you apply them) etc. It's not the best approach for printing a report, but it's the highest-fidelity approach for printing visuals when you want to do the equivalent of a print-screen.
The resolution of the bitmap sent is set to the selected printer resolution, typically 600dpi.
Efficient Printing
So, for the most efficient printing of multi-page reports, you'll want to make sure you do the following:
- Have a PostScript-compatible printer with an appropriate PostScript driver (typically ends with " PS")
- Avoid Opacity other than 1.0 in your elements to be printed (or use the appropriate fallback settings)
- Leave out perspective transforms, 3d, and other things not compatible with PostScript printing.