European Silverlight 4 & Silverlight 5 Hosting BLOG

BLOG about Silverlight 5 Hosting and Its Techologies - Dedicated to European Windows Hosting Customer

European Silverlight 6 Hosting - HostForLIFE.eu :: Spire For WPF, .NET And Silverlight Applications From E-ICEBLUE

clock July 12, 2018 08:35 by author Peter

This article is about my views on Spire.doc which I tried for development purposes on my personal site. Now, I would like to discuss a few points about it. Recently, I came across a tool for .NET developers named Spire, which has more features and is an easy GUI interface tool for clients. E-ICEBLUE has a large number of tools and helps developers  a lot with different streams like .NET, Windows Presentation Foundation, and Silverlight. E-ICEBLUE also helps in providing customer support towards all products for their clients.

Tools from E-ICEBLUE

For .NET

  • Office for .NET
  • OfficeViewer for .NET
  • Doc for .NET
  • DocViewer for .NET
  • XLS for .NET
  • Spreadsheet for .NET
  • Presentation for .NET
  • PDF for .NET
  • PDFViewer for .NET
  • PDFViewer for ASP.NET
  • DataExport for .NET

For WPF

  • Office for WPF
  • Doc for WPF
  • DocViewer for WPF
  • XLS for WPF
  • PDF for WPF
  • PDFViewer for WPF

For Silverlight

  • Office for Silverlight
  • Doc for Silverlight
  • XLS for Silverlight
  • PDF for Silverlight

I tried using Spire.Office for my developments on .NET and WPF.

  • Helps in opening all the file formats.
  • Develop your .NET applications with easy GUI.
  • Surf for your APIs with the help of the "HELP document" available with the software.
  • Helps in opening Word documents, Spreadsheets, PDFs, and your project files on .NET applications including WPF, ASP.NET, WinForms, Web Services, etc.
  • You have all options here which you can find in MS-Office, like find & replace, copy/paste, review your documents, working with extensions, etc.
  • Helps in the conversion of various file formats – Excel sheets – adding digital signatures, etc.

I tried working with WPF projects with Data Binding, Animations, MVVM model, developing a media player, isolated storage, etc., and I feel Spire helps us with all features that Microsoft Visual Studio has in it.

Still, Spire works in a large scale on conversion of file formats, merging the data, exporting the data, accessing all data file formats, and multiple printing orientations etc.


European Silverlight 6 Hosting - HostForLIFE.eu :: Update Data Using Silverlight RIA Enabled ServiceToday

clock July 10, 2018 11:28 by author Peter

Update Data Using Silverlight RIA Enabled ServiceToday, in this article let's play around with one of the interesting and most useful concepts in Silverlight.

Question: What is update data using Silverlight RIA enabled service?
In simple terms "This application enables to update the data in the database with help of Silverlight RIA enabled service. It uses base platform of entity framework to communicate with database".

Step 1: Create a database named "Company" with employee table in it.

Step 2: Open up Visual Studio and create a new Silverlight application enabled with RIA Services
Step 3: When the project is created. Right-click on RIA Service project and add new entity data model framework and set it up for previously created database.
Step 4: Again right click on RIA service project and add Domain Service Class as new item.
Step 5: Complete code of EmployeeDomain.cs looks like this (Domain Service Class)
namespace SilverlightRIAInsert.Web
{
using System;
using System.Collections.Generic;
using System.ComponentModel;
using System.ComponentModel.DataAnnotations;
using System.Data;
using System.Linq;
using System.ServiceModel.DomainServices.EntityFramework;
using System.ServiceModel.DomainServices.Hosting;
using System.ServiceModel.DomainServices.Server;
// Implements application logic using the CompanyEntities context.
// TODO: Add your application logic to these methods or in additional methods.
// TODO: Wire up authentication (Windows/ASP.NET Forms) and uncomment the following to disable anonymous access
// Also consider adding roles to restrict access as appropriate.
// [RequiresAuthentication][EnableClientAccess()]
public class EmployeeDomain : LinqToEntitiesDomainService<CompanyEntities>
{
    // TODO:// Consider constraining the results of your query method.  If you need additional input you can
    // add parameters to this method or create additional query methods with different names.
    // To support paging you will need to add ordering to the 'Employee'
    query.public IQueryable<Employee> GetEmployee()
    {
        return this.ObjectContext.Employee;
    }
    public void InsertEmployee(Employee employee)
    {
        if ((employee.EntityState != EntityState.Detached))
        {
            this.ObjectContext.ObjectStateManager.ChangeObjectState(employee, EntityState.Added);
        }
        else{this.ObjectContext.Employee.AddObject(employee);
        }
    }
    public void UpdateEmployee(Employee currentEmployee)
    {
        this.ObjectContext.Employee.AttachAsModified(currentEmployee, this.ChangeSet.GetOriginal(currentEmployee));
    }
    public void DeleteEmployee(Employee employee)
    {
        if ((employee.EntityState != EntityState.Detached))
        {
            this.ObjectContext.ObjectStateManager.ChangeObjectState(employee, EntityState.Deleted);
        }
        else{this.ObjectContext.Employee.Attach(employee);
           this.ObjectContext.Employee.DeleteObject(employee);
        }
    }
}
}


Step 6: Now rebuild the solution file.
Step 7: The complete code of MainPage.xaml looks like this:
<usercontrolx:class="SilverlightRIAInsert.MainPage"xmlns="http://schemas.microsoft.com/winfx/2006/xaml/presentation"
xmlns:x="http://schemas.microsoft.com/winfx/2006/xaml"xmlns:d="http://schemas.microsoft.com/expression/blend/2008"
xmlns:mc="http://schemas.openxmlformats.org/markup-compatibility/2006"mc:ignorable="d"
d:designheight="300"d:designwidth="543">
<Gridx:Name="LayoutRoot"Width="608">
<TextBlockHeight="23"HorizontalAlignment="Left"Margin="152,29,0,0"Name="textBlock1"Text="Id"FontFamily="Verdana"FontSize="15"VerticalAlignment="Top"/>
<TextBoxHeight="23"HorizontalAlignment="Left"Margin="252,25,0,0"Name="textBox1"VerticalAlignment="Top"Width="120"/>
<TextBlockHeight="23"HorizontalAlignment="Left"Margin="150,72,0,0"Name="textBlock2"Text="FirstName"FontFamily="Verdana"FontSize="15"VerticalAlignment="Top"/>
<TextBoxHeight="23"HorizontalAlignment="Left"Margin="252,68,0,0"Name="textBox2"VerticalAlignment="Top"Width="120"/>
<TextBlockHeight="23"HorizontalAlignment="Left"Margin="150,113,0,0"Name="textBlock3"Text="LastName"FontFamily="Verdana"FontSize="15"VerticalAlignment="Top"/>
<TextBoxHeight="23"HorizontalAlignment="Left"Margin="252,113,0,0"Name="textBox3"VerticalAlignment="Top"Width="120"/>
<ButtonContent="Update"FontFamily="Verdana"FontSize="19"Background="DeepSkyBlue"Height="44"HorizontalAlignment="Left"Margin="252,206,0,0"Name="button1"VerticalAlignment="Top"Width="120"Click="button1_Click"/>
<TextBoxHeight="23"HorizontalAlignment="Left"Margin="252,155,0,0"Name="textBox4"VerticalAlignment="Top"Width="120"/>
<TextBlockHeight="23"HorizontalAlignment="Left"Margin="152,155,0,0"Name="textBlock4"Text="Age"FontFamily="Verdana"FontSize="16"VerticalAlignment="Top"/>
</Grid>"
</usercontrol>


Step 8: The complete code of MainPage.xaml.cs looks like this:
using System;
using System.Collections.Generic;
using System.Linq;
using System.Net;
using System.ServiceModel.DomainServices.Client;
using System.Windows;
using System.Windows.Controls;
using System.Windows.Documents;
using System.Windows.Input;
using System.Windows.Media;
using System.Windows.Media.Animation;
using System.Windows.Shapes;
using SilverlightRIAUpdate.Web;
namespace SilverlightRIAUpdate
{
public partial class MainPage : UserControl
{
    public MainPage()
    {
        InitializeComponent();
    }
    EmployeeDomain objDomain = new EmployeeDomain();
    private void button1_Click(object sender, RoutedEventArgs e)
    {
        EntityQuery<Employee> query = objDomain.GetEmployeeQuery();
        objDomain.Load(query, UpdateLoad, null);
        MessageBox.Show("Data Updated Successfully");
    }
    public void UpdateLoad(LoadOperation<Employee> emp)
    {
        foreach (Employee e in objDomain.Employees)
        {
            if (e.Id == int.Parse(textBox1.Text))
           {
                e.FirstName = textBox2.Text;
                e.LastName = textBox3.Text;
                e.Age = int.Parse(textBox4.Text);
                objDomain.SubmitChanges();
                break;
            }
        }
    }
}
}


HostForLIFE.eu Proudly Launches Umbraco 7.5.7 Hosting

clock January 27, 2017 07:55 by author Peter

HostForLIFE.eu, a leading Windows web hosting provider with innovative technology solutions and a dedicated professional services team, today announced the support for Umbraco 7.5.7 hosting plan due to high demand of Umbraco users in Europe. The company has managed to build a strong client base in a very short period of time. It is known for offering ultra-fast, fully-managed and secured services in the competitive market.


HostForLIFE.eu hosts its servers in top class data centers that is located in Amsterdam, (NL), London, (UK), Washington, D.C. (US), Paris, (France), Frankfurt, (Germany), Chennai, (India), Milan, (Italy), Toronto, (Canada) and São Paulo, (Brazil) to guarantee 99.9% network uptime. All data centers feature redundancies in network connectivity, power, HVAC, security and fire suppression. All hosting plans from HostForLIFE.eu include 24×7 support and 30 days money back guarantee. HostForLIFE Umbraco hosting plan starts from just as low as €3.49/month only and this plan has supported ASP.NET Core 1.1, ASP.NET MVC 5/6 and SQL Server 2012/2014/2016.

Umbraco is a fully-featured open source content management system with the flexibility to run anything from small campaign or brochure sites right through to complex applications for Fortune 500's and some of the largest media sites in the world. Umbraco is strongly supported by both an active and welcoming community of users around the world, and backed up by a rock-solid commercial organization providing professional support and tools. Umbraco can be used in its free, open-source format with the additional option of professional tools and support if required.

Umbraco release that exemplifies our mission to continue to make Umbraco a bit simpler every day. The other change is that there's now a "ValidatingRequest" event you can hook into. This event allows you to "massage" any of the requests to ImageProcessor to your own liking. So if you'd want to never allow any requests to change BackgroundColor, you can cancel that from the event. Similarly if you have a predefined set of crops that are allowed, you could make sure that no other crop sizes will be processed than those ones you have defined ahead of time.

Further information and the full range of features Umbraco 7.5.7 Hosting can be viewed here: http://hostforlife.eu/European-Umbraco-757-Hosting


HostForLIFE.eu Proudly Launches Visual Studio 2017 Hosting

clock December 2, 2016 07:20 by author Peter

European leading web hosting provider, HostForLIFE.eu announces the launch of Visual Studio 2017 Hosting

HostForLIFE.eu was established to cater to an underserved market in the hosting industry; web hosting for customers who want excellent service. HostForLIFE.eu - a cheap, constant uptime, excellent customer service, quality, and also reliable hosting provider in advanced Windows and ASP.NET technology. HostForLIFE.eu proudly announces the availability of the Visual Studio 2017 hosting in their entire servers environment.

The smallest install is just a few hundred megabytes, yet still contains basic code editing support for more than twenty languages along with source code control. Most users will want to install more, and so customer can add one or more 'workloads' that represent common frameworks, languages and platforms - covering everything from .NET desktop development to data science with R, Python and F#.

System administrators can now create an offline layout of Visual Studio that contains all of the content needed to install the product without requiring Internet access. To do so, run the bootstrapper executable associated with the product customer want to make available offline using the --layout [path] switch (e.g. vs_enterprise.exe --layout c:\mylayout). This will download the packages required to install offline. Optionally, customer can specify a locale code for the product languages customer want included (e.g. --lang en-us). If not specified, support for all localized languages will be downloaded.

HostForLIFE.eu hosts its servers in top class data centers that is located in Amsterdam (NL), London (UK), Paris (FR), Frankfurt(DE) and Seattle (US) to guarantee 99.9% network uptime. All data center feature redundancies in network connectivity, power, HVAC, security, and fire suppression. All hosting plans from HostForLIFE.eu include 24×7 support and 30 days money back guarantee. The customers can start hosting their Visual Studio 2017 site on their environment from as just low €3.00/month only.

HostForLIFE.eu is a popular online ASP.NET based hosting service provider catering to those people who face such issues. The company has managed to build a strong client base in a very short period of time. It is known for offering ultra-fast, fully-managed and secured services in the competitive market.

HostForLIFE.eu offers the latest European Visual Studio 2017 hosting installation to all their new and existing customers. The customers can simply deploy their Visual Studio 2017 website via their world-class Control Panel or conventional FTP tool. HostForLIFE.eu is happy to be offering the most up to date Microsoft services and always had a great appreciation for the products that Microsoft offers.

Further information and the full range of features Visual Studio 2017 Hosting can be viewed here http://hostforlife.eu/European-Visual-Studio-2017-Hosting

About Company
HostForLIFE.eu is European Windows Hosting Provider which focuses on Windows Platform only. HostForLIFE.eu deliver on-demand hosting solutions including Shared hosting, Reseller Hosting, Cloud Hosting, Dedicated Servers, and IT as a Service for companies of all sizes.

HostForLIFE.eu is awarded Top No#1 SPOTLIGHT Recommended Hosting Partner by Microsoft. Their service is ranked the highest top #1 spot in several European countries, such as: Germany, Italy, Netherlands, France, Belgium, United Kingdom, Sweden, Finland, Switzerland and other European countries. Besides this award, they have also won several awards from reputable organizations in the hosting industry and the detail can be found on their official website.


European Silverlight Hosting - HostForlIFE.eu :: Storing Files in SQL Server using WCF RIA Services and Silverlight

clock November 24, 2016 05:32 by author Scott

We have worked on several Silverlight Line of Business applications that require storing documents and files in a secure environment. There are several ways to accomplish this but one approach that has been successful for us is to store the documents using FILESTREAM Storage in SQL Server 2008. 

This is the first of three articles which will describe how you can create a Silverlight LOB application that stores and displays documents using FILESTREAM Storage in SQL Server 2008. 

1. Configuring FILESTREAM in your database and WCF RIA Services setup. 
2. Uploading and Saving files to the database from a Silverlight LOB application. 
3. Viewing files stored in the FILESTREAM from a Silverlight LOB application. 

Configuring FILESTREAM in you database

The first thing I would recommend is to read about FILESTREAM. Here is a tutorial which describes FILESTREAM. 

Okay, now that you read the entire white paper we are ready to roll! 

Setting up your database

Your database needs to enable FILESTREAM on the instance of the SQL Server Database Engine. 

Now that the FILESTREAM is enabled for the server you need to configure your database.

The basic steps include: 

1. Create a Filegroup of type Filestream
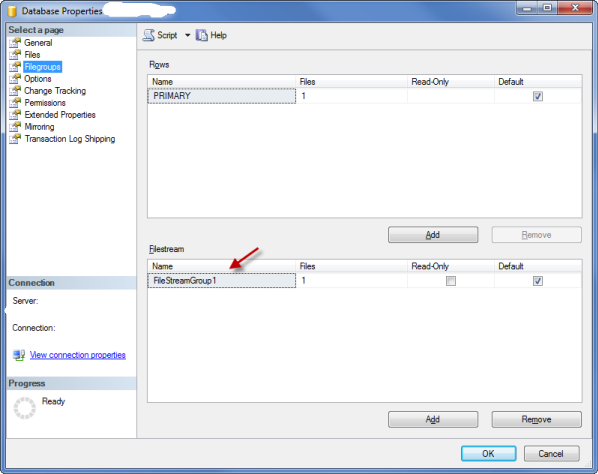
2. Create a File for the new Filestream Group
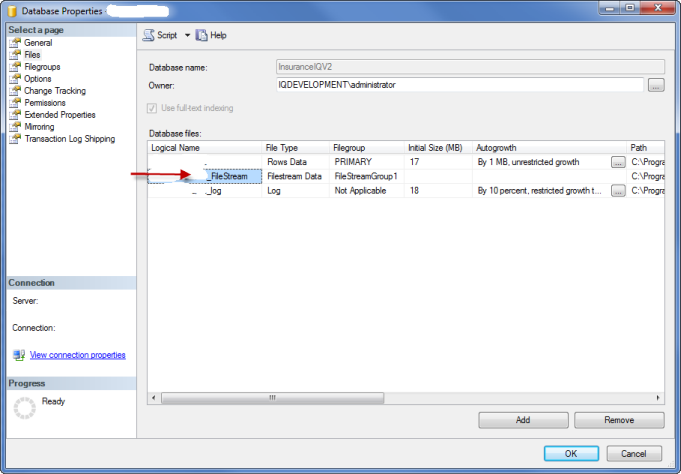
Now that your  database can handle FILESTREAM, the next is to create the SQL Tables that will store documents using the FILESTREAM. In this example I will be using three tables:

- File - storage for the document via the FILESTREAM
- Document - metadata about the File
- Folder - Virtual folder for the document

File table script

CREATE TABLE [dbo].[File]( [FileID] [int] IDENTITY(1,1) NOT NULL, [DocumentFileId] [uniqueidentifier] ROWGUIDCOL NOT NULL, [DocumentFile] [varbinary](max) FILESTREAM NULL, CONSTRAINT [File_PK] PRIMARY KEY CLUSTERED ( [FileID] ASC )WITH (PAD_INDEX = OFF, STATISTICS_NORECOMPUTE = OFF, IGNORE_DUP_KEY = OFF, ALLOW_ROW_LOCKS = ON, ALLOW_PAGE_LOCKS = ON) ON [PRIMARY] FILESTREAM_ON [FileStreamGroup1], UNIQUE NONCLUSTERED ( [DocumentFileId] ASC )WITH (PAD_INDEX = OFF, STATISTICS_NORECOMPUTE = OFF, IGNORE_DUP_KEY = OFF, ALLOW_ROW_LOCKS = ON, ALLOW_PAGE_LOCKS = ON) ON [PRIMARY] ) ON [PRIMARY] FILESTREAM_ON [FileStreamGroup1]

One thing we have found is that you only want to access the File table when you are ready to display the document. If you include this table in RIA Service Domain Service it will really slow things down—a lot. That is why we separated the metadata from the FILESTREAM into two tables - File and Document. 

Document table

You can add as many columns for metadata as needed for your project.  
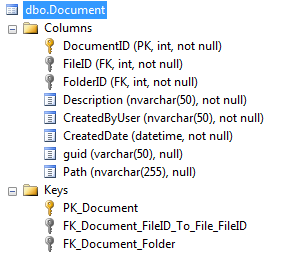
A few things to notice:

1. This table contains a description and some metadata about the file. We use this table to bind a list of documents in a treeview or gridview control.
2. The guid field is used to create a second unique field. More to come on this in part 3.
3. Path will store the actual file name (e.g. MyDocument.pdf). We need this field so we can determine the type of file that is stored in the database (more on this in part 3).
4. FolderID points to a Folder table (see below). We use this table to organize documents in Folders.

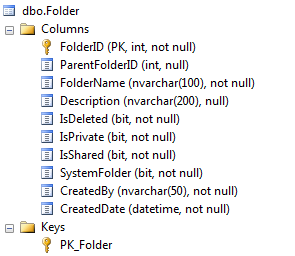
Folder table

We use the ParentFolderID to enable nested folders.  
Okay, now our database is configured for FILESTREAM and we have the necessary tables to store documents. We are creating a Silverlight LOB application using WCF RIA Services, so assuming we already have our Silverlight project created our next steps will be:

1. Add/Update Entity Framework Entity Data Model (*.edmx) in the project. Include the File, Document, and Folder tables.
2. Add/Update Domain Service class and metadata for the three tables.

Tip - I like to include two methods when returning a Document. One that includes the File (i.e. Heavy version) and one that does not include the File (i.e. Lightweight version). This gives me flexibility on the client side. 

public Document GetDocumentById(int documentId) { return this.ObjectContext.Documents.Where(d => d.DocumentID == documentId).FirstOrDefault(); } public Document GetDocumentWithFileById(int documentId) { return this.ObjectContext.Documents.Include("File") .Where(d => d.DocumentID == documentId).FirstOrDefault(); }

To get a list of documents for a folder I use the following query. This can be bound to a gridview control. 

public IQueryable GetDocumentsByFolderId(int folderId) { return this.ObjectContext.Folders .Include("Document") .Where(f => f.FolderID == folderId).OrderByDescending(com => com.Document.CreatedDate); } 


European Silverlight 5 Hosting - HostForLIFE.eu :: How to Implement AutoComplete Text in Silverlight

clock October 5, 2016 23:59 by author Scott

Introduction

Silverlight is evolving with a lot of new features in each and every version release. The AutoComplete text feature is one such example. In this article I will demonstrate the implementation of the AutoComplete text feature in a Silverlight application. I will also create a sample Silverlight application to help explain the code. I have used Silverlight 4.0 and Visual Studio 2010 for developing the sample application.

AutoComplete Functionality

AutoComplete text functionality is not only a fancy effect but it's also a pretty useful feature from a user prospective and this feature is available in most of the latest applications. As the user enters text in a text box, a list of values gets populated and are listed in a similar fashion to that of a drop down based on the entered text. So the user is able to see the possible suggestions and can select a value from them or they also have the freedom to enter their own text as the base control is a textbox.

Some popular websites implementing the auto complete functionality are www.google.com,www.youtube.com, etc.,

Silverlight AutoCompleteBox Control

Implementing the autocomplete functionality in a Silverlight application is pretty straight forward because of the availability of the AutoCompleteBox control. This control is available in Silverlight 3.0 and higher versions. The developer only needs to set the ItemSource property of the AutoCompleteBox control with the value collection that is to be listed. The rest will be taken care by the control itself. 

Below are some of the useful settings that can be leveraged from the AutoCompleteBox control.

  1. FilterMode – Specifies the filter mode to display the data (StartsWith, Contains, Equals, etc.,)
  2. MinimumPrefixLength – Minimum prefix length for the auto complete feature to be triggered
  3. MaxDropDownHeight – Maximum height of the dropdown
  4. IsTextCompletionEnabled – If set to true then the first match found during the filtering process will be populated in the TextBox


Silverlight AutoCompleteBox Implementation

In this section we will create a sample Silverlight window implementing the autocomplete text feature. In the MainWindow.xaml add an AutoCompleteBox control and set the basic properties. Below is the code:

<UserControl xmlns:sdk="http://schemas.microsoft.com/winfx/2006/xaml/presentation/sdk"  
    x:Class="AutoCompleteBoxSample.MainPage"
    xmlns=http://schemas.microsoft.com/winfx/2006/xaml/presentation
    xmlns:x=http://schemas.microsoft.com/winfx/2006/xaml
    xmlns:d=http://schemas.microsoft.com/expression/blend/2008
    xmlns:mc=http://schemas.openxmlformats.org/markup-compatibility/2006
    mc:Ignorable="d"
    d:DesignHeight="300" d:DesignWidth="400">

    <Grid x:Name="LayoutRoot" Background="White">
        <Canvas>
            <sdk:Label Content="Enter the city: " Margin="46,76,264,198" />
            <sdk:AutoCompleteBox Height="28" H
orizontalAlignment="Left" Margin="142,77,0,0" FilterMode="StartsWith"
MinimumPrefixLength="1" MaxDropDownHeight="80" Name="autoCompleteBox1" VerticalAlignment="Top" Width="120"
Canvas.Left="-6" Canvas.Top="-5" />
        </Canvas>
    </Grid>
</UserControl>

namespace AutoCompleteBoxSample
{
    public partial class MainPage : UserControl
    {
        List<string> _cities;

        public MainPage()
        {
            InitializeComponent();
            autoCompleteBox1.ItemsSource = PopulateCities();
        }

        private IEnumerable PopulateCities()
        {
            _cities = new List<string>();
            _cities.Add("Boston");
            _cities.Add("Bangalore");
            _cities.Add("Birmingham");
            _cities.Add("Auckland");
            _cities.Add("Amsterdam");
            _cities.Add("Aspen");
            return _cities;
        }
    }
}

Run the application and you will see the figure below:


Using a DomainDataSource

In the above case we had the data directly in the application and it was hence hard-coded. In case if the data lies in the database, then the WCF RIA service and the DomainDataSource comes into play. Create a WCF RIA service and hook up the service to expose the data in the table through a generated data context method. Use a DomainDataSource to act as an ItemSource for the AutoCompleteBox control.

Below is the XAML code:

<Canvas>
     <riaControls:DomainDataSource AutoLoad="True"
                                      QueryName="GetCities"
                                      x:Name="CityDataSource">
          <riaControls:DomainDataSource.DomainContext>
                    <web:MyDatabaseContext />
          </riaControls:DomainDataSource.DomainContext>
     </riaControls:DomainDataSource>
     <sdk:Label Content="Enter the city: " Margin="46,76,264,198" />
<sdk:AutoCompleteBox Height="28" ItemsSource="{Binding Data, ElementName=CityDataSource}"
HorizontalAlignment="Left" Margin="142,77,0,0" FilterMode="StartsWith" MinimumPrefixLength="1" MaxDropDownHeight="80"
Name="autoCompleteBox1" VerticalAlignment="Top" Width="120" Canvas.Left="-6" Canvas.Top="-5" />
</Canvas>


HostForLIFE.eu Proudly Launches ASP.NET Core 1.0 RC2 Hosting

clock June 4, 2016 01:06 by author Peter

HostForLIFE.eu was established to cater to an underserved market in the hosting industry; web hosting for customers who want excellent service. HostForLIFE.eu - a cheap, constant uptime, excellent customer service, quality, and also reliable hosting provider in advanced Windows and ASP.NET technology. HostForLIFE.eu proudly announces the availability of the ASP.NET Core 1.0 RC2 hosting in their entire servers environment.

ASP.NET is Microsoft's dynamic website technology, enabling developers to create data-driven websites using the .NET platform and the latest version is 5 with lots of awesome features. ASP.NET Core 1.0 RC2 is a lean .NET stack for building modern web apps. Microsoft built it from the ground up to provide an optimized development framework for apps that are either deployed to the cloud or run on-premises. It consists of modular components with minimal overhead.

A key change that occurred between RC1 and RC2 is the introduction of the .NET command-line interface.  This tool replaces the dnvm, dnx, and dnu utilities with a single tool that handles the responsibilities of these tools. In RC1 an ASP.NET application was a class library that contained a Startup.cs class. When the DNX toolchain run your application ASP.NET hosting libraries would find and execute the Startup.cs, booting your web application. Whilst the spirit of this way of running an ASP.NET Core application still exists in RC2, it is somewhat different. As of RC2 an ASP.NET Core application is a .NET Core Console application that calls into ASP.NET specific libraries. What this means for ASP.NET Core apps is that the code that used to live in the ASP.NET Hosting libraries and automatically run your startup.cs now lives inside a Program.cs.

HostForLIFE.eu hosts its servers in top class data centers that is located in Amsterdam (NL), London (UK), Paris (FR), Frankfurt(DE) and Seattle (US) to guarantee 99.9% network uptime. All data center feature redundancies in network connectivity, power, HVAC, security, and fire suppression. All hosting plans from HostForLIFE.eu include 24×7 support and 30 days money back guarantee. The customers can start hosting their ASP.NET Core 1.0 RC2 site on their environment from as just low €3.00/month only.

HostForLIFE.eu is a popular online ASP.NET based hosting service provider catering to those people who face such issues. The company has managed to build a strong client base in a very short period of time. It is known for offering ultra-fast, fully-managed and secured services in the competitive market.

HostForLIFE.eu offers the latest European ASP.NET Core 1.0 RC2 hosting installation to all their new and existing customers. The customers can simply deploy their ASP.NET Core 1.0 RC2 website via their world-class Control Panel or conventional FTP tool. HostForLIFE.eu is happy to be offering the most up to date Microsoft services and always had a great appreciation for the products that Microsoft offers.

Further information and the full range of features ASP.NET Core 1.0 RC2 Hosting can be viewed here http://hostforlife.eu


Silverlight 4 Hosting - HostForLIFE.eu :: How to Make Video Player?

clock April 12, 2016 23:41 by author Anthony

Today, I will make a tutorial about how to make simple video player with Silverlight 4. Once you have that lets make the project, We want to make a Silverlight Application and after naming your project, on the next dialogue select Silverlight 4 from the combo box.


The Pre-created code for our project should look like this:

<UserControl x:Class="SilverlightApplication3.MainPage"

    xmlns="http://schemas.microsoft.com/winfx/2006/xaml/presentation"

    xmlns:x="http://schemas.microsoft.com/winfx/2006/xaml"

    xmlns:d="http://schemas.microsoft.com/exp<b></b>ression/blend/2008"

    xmlns:mc="http://schemas.openxmlformats.org/markup-compatibility/2006"

    mc:Ignorable="d"

    d:DesignHeight="300" d:DesignWidth="400">
 
    <Grid x:Name="LayoutRoot" Background="White">

    </Grid>

</UserControl>

However, We don't need all those links, We only need a couple they are
view sourceprint?

xmlns="http://schemas.microsoft.com/winfx/2006/xaml/presentation"

   xmlns:x="http://schemas.microsoft.com/winfx/2006/xaml"

So you can delete the others, Once you have your code should look like this:
view sourceprint?

<UserControl x:Class="SilverlightApplication3.MainPage"

    xmlns="http://schemas.microsoft.com/winfx/2006/xaml/presentation"

    xmlns:x="http://schemas.microsoft.com/winfx/2006/xaml">

    <Grid x:Name="LayoutRoot" Background="White">
        
    </Grid>

</UserControl>

After that minor tweak, We now need to add a Canvas tag to hold all of our video player elements together for us, To do this we need to put the <Canvas> Tag between the <Grid> Tags.

    <Grid x:Name="LayoutRoot" Background="White">

    <Canvas Name="Holder" Width="350" Height="220" Background="Black">

    </Canvas>

</Grid>


These properties of the Canvas are very common in our project, All our elements will have a Name, A Height and a Width. They are measured in Pixels so you can easily make this pixel-perfect if you want to. The name is what we use to address the element of the project, We will need this later on. So We have in effect a black shape. We now need to add the video in, to do this we need to use the <MediaElement> tag. This have three main properties that we need in addition to a Name, Width and Height we need the Source, Volume and AutoPlay settings.

- The source is what we want the media element to find and play, In our case the video is at media/media.wmv so, Our source would look like this

Source="media/media.wmv"

- The volume setting is pretty self explanitoriy so we will set it to 100 for this tutorial.
- The AutoPlay setting has two values, True or False, It determines if the video should automatically play when it has loaded, for this tutorial we will set it to False.

So after all that, Our MediaElement Code should look like this

<MediaElement Name="Video" Source="media/media.wmv" AutoPlay="False" Volume="100" />

I have named the element video so that we will not get confused to it's function later on in the tutorial.
Right ok, Now we have a video lets add some controls so that we can control it.  Using the resources I have provided, We will add a new image tag into our code, this will be our Play Button.

The code for this will be like so;

<Image Name="btnPlay" Height="17" Width="49" Source="media/play.png" />

As you can see, The element has a name, height, width and source. Because we have put all our resources into a folder in the project called media we always address the image as media/play.png instead of just play.png

We can also add other properties to this, As well as position it. To do so we will change the opacity to 0.4 and move it 220 pixels down from the canvas so we can see the button clearly. So, The code will now look like this;

<Image Name="btnPlay" Height="17" Width="49" Source="media/play.png" Opacity="0.4" Canvas.Top="220" />

The Opacity property can be any value between 0 and 1.

Right, We have an image that doesn't do anything which isn't entirely useful at the moment so lets add some code to it. Open the event window while the image is selected and find the event for MouseLeftButtonDown this is silverlights version of click. It will take you to the code behind the project for that event and this bit is very simple, the only code we need to put in this bit is Video.Play(); and thats all, That will make the video play! easy!

If your confused where to put it, this is what it should look like:

private void btnPlay_MouseLeftButtonDown(object sender, MouseButtonEventArgs e)

       {

           Video.Play();

       }

You may notice that the source of the media element has an error on it, To fix this you find the media.wmv in the media folder and change it's Build Action to Resource and it will work fine.
You can run it now and the video will play.


HostForLIFE.eu Silverlight 4 Hosting
HostForLIFE.eu revolutionized hosting with Plesk Control Panel, a Web-based interface that provides customers with 24x7 access to their server and site configuration tools. Plesk completes requests in seconds. It is included free with each hosting account. Renowned for its comprehensive functionality - beyond other hosting control panels - and ease of use, Plesk Control Panel is available only to HostForLIFE's customers. They offer a highly redundant, carrier-class architecture, designed around the needs of shared hosting customers.


Silverlight 4 Hosting - HostForLIFE.eu :: How to Upload File In Silverlight?

clock April 5, 2016 21:06 by author Anthony

Today, I will eplain about a simple way to upload file in Silverlight. Uploading files is quite an easy one in Silverlight: it’s basically just a request made to another server and the file contents are passed in this request. A possible way of implementing this is by using the WebClient class:

private void UploadFile()
{
FileStream _data; // The file stream to be read
string uploadUri;
 
byte[] fileContent = new byte[_data.Length]; // Read the contents of the stream into a byte array
int bytesRead = _data.Read(fileContent, 0, CHUNK_SIZE);
 
WebClient wc = new WebClient();
wc.OpenWriteCompleted += new OpenWriteCompletedEventHandler(wc_OpenWriteCompleted);
Uri u = new Uri(uploadUri);
wc.OpenWriteAsync(u, null, new object[] { fileContent, bytesRead }); // Upload the file to the server
}
 
void wc_OpenWriteCompleted(object sender, OpenWriteCompletedEventArgs e) // The upload completed
{
if (e.Error == null)
{
  // Upload completed without error
}

The above solution does the job of uploading the file well. However it does not indicate file upload progress at all: when uploading large files or when having slow internet connection this behaviour would be desirable.

Silverlight has no built-in way to monitor the number of bytes sent which means that the only way to indicate upload progress is sending the file to the server in multiple, smaller chunks. Of course this behaviour needs support from the server side as well.

The idea is that multiple calls are made to the server, every call submitting the next chunk of the file. On the server these chunks are appended to the file.


Silverlight Code Snippet

public const int CHUNK_SIZE = 4096;
public const string UPLOAD_URI = "http://localhost:55087/FileUpload.ashx?filename={0}&append={1}";
private Stream _data;
private string _fileName;
private long _bytesTotal;
private long _bytesUploaded;
private void UploadFileChunk()
{
    string uploadUri = ""; // Format the upload URI according to wether the it's the first chunk of the file
    if (_bytesUploaded == 0)
    {
        uploadUri = String.Format(UPLOAD_URI,_fileName,0); // Dont't append
    }
    else if (_bytesUploaded < _bytesTotal)
    {
        uploadUri = String.Format(UPLOAD_URI, _fileName, 1); // append
    }
    else
    {
        return;  // Upload finished
    }
    byte[] fileContent = new byte[CHUNK_SIZE];
    _data.Read(fileContent, 0, CHUNK_SIZE);
    WebClient wc = new WebClient();
    wc.OpenWriteCompleted += new OpenWriteCompletedEventHandler(wc_OpenWriteCompleted);
    Uri u = new Uri(uploadUri);
    wc.OpenWriteAsync(u, null, fileContent);
    _bytesUploaded += fileContent.Length;
}
void wc_OpenWriteCompleted(object sender, OpenWriteCompletedEventArgs e)
{
    if (e.Error == null)
    {  
        object[] objArr = e.UserState as object[];
        byte[] fileContent = objArr[0] as byte[];
        int bytesRead = Convert.ToInt32(objArr[1]);
        Stream outputStream = e.Result;
        outputStream.Write(fileContent, 0, bytesRead);
        outputStream.Close();
        if (_bytesUploaded < _bytesTotal)
        {
            UploadFileChunk();
        }
        else
        {
            // Upload complete
        }
    }
}

Since Silverlight is a client side technology the server side can be implemented in any language. In this example I’ve created .NET and PHP support for the server side.


.NET Server Side Code Snippet

public const int CHUNK_SIZE = 4096;
public const string UPLOAD_URI = "http://localhost:55087/FileUpload.ashx?filename={0}&append={1}";
private Stream _data;
private string _fileName;
private long _bytesTotal;
private long _bytesUploaded;
private void UploadFileChunk()
{
    string uploadUri = ""; // Format the upload URI according to wether the it's the first chunk of the file
    if (_bytesUploaded == 0)
    {
        uploadUri = String.Format(UPLOAD_URI,_fileName,0); // Dont't append
    }
    else if (_bytesUploaded < _bytesTotal)
    {
        uploadUri = String.Format(UPLOAD_URI, _fileName, 1); // append
    }
    else
    {
        return;  // Upload finished
    }
    byte[] fileContent = new byte[CHUNK_SIZE];
    _data.Read(fileContent, 0, CHUNK_SIZE);
    WebClient wc = new WebClient();
    wc.OpenWriteCompleted += new OpenWriteCompletedEventHandler(wc_OpenWriteCompleted);
    Uri u = new Uri(uploadUri);
    wc.OpenWriteAsync(u, null, fileContent);
    _bytesUploaded += fileContent.Length;
}
void wc_OpenWriteCompleted(object sender, OpenWriteCompletedEventArgs e)
{
    if (e.Error == null)
    {  
        object[] objArr = e.UserState as object[];
        byte[] fileContent = objArr[0] as byte[];
        int bytesRead = Convert.ToInt32(objArr[1]);
        Stream outputStream = e.Result;
        outputStream.Write(fileContent, 0, bytesRead);
        outputStream.Close();
        if (_bytesUploaded < _bytesTotal)
        {
            UploadFileChunk();
        }
        else
        {
            // Upload complete
        }
    }
}

PHP Server Side Code Snippet

<?php
//  This is the most basic of scripts with no try catches
$filename = isset($_REQUEST["filename"]) ? $_REQUEST["filename"] : "jjj";
$append = isset($_REQUEST["append"]);
try
{
    if(!$append)
        $file = fopen($filename,"w");
    else
        $file = fopen($filename,"a");
    $input = file_get_contents ("php://input");
    fwrite($file,$input);
    fclose($file);
}
catch (Exception $e)
{
    echo 'Caught exception: ',  $e->getMessage(), "\n";
}
?>

Notes : Before running the project, set the UPLOAD_URI variable to point to the appropriate .asmx or .php file. The script is not suited for production environment because of the following:
Files are uploaded directly to the root directory of the web application. The files are created and constantly appended to. A more desirable approach would be to store the unfinished files in a temp folder until upload is complete and then move them to the upload folder


HostForLIFE.eu Silverlight 4 Hosting
HostForLIFE.eu revolutionized hosting with Plesk Control Panel, a Web-based interface that provides customers with 24x7 access to their server and site configuration tools. Plesk completes requests in seconds. It is included free with each hosting account. Renowned for its comprehensive functionality - beyond other hosting control panels - and ease of use, Plesk Control Panel is available only to HostForLIFE's customers. They offer a highly redundant, carrier-class architecture, designed around the needs of shared hosting customers.


Silverlight 5 Hosting - HostForLIFE.eu :: How to Resolve and Avoid Crashes in Silverlight 5?

clock March 30, 2016 20:26 by author Anthony

Some websites require a plugin to display its content properly. When a web page containing a particular contains, eat plugin will automatically run and execute the code and render the content that is specifically aimed at the area of the web. One plugin that can do this is Silverlight. Silverlight is a product of Microsoft. Microsoft Silverlight is a cross-browser plug-in powered by the .NET that allows you to view certain multimedia such as high quality video or interactive web. But when you have problem with the content of the video or interactive web browsing, you may need updating or need to install Microsoft Silverlight on your device. Sometimes a web browser crashes can be caused by Silverlight that is not functioning properly.

If that happens, then it must be overcome so that web browsers can work as usual. So in this article, I will discuss about how to cope with a crash on the Silverlight plugin, and also how to prevent Silverlight from crashing.

STEP 1

Make sure the Silverlight plugin has been installed properly. Please try to run your web browser, and download Silverlight. Once downloaded, run the installation file. If completed please close your web browser and then run it back to see to it whether the issue has been resolved.

STEP 2

Try to reset Internet Explorer Internet Privacy Settings. Click Tools> Internet Options> Privacy, and select Sites. Then simply enter the URL of the web that you want to visit that requires the Silverlight application. Then click OK. Then please restart Internet Explorer to test Silverlight.

STEP 3

Disable the Silverlight plugin from Google Chrome your web browser, then restart your browser. Type about: plugins in the address bar. Then click the Disable button that is located next to Microsoft Silverlight. Then close the plugin tab, repeat this process and then click Enable to restart Silverlight.

STEP 4

Change the name of the file MSPR.HDS associated with Silverlight. Run Windows Explorer on your computer, open the file C:\ProgramData\Microsoft\PlayReady. Then click on MSPR.HDS file, right click and select "Rename", please rename the file with the name you want.

STEP 5

Close your web browser, and then try to run it again to test Silverlight.


How To Prevent Silverlight from crashes?

Google Chrome users may not be able to enjoy this plugin automatically. To overcome this problem can perform the following steps so that you can enjoy Silverlight in Google Chrome

  • Open your Google Chrome browser, type chrome://banners/#enable-NPAPI in the address bar and press enter.
  • Click Enable.
  • If you are using Silverlight in websites such as Netflix, Amazon Instant Video, you only need to right click on the content in question and select Run this plugin.
  • Now you can experience the difference when using Microsoft Silverlight plugin.


HostForLIFE.eu Silverlight 5 Hosting

HostForLIFE.eu revolutionized hosting with Plesk Control Panel, a Web-based interface that provides customers with 24x7 access to their server and site configuration tools. Plesk completes requests in seconds. It is included free with each hosting account. Renowned for its comprehensive functionality - beyond other hosting control panels - and ease of use, Plesk Control Panel is available only to HostForLIFE's customers. They offer a highly redundant, carrier-class architecture, designed around the needs of shared hosting customers.


About HostForLIFE.eu

HostForLIFE.eu is European Windows Hosting Provider which focuses on Windows Platform only. We deliver on-demand hosting solutions including Shared hosting, Reseller Hosting, Cloud Hosting, Dedicated Servers, and IT as a Service for companies of all sizes.

We have offered the latest Windows 2016 Hosting, ASP.NET Core 2.2.1 Hosting, ASP.NET MVC 6 Hosting and SQL 2017 Hosting.


Tag cloud

Sign in