European Silverlight 4 & Silverlight 5 Hosting BLOG

BLOG about Silverlight 5 Hosting and Its Techologies - Dedicated to European Windows Hosting Customer

European Cloud Silverlight 5 Hosting – HostForLIFE.eu :: How to Set Focus Control in Silverlight 5

clock September 1, 2014 12:42 by author Onit

In this article I will going to show you about focusing any element in Silverlight, Silverlight 5 is an application framework for writing and running rich Internet applications, with features and purposes similar to those of Adobe Flash. Just supposed that we had a login panel as he very first screen after validation we will navigate to another page. So when I am talking about the login panel we will have two input fields (textboxes) to insert username and password and looking from thge user's point of view we want that the username textbox field is to be focused.


Create a Silverlight Application

Before we jump more into the content about focus control first we should create a Silverlight application, just named it (for example: "FocusingControlInSilverlightApplication", use one textbox, passwordbox and button for the login interface.

It will looked like below:

Set Focus to the username textbox

So as we know we have a function something like Focus() to make it focused but it is not going to work for the very first time. Here is the reason, when we will run the application the Silverlight Plugin is not yet focused. Unless until we focus that Plugin in we can't focus any control in Silverlight application. To make it happen we have to simply add a single line of code on the loaded event which will look like and focus the Plugin

public MainPage()
        {
            InitializeComponent();

            this.Loaded += new RoutedEventHandler(MainPage_Loaded);
        }

        void MainPage_Loaded(object sender, RoutedEventArgs e)
        {
            //First focus the silverlight plogin and than focus the control.
            HtmlPage.Plugin.Focus(); (1)
            userNameTextBox.Focus();(2)
        }

Line one is focusing the Silverlight Plugin.
Focus that element.
But we need to add the following to the namespace import section.


using System.Windows.Browser;


Now run the application and you will find the control focused.

Once the Silverlight Plugin is focused, the simple Focus() function will work. Suppose we want to set the focus to the passwordbox; now after the Silverlight Plugin is focused so any event let say we add a focus button beside the login button and on click event of that button let's add the following

void focusButton_Click(object sender, RoutedEventArgs e)
        {
            //After Silverlight Plug in is focused
            passwordTextBox.Focus();
        }

And the screen will look like:

Click on the focus button and your passwordTextBox will be focused; the reason being is we have already focused the Plugin.

I just want to point to that since our login page is the very first page so we need to focus it using code behind. If suppose you have already clicked any of the Silverlight controls or the page itself, we have gotten the Plugin focused; after that if we want to focus any control, we can simply use the control.Focus() method.

Alternative

We do have an alternative to focus the Plugin at the very first moment of page load. As we know for every Silverlight application we get a .aspx and .html page created automatically.

This page has got the .xap file integrated in them which looks like:

<body>

    <form id="form1" runat="server" style="height:100%">
    <div id="silverlightControlHost">
        <object id="focusingControlInSilverlightApplicationTestPageXaml"  data="data:application/x-silverlight-2," type="application/x-silverlight-2" width="100%" height="100%">
                     <param name="source" value="ClientBin/FocusingControlInSilverlightApplication.xap"/>
                     <param name="onError" value="onSilverlightError" />
                     <param name="background" value="white" />
                     <param name="minRuntimeVersion" value="4.0.50826.0" />
                     <param name="autoUpgrade" value="true" />
                     <a href="http://go.microsoft.com/fwlink/?LinkID=149156&v=4.0.50826.0" style="text-decoration:none">
                               <img src="http://go.microsoft.com/fwlink/?LinkId=161376" alt="Get Microsoft Silverlight" style="border-style:none"/>
                     </a>
              </object><iframe id="_sl_historyFrame" style="visibility:hidden;height:0px;width:0px;border:0px"></iframe></div>
    </form>
</body>


Including some JavaScript. So let's include the id attribute for the object tag and give some name; in my case it is "focusingControlInSilverlightApplicationTestPageXaml" and add the following function to the JavaScript section:


function FocusPlugin() {

            document.getElementById('focusingControlInSilverlightApplicationTestPageXaml').focus();
}

And on the body part of HTML add the following:


<body onload="FocusPlugin()">


This will do the work; you don't need to write anything in the code behind. At the very first moment when the .aspx or .html (test pages) loads it will focus the corresponding Plugin and there after only control.focus() method will focus the control.


European HostForLIFE.eu Proudly Launches WordPress 4.0 Hosting

clock September 1, 2014 09:12 by author Peter

HostForLIFE.eu proudly launches the support of WordPress 4.0 on all our newest Windows Server environment. On WordPress 4.0 hosted by HostForLIFE.eu, you can try our new and improved features that deliver extremely high levels of uptime and continuous site availability start from €3.00/month.

WordPress is a flexible platform which helps to create your new websites with the CMS (content management system). There are lots of benefits in using the WordPress blogging platform like quick installation, self updating, open source platform, lots of plug-ins on the database and more options for website themes and the latest version is 4.0 with lots of awesome features.

WordPress 4.0 was released in August 2014, which introduces a brand new, completely updated admin design: further improvements to the editor scrolling experience, especially when it comes to the second column of boxes, better handling of small screens in the media library modals, A separate bulk selection mode for the media library grid view, visual tweaks to plugin details and customizer panels and Improvements to the installation language selector.

HostForLIFE.eu is a popular online WordPress 4.0 hosting service provider catering to those people who face such issues. The company has managed to build a strong client base in a very short period of time. It is known for offering ultra-fast, fully-managed and secured services in the competitive market.

Another wonderful feature of WordPress 4.0 is that it uses vector-based icons in the admin dashboard. This eliminates the need for pixel-based icons. With vector-based icons, the admin dashboard loads faster and the icons look sharper. No matter what device you use, whether it’s a smartphone, tablet, or a laptop computer, the icons actually scale to fit your screen.

WordPress 4.0 is a great platform to build your web presence with. HostForLIFE.eu can help customize any web software that company wishes to utilize. Further information and the full range of features WordPress 4.0 Hosting can be viewed here http://hostforlife.eu/European-WordPress-4-Hosting

About Company
HostForLIFE.eu is European Windows Hosting Provider which focuses on Windows Platform only. We deliver on-demand hosting solutions including Shared hosting, Reseller Hosting, Cloud Hosting, Dedicated Servers, and IT as a Service for companies of all sizes.


Comparison of Windows ASP.NET Hosting between HostForLIFE.eu Hosting Platform and Windows Azure Platform

clock August 25, 2014 11:13 by author Peter

Given the length of this review and the number of plans, it is unrealistic to compare everything of them one by one. As usual, the review focuses on price, features, uptime & speed as well as customer support. Before starting our detailed comparison, we’d like to share with you the overall ratings of the plans based on our first-hand hosting experience and large-sampled customer reviews.

Please refer to this table for more differences and similarities.


HostForLIFe.EU

Windows Azure


Price

€3.00/month

$76 / month

Website

Unlimited

100

Disk Space

Unlimited

1 GB

Bandwidth

Unlimited

Unlimited

1 SQL Server Size

Include 50MB

0 to 100 MB = $ 5.041/mo

Server Features

Include 4 GB RAM or higher

768 MB = $16/month

SLA

99.90%

99.90%

ASP.NET 4.5.2 / ASP.NET 4.5.1

Yes

Yes

ASP.NET 4.5 / ASP.NET 4.0

Yes

Yes

ASP.NET 3.5 / ASP.NET 2.0 / ASP.NET 1.1

Yes

Yes

Classic ASP

Yes

Yes

ASP.NET MVC 6.0 / 5.2 / MVC 5.1.2 / MVC 5.1.1 / MVC 5.0

Yes

Yes

ASP.NET MVC 4.0 / MVC 3.0 / MVC 2.0

Yes

Yes

WordPress

Yes

Yes

Umbraco

Yes

Yes

Joomla

Yes

Yes

Drupal

Yes

Yes

Node.js

Yes

Yes

PHP 5

Yes

Yes

Conclusion
Both companies are able to provide brilliant Windows hosting service. If a choice has to be made, we recommend HostForLIFE.eu as your web host because the price is more reasonable, features more complete and the performance and our technical support are awesome.To learn more about HostForLIFE.eu web hosting, please visit http://www.hostforlife.eu


European Silverlight 5 Hosting – HostForLIFE.eu :: Tips - The Easiest way to Reading URL-Parameters in Silverlight

clock August 15, 2014 08:38 by author Onit

In this guide we will showed you how to read the URL-Parameters in Silverlight this article will showed you the easiest way to read it. In CRM there is a setting that you can “pass-param”. If you are on a CRM Form you get keys like “typename” and “id”.

Below is the Complete list of CRM:

Parameter

Name

Description

typename

Entity Name

Name of the entity

type

Entity Type Code

Integer that uniquely identifies the entity in a specific organization

id

Object GUID

GUID that represents a record.

orgname

Organization Name

Unique name of the organization.

userlcid

User Language Code

Language code identifier that is being used by the current user.

orglcid

Organization Language Code

Language code identifier that represents the base language for the organization.


For Example is like

[something].aspx?id=%7bB2232821-A775-DF11-8DD1-00155DBA3809%7d&orglcid=1033&orgname=adventureworkscycle&type=1&typename=account&userlcid=1033

If you have the Silverlight in the Sitemap you don’t get (of course), typename, type and id. You can read them in your Silverlight:

IDictionary<string, string> QueryString = HtmlPage.Document.QueryString;
 string orgname, entityname;

 if (QueryString.ContainsKey("orgname"))
     orgname = QueryString["orgname"];

 if (QueryString.ContainsKey("typename"))
     entityname = QueryString["typename"];


European Silverlight 5 Hosting – HostForLIFE.eu :: How to Create Multi-Click Event in Silverlight 5

clock August 6, 2014 07:22 by author Onit

Silverlight 5 has given us a new property in the MouseButtonEventArgs called Click Count. Before the release of this Silverlight 5, there are no implementation of “double click” event, you need to write your code to implement that. But instead of giving double click event, the Silverlight gave us the ability to tracking how much clicking we done. But there’s a limitation of the clickcount, and in this article will look at creating a solution to resolve it.

Implement ClickCount

For this post we will be using a simple test harness that look like this:
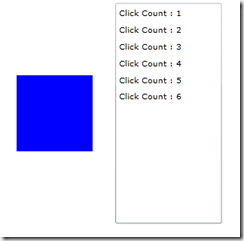
The blue box on the left is going to be our click area.  The right side is a simple ListBox with the ItemsSource set to an ObservableCollection<string>.  And here is what the XAML looks like:

<Grid x:Name="LayoutRoot" Background="White">
    <Grid.ColumnDefinitions>
        <ColumnDefinition/>
        <ColumnDefinition/>
    </Grid.ColumnDefinitions>
       
    <Rectangle Fill="Blue"
               Width="100"
               Height="100"
               VerticalAlignment="Center"
               HorizontalAlignment="Center"/>
       
    <ListBox x:Name="lbClicks"
             Margin="5,5,5,5"
             HorizontalAlignment="Stretch"
             VerticalAlignment="Stretch"
             Grid.Column="1"/>
</Grid>

You can use the code below for the code behind that xaml

private ObservableCollection<string> _events =
             new ObservableCollection<string>();
public MainPage()
{
    InitializeComponent();
    lbClicks.ItemsSource = _events;
}

look at the first example. To track the ClickCount we need to add the MouseLeftButtonDown event. Add the code below to our rectangle in XAML:

<Rectangle Fill="Blue"
            Width="100"
            Height="100"
            VerticalAlignment="Center"
            HorizontalAlignment="Center"         
MouseLeftButtonDown="Rectangle_MouseLeftButtonDown"/>

In our event handler, we can easily track the click count by adding a new string to our _events collection.  You will notice that the ClickCount will increase each time you click the mouse button if you are quick enough.  Pause in the clicking for a moment and the ClickCount will reset!.

private void Rectangle_MouseLeftButtonDown(object sender,
                                  MouseButtonEventArgs e)
{
       _events.Add("Click Count : " + e.ClickCount);
}

You can see that we can track a double click or triple click or a click-15 if we want.
All we would need to add is a conditional statement based off of the ClickCount property.

if(e.ClickCount == 2)

{
  MessageBox.Show("Double click");
}

Issue

however, While this is an interesting solution for the missing functionality, it does have a missing component that will cause you some grief.  Instead of our conditional statement that we had above, what if our code looked something like this:

if(e.ClickCount == 1)
{
  MessageBox.Show("Single click");
}
else if(e.ClickCount == 2)
{
  MessageBox.Show("Double click");}
}

If you run this code, you will notice that you will never fire the “Double click” MessageBox.  This is because the moment the first MessageBox is displayed, the focus is taken away from our rectangle and thus the ClickCount is started over when we come back to it.  This means that attempting to implement two events is a bit tricky.

How to make it worked!

So How to track multiple click?  You need to write some code.  In order to create a reusable solutionwe decide to implement solution as a behavior.  This will allow us to add a multiple click handler to any UIElement in XAML without having to do a bunch of wiring.  However, the code is straight forward enough you can easily remove it and create your own reusable solution.

Every time a user clicks on your object a DispatcherTimer is stopped and then started.  In addition we track the latest sender object and the ClickCount.  Once the user stops clicking on your object, the DispatcherTimer is allowed to hit the Click event and we fire an event giving the latest ClickCount and the sending object.

Our code for the behavior will looks like this:
public class MultiClick : Behavior<UIElement>

{
    private DispatcherTimer _timer;
    private int _clickCount;
    private object _sender;

    public MultiClick()
    {
        _timer = new DispatcherTimer()
             {Interval = new TimeSpan(0, 0, 0, 0, 250)};
        _timer.Tick += _timer_Tick;
    }

    #region events and delegates

    public delegate void MouseMultiClickHandler(object sender,
                                              int clickCount);
    public event MouseMultiClickHandler MouseMultiClick;

    #endregion

    #region Behavior Overrides
    protected override void OnAttached()
    {
        base.OnAttached();
        AssociatedObject.MouseLeftButtonDown
        += AssociatedObject_MouseLeftButtonDown;
    }

    protected override void OnDetaching()
    {
        base.OnDetaching();
        AssociatedObject.MouseLeftButtonDown
        -= AssociatedObject_MouseLeftButtonDown;
    }
    #endregion

    #region EventHandlers

    void _timer_Tick(object sender, EventArgs e)
    {
        _timer.Stop();

        if (MouseMultiClick != null)
            MouseMultiClick(_sender, _clickCount);
    }

    void AssociatedObject_MouseLeftButtonDown(object sender,
                                   MouseButtonEventArgs e)
    {
        _timer.Stop();
        _clickCount = e.ClickCount;
        _sender = sender;
        _timer.Start();

    }

    #endregion

}

The OnAttached/OnDetaching methods are how the Behavior is attached to the object, an UIElement is our case.  The AssociatedObject is simply to object that the Behavior is attached to.  As we discussed before, the DispatcherTimer is stopped and started when the user clicks on the object.  Once the DispatcherTimer hits the Click event, it(dispatcher time) will stop stopped, a MouseMultiClick event is fired and the Behavior waits for the next MouseLeftButtonDown event.

**Note: Its important to set the time at 200 milliseconds. And no longer than that you may get unexpected results.

This is how we use our behavior, Here is what are Rectangle looks like with our Behavior.  I have also removed the MouseLeftButtonDown event.

<Rectangle Fill="Blue"
            Width="100"
            Height="100"
            VerticalAlignment="Center"
            HorizontalAlignment="Center">
    <i:Interaction.Behaviors>
        <local:MultiClick MouseMultiClick="MultiClick_MouseMultiClick"/>
    </i:Interaction.Behaviors>
</Rectangle>

You can see we attached to the MouseMultiClick event we created in our Behavior.  The code behind is pretty much identical to our original code behind, where we are simply tracking the event:

private void MultiClick_MouseMultiClick(object sender,
                                       int clickCount)
{
    _events.Add("Multi Click : " + clickCount);
}
  If you run the project again, you will now see that instead of getting an event for every click, you only get one event for each round of clicking.  So you can track single, double, triple, etc.  From there you can implement your code based on your project needs.


HostForLIFE.eu Proudly Launches New Data Center in London (UK) and Seattle (US)

clock July 15, 2014 10:44 by author Peter

HostForLIFE.eu, a leading Windows web hosting provider with innovative technology solutions and a dedicated professional services team proudly announces New Data Center in London (UK) and Seattle (US) for all costumers. HostForLIFE’s new data center in London and Seattle will address strong demand from customers for excellent data center services in Europe and United States, as data consumption and hosting services experience continued growth in the global IT markets.

The new facility will provide customers and their end users with HostForLIFE.eu.com services that meet in-country data residency requirements. It will also complement the existing HostForLIFE.eu. The London and Seattle data center will offer the full range of HostForLIFE.eu.com web hosting infrastructure services, including bare metal servers, virtual servers, storage and networking.

"Our expansion into London and Seattle gives us a stronger European and American market presence as well as added proximity and access to our growing customer base in region. HostForLIFE.eu has been a leader in the dedicated Windows & ASP.NET Hosting industry for a number of years now and we are looking forward to bringing our level of service and reliability to the Windows market at an affordable price,” said Kevin Joseph, manager of HostForLIFE.eu, quoted in the company's press release.

The new data center will allow customers to replicate or integrate data between London and Seattle data centers with high transfer speeds and unmetered bandwidth (at no charge) between facilities. London and Seattle, itself, is a major center of business with a third of the world’s largest companies headquartered there, but it also boasts a large community of emerging technology startups, incubators, and entrepreneurs.

For more information about new data center in London and Seattle, please visit http://www.HostForLIFE.eu

About Company
HostForLIFE.eu is European Windows Hosting Provider which focuses on Windows Platform only. We deliver on-demand hosting solutions including Shared hosting, Reseller Hosting, Cloud Hosting, Dedicated Servers, and IT as a Service for companies of all sizes.


Silverlight 5 Hosting Germany - HostForLIFE.eu :: How to access controls in DataGrid TemplateColumn header?

clock June 12, 2014 08:36 by author Peter

A data grid view is a rectangular control made of columns and rows. I have a DataGrid where I have included some controls in column header. Each column is a Template column. These controls appear just below the column header which are used for entering filter information. Here's the issue on my code on Silverlight 5.

VisualTreeHelper class helps to iterate through the visual tree of the xaml. Using it we can find the child and parent controls of the rendered controls. Lets check the Visual Tree of the rendered control using Silverlight Spy.

The Following Method do a search over the child controls with in a control recursively and returns the control based on Name.

private object GetChildControl(DependencyObject parent, string controlName)


    Object tempObj = null;
    int count = VisualTreeHelper.GetChildrenCount(parent);
    for (int counter = 0; counter < count; counter++)
    {
        //Get The Child Control based on Index
        tempObj = VisualTreeHelper.GetChild(parent, counter);
        //If Control's name Property matches with the argument control
        //name supplied then Return Control
        if ((tempObj as DependencyObject).GetValue(NameProperty).ToString() == controlName)
            return tempObj;
        else //Else Search Recursively
        {
            tempObj = GetChildControl(tempObj as DependencyObject, controlName);
            if (tempObj != null)
                return tempObj;
        }
    }
    return null;
}

Make sure that the same has to be delegated to UI thread using Dispatcher.As the controls created using UI Thread can not be accessed from other thread.
//Access the Grid Header Controls
Dispatcher.BeginInvoke(delegate
{
    var hyperlinkControl = GetChildControl(dataGrid1, "hlSort");
    var checkControl = GetChildControl(dataGrid1, "chkSelectAll");
});


Silverlight 5 Hosting Germany - HostForLIFE.eu :: How to access controls in DataGrid TemplateColumn header?

clock June 12, 2014 08:36 by author Peter

A data grid view is a rectangular control made of columns and rows. I have a DataGrid where I have included some controls in column header. Each column is a Template column. These controls appear just below the column header which are used for entering filter information. Here's the issue on my code on Silverlight 5.

VisualTreeHelper class helps to iterate through the visual tree of the xaml. Using it we can find the child and parent controls of the rendered controls. Lets check the Visual Tree of the rendered control using Silverlight Spy.

The Following Method do a search over the child controls with in a control recursively and returns the control based on Name.

private object GetChildControl(DependencyObject parent, string controlName)

    Object tempObj = null;
    int count = VisualTreeHelper.GetChildrenCount(parent);
    for (int counter = 0; counter < count; counter++)
    {
        //Get The Child Control based on Index
        tempObj = VisualTreeHelper.GetChild(parent, counter);
        //If Control's name Property matches with the argument control
        //name supplied then Return Control
        if ((tempObj as DependencyObject).GetValue(NameProperty).ToString() == controlName)
            return tempObj;
        else //Else Search Recursively
        {
            tempObj = GetChildControl(tempObj as DependencyObject, controlName);
            if (tempObj != null)
                return tempObj;
        }
    }
    return null;
}

Make sure that the same has to be delegated to UI thread using Dispatcher. As the controls created using UI Thread can not be accessed from other thread.
//Access the Grid Header Controls
Dispatcher.BeginInvoke(delegate
{
    var hyperlinkControl = GetChildControl(dataGrid1, "hlSort");
    var checkControl = GetChildControl(dataGrid1, "chkSelectAll");
});


HostForLIFE.eu Announces Release of Cheap Dedicated Windows Cloud Server Hosting Plans

clock June 3, 2014 09:08 by author Peter

European leading web hosting provider, HostForLIFE.eu announced cheap dedicated Windows cloud server due to high demand of Windows cloud server users in Europe.

Windows & ASP.NET hosting provider HostForLIFE.eu announced cheap dedicated Windows cloud server hosting plans. HostForLIFE.eu offers the ultimate performance and flexibility at an economical price for windows cloud server. HostForLIFE.eu cheap dedicated Windows cloud server hosting plans starts from just as low as €16.00/month only.

HostForLIFE.eu provisions all dedicated Windows Cloud Server in just few minutes (upon payment verification and completion). HostForLIFE.eu has a very strong commitment to introduce their Cheap dedicated Windows and ASP.NET Cloud Server hosting service to the worldwide market. HostForLIFE.eu starts to target market in Europe. HostForLIFE.eu will be the one-stop cheap dedicated Windows and ASP.NET Cloud Server Hosting Solution for every ASP.NET enthusiast and developer.

HostForLIFE’s cheap dedicated Windows Dedicated Cloud Server hosting plan comes with the following features: Windows 2008R2/2012, Data Center OS Version, 1 x vCPU, 1 GB RAM, You have full root access to the server 24/7/365, 40 GB Storage (SSD), 1000 GB Bandwidth, 1000 Mbps Connection, 1 Static IP and SAN Storage.

For additional information on this cheap Windows dedicated cloud server Hosting plan, please visit http://hostforlife.eu/European-Cheap-Windows-Cloud-Server-Plans

About HostForLIFE.eu:
HostForLIFE.eu is European Windows Hosting Provider which focuses on Windows Platform only. HostForLIFE.eu deliver on-demand hosting solutions including Shared hosting, Reseller Hosting, Cloud Hosting, Dedicated Servers, and IT as a Service for companies of all sizes.

HostForLIFE.eu is awarded Top No#1 SPOTLIGHT Recommended Hosting Partner by Microsoft (see www.microsoft.com/web/hosting/HostingProvider/Details/953). Their service is ranked the highest top #1 spot in several European countries, such as: Germany, Italy, Netherlands, France, Belgium, United Kingdom, Sweden, Finland, Switzerland and other European countries. Besides this award, they have also won several awards from reputable organizations in the hosting industry and the detail can be found on their official website.


HostForLIFE.eu offers €1.29/month Affordable and High Performance Windows & ASP.NET Shared Hosting Plan

clock May 20, 2014 11:53 by author Peter

European Windows and ASP.NET hosting specialist, HostForLIFE.eu, has officially launched the new Windows & ASP.NET Shared Hosting Plan offered from as low as €1.29/month only. This LITE Windows & ASP.NET Hosting packages combine generous or 1 website, 1 GB disk space, 10 GB bandwidth, Support UTF-8 Domains, Dedicated Pool, etc. As the market for hosted solutions continues to grow, the new hosting range is designed to exceed the growing technical demands of businesses and IT professionals.

HostForLIFE.eu  is confident that their new LITE shared hosting plans will surely appeal to the personal across the world, besides the website owners and companies owning websites. The new web hosting plans will meet the requirement of high performance web hosting where one can easily update the content of a website on a regular basis. This plan is designed more for the web hobbiest needing affordable, high availability, hosting and easy backend management of windows and ASP.NET with powerful Plesk control panel.

Every day thousands of people decide to set up a website for business or personal use. New business owners and the average consumer don’t always have access to unlimited budgets. HostForLIFE.eu understand the importance of reliable hosting but are not always prepared to pay the exorbitant prices that reliable hosts charge.

For additional information about LITE Shared Hosting Plan offered by HostForLIFE.eu, please visit http://hostforlife.eu

About HostForLIFE.eu:

HostForLIFE.eu is European Windows Hosting Provider which focuses on Windows Platform only. HostForLIFE.eu  deliver on-demand hosting solutions including Shared hosting, Reseller Hosting, Cloud Hosting, Dedicated Servers, and IT as a Service for companies of all sizes.

HostForLIFE.eu is awarded Top No#1 SPOTLIGHT Recommended Hosting Partner by Microsoft (see www.microsoft.com/web/hosting/HostingProvider/Details/953). Their service is ranked the highest top #1 spot in several European countries, such as: Germany, Italy, Netherlands, France, Belgium, United Kingdom, Sweden, Finland, Switzerland and other European countries. Besides this award, They have also won several awards from reputable organizations in the hosting industry and the detail can be found on their official website.


About HostForLIFE.eu

HostForLIFE.eu is European Windows Hosting Provider which focuses on Windows Platform only. We deliver on-demand hosting solutions including Shared hosting, Reseller Hosting, Cloud Hosting, Dedicated Servers, and IT as a Service for companies of all sizes.

We have offered the latest Windows 2016 Hosting, ASP.NET Core 2.2.1 Hosting, ASP.NET MVC 6 Hosting and SQL 2017 Hosting.


Tag cloud

Sign in