European Silverlight 4 & Silverlight 5 Hosting BLOG

BLOG about Silverlight 5 Hosting and Its Techologies - Dedicated to European Windows Hosting Customer

European Silverlight Hosting - HostForLIFE.eu :: PopUp Control In Silverlight

clock April 17, 2020 07:20 by author Peter

Pop Up Control is a Visual Prompt Control provided in Silverlight. There are certain times when you need to really grab the user's attention. Maybe you need to display details about a critical error. Then you can just use this control. This visual prompt is designed to simulate a dialog box.
In our Sample Application we will just demonstrate how to use it.

Create a Silverlight Project

Figure 1.1 Creating Silverlight Project


Designing the Application

Here is an idea, we will add three images (ImageControls) to our application and on theirs LeftMouseButtonDown Event we will display the PopUp. So I have taken the help of Blend 3 to design the application. It will have 3 Images as Home, Search and Reports. The following figure displays our application.

Figure 1.2 Designing our Application
Adding a PopUp Control

This is actually disturbing; you can't find the control in the toolbox. But if you start typing the control name it will satisfy you. So I have added some controls like Border, StackPanel and Displaying Text and Button to close the PupUp.
    <Popup x:Name="myPopup" Margin="-34,0,-31,0" Grid.Row="2" Grid.Column="1" Height="78" VerticalAlignment="Bottom"  >    <Border CornerRadius="10" Background="Silver" BorderThickness="2" BorderBrush="Black"> 
        <StackPanel Margin="10"> 
                    <TextBlock x:Name="PopUpText"/> 
                    <Button x:Name="PopUpButton" Height="30" Width="90" Content="Close" Click="PopUpButton_Click" /> 
        </StackPanel> 
        </Border> 
    </Popup> 


PopUp Control has a unique property called IsOpen which returns a boolean value of either true or false. The default value is always false. With this concept in mind let's add some events and use this property to control the show of the PopUp.

Calling the PopUp Control
As we discussed earlier we can handle the display of the PopUp by using the property IsOpen. Now we will see how we have used in our sample application.
    private void PopUpButton_Click(object sender, RoutedEventArgs e) 
    { 
          myPopup.IsOpen = false; 
    } 
     
    private void Home_MouseLeftButtonDown(object sender, MouseButtonEventArgs e) 
    { 
          PopUpText.Text = "You Clicked Home"; 
          myPopup.IsOpen = true; 
    } 
     
    private void Search_MouseLeftButtonDown(object sender, MouseButtonEventArgs e) 
    { 
          PopUpText.Text = "You Clicked Search"; 
          myPopup.IsOpen = true; 
    } 
     
    private void Reports_MouseLeftButtonDown(object sender, MouseButtonEventArgs e) 
    { 
          PopUpText.Text = "You Clicked Reports"; 
          myPopup.IsOpen = true; 
    } 

Running the Application
When you click different images you will be notified by the PopUp Control.

image3.gif

Figure 1.3 PopUp is displayed

That's it, we have successfully used the PopUp Control. Enjoy Coding.


European Silverlight Hosting - Amsterdam :: Working with the Slider Control in Silverlight 5

clock November 1, 2019 09:49 by author Peter

The Slider control in Silverlight 5 is used to allow a user to select from a range of values by sliding it along a track. You can create a horizontal or vertical slider. You can specify the range of values and the precision of movement too. The Slider class that represents this control is defined in the System.Windows.Controls namespace. Some of the commonly used properties of this class are:

To demonstrate the use of the Slider control, let us create a TextBox with some text which is enlarged or shrunk depending upon the slider value. Create a Silverlight 5 application and replace the Grid tag with the Canvas tag. Drag and drop the Slider from the Toolbox into your XAML code (between the Canvas tags). Also drag and drop an TextBox control. The sole reason for using a TextBox here instead of TextBlock is that a TextBlock does not support the Background property and we wish to specify a background here for the control containing the text.

Configure the properties of the controls as shown below:

<UserControl x:Class="Imager.MainPage"
    xmlns="http://schemas.microsoft.com/winfx/2006/xaml/presentation"
    xmlns:x="http://schemas.microsoft.com/winfx/2006/xaml"
    xmlns:d="http://schemas.microsoft.com/expression/blend/2008" xmlns:mc="http://schemas.openxmlformats.org/markup-compatibility/2006"
      mc:Ignorable="d" d:DesignWidth="640" d:DesignHeight="480">
     <Canvas x:Name="LayoutRoot" Width="640" Height="480">
         <TextBox Name="txtMsg" Canvas.Left="40" Canvas.Top="30" Height="22" Width="132" Text="Silverlight Rocks!" Background="Aqua" IsReadOnly="True"  />
         <Slider Name="slider"  Background="Transparent" Height="25" Width="150" Maximum="150" Minimum="0" SmallChange="5" ValueChanged="Slider_ValueChanged" IsDirectionReversed="False" ></Slider>

     </Canvas>
</UserControl>

The code accomplishes the following:

  • Creates a canvas of height 480 and width 640
  • Creates a TextBox with the text "Silverlight Rocks!" and positions it on the canvas at 40,30 location.
  • Creates a Slider control with transparent background, maximum 150 and minimum 0, small change (precision of movement) as 5 and height and width as 25 and 150 respectively.
  • Creates an event handler for Value Changed event of Slider.

Now open the MainPage.xaml.cs and add the following code:
public partial class MainPage : UserControl

    {
        double start, end, height, width, size;
        public MainPage()
        {
             InitializeComponent();
             //original values of the slider

            start = slider.Minimum;
            end = slider.Maximum;

            //original height and width of the text box

            height = txtMsg.Height;
            width = txtMsg.Width;
            size = txtMsg.FontSize; 
        }
        private void Slider_ValueChanged(object sender, RoutedPropertyChangedEventArgs<double> e)
        {
            // If slider has reached the beginning

            if (e.NewValue == start)
            {
                txtMsg.Height = height;
                txtMsg.Width = width;
                txtMsg.FontSize = size;
            }

            //if slider has moved forward

            if (e.NewValue > e.OldValue)
            {
                txtMsg.Height = height + e.NewValue;
                txtMsg.Width = width + e.NewValue;
                txtMsg.FontSize += 1;
            }
            else //if slider has moved backward
            {
                txtMsg.Height = txtMsg.Height - (e.OldValue-e.NewValue);
                txtMsg.Width = txtMsg.Width - (e.OldValue - e.NewValue);
                txtMsg.FontSize -= 1;
            }
        }
    }

The logic in this code is self explanatory from the comments. When you build and execute your solution and move the slider, you will see the text increasing or decreasing in size. Though this was a simple demonstration, in actual scenarios, you can customize the Slider control through its various properties. You can also enhance its design characteristics in Expression Blend 4 if required.


European Silverlight Hosting - Amsterdam :: How To Control Playback of Media Using a MediaElement of Silverlight?

clock October 18, 2019 11:42 by author Peter

We can integrate media into our Silverlight pages and WPF UserControls. The MediaElement object provides several media-specific properties. The following list describes the commonly used properties.

  •     AutoPlay: Specifies whether the MediaElement should begin playing automatically. The default value is True.
  •     IsMuted: Specifies whether the MediaElement is silenced. A value of True mutes the MediaElement. The default value is False.
  •     Stretch: Specifies how video is stretched to fill the MediaElement object. Possible values are None, Uniform, UniformToFill, and Fill. The default is Fill.
  •     Volume: Specifies the volume of the MediaElement object’s audio as a value from 0 to 1, with 1 being the loudest. The default value is 0.5.

In addition to its media-specific properties, MediaElement also has all the properties of a UIElement, such as Opacity and Clip.

Controlling Media Playback
You can control media playback by using the Play, Pause, and Stop methods of a MediaElement object.
<Canvas
    xmlns="http://schemas.microsoft.com/client/2007"
        xmlns:x="http://schemas.microsoft.com/winfx/2006/xaml" Loaded="CanvasLoaded">
    <MediaElement x:Name="MyMedia" Stretch="Uniform"
        Source="/images/Silverlight_Small.wmv" Height="200" Width="200" />
  <Canvas x:Name="ButtonPanel">
      <Canvas Background="Red" Canvas.Left="10" Canvas.Top="185" Height="25" Width="50"
        MouseLeftButtonDown="StopMedia" Cursor="Hand">
        <Rectangle Height="30" Width="40" Canvas.Left="10" />
        <TextBlock Text="Stop" Canvas.Left="10" Foreground="Yellow" />
       </Canvas>
       
       <Canvas Background="Green" Canvas.Left="70" Canvas.Top="185" Height="25" Width="50"
        MouseLeftButtonDown="PlayMedia" Cursor="Hand">
        <Rectangle Height="30" Width="40" Canvas.Left="10" />
        <TextBlock Text="Play" Canvas.Left="10" Foreground="Yellow" />
       </Canvas>
       
       <Canvas Background="Blue" Canvas.Left="130" Canvas.Top="185" Height="25" Width="60"
        MouseLeftButtonDown="PauseMedia" Cursor="Hand">
        <Rectangle Height="30" Width="40" Canvas.Left="10" />
        <TextBlock Text="Pause" Canvas.Left="10" Foreground="Yellow" />
       </Canvas>
       
       <Canvas Background="Black" Canvas.Left="10" Canvas.Top="215" Height="25" Width="180"
        MouseLeftButtonDown="ToggleFullScreen" Cursor="Hand">
        <Rectangle Height="30" Width="40" Canvas.Left="10" />
        <TextBlock Text="Full Screen" Canvas.Left="55" Foreground="Yellow" />
       </Canvas>
    </Canvas>
  </Canvas>    

// --------- JavaScript Code to control the Media object -------------
// Fires when Canvas is loaded
function CanvasLoaded(sender, args)
{
    var canvas = sender.getHost();
    canvas.content.onfullScreenChange = onFullScreenChanged;                            
}
// Fires when Full screen is changed
function onFullScreenChanged(sender, args)
{
    var canvas = sender.getHost();
    var buttonPanel = sender.findName("ButtonPanel");
    // Change the opacity of the button panel so that in the full screen it disappears and in normal screen it appears
    if (canvas.content.fullScreen == true)
        buttonPanel.opacity = 0;
    else
        buttonPanel.opacity = 1;
    // change the media object height and width to the canvas height and width
    var media = sender.findName("MyMedia");
    media.width = canvas.content.actualWidth;
    media.height = canvas.content.actualHeight;
}
//Fires when Full Screen button is clicked
function ToggleFullScreen(sender, args)
{
    var canvas = sender.getHost();
    canvas.content.fullScreen = !canvas.content.fullScreen;
}
// Fires when Stop button is clicked
function StopMedia(sender, args)
{
    sender.findName("MyMedia").stop();
}
// Fires when Play button is clicked
function PlayMedia(sender, args)
{
    sender.findName("MyMedia").play();
}
// Fires when Pause button is clicked
function PauseMedia(sender, args)
{
    sender.findName("MyMedia").pause();

Hope this helps!!


Silverlight 5 Hosting UK - HostForLIFE.eu :: How to fixed Silverlight Control Content always null from Javascript Access

clock August 16, 2019 09:39 by author Peter

Today, I am going to show you how to fixed Silverlight 5 Control Content always null from Javascript Access. I got an Error when  I try to access the Silverlight object from the client side. Here’s the following snippet code from client site.

function search() {
            try {
                var silverLightControl = document.getElementById("silverlightControl");
                silverLightControl.Content.Page.SetUser(document.getElementById("txtUser").value);
            } catch (e) {
                alert(e.description);
            }
        }

The page with silverlight object embedded
    <div id="silverlightControl">
        <object data="data:application/x-silverlight-2," type="application/x-silverlight-2" width="100%" height="100%">
          <param name="source" value="ClientBin/SLAspxCommunication.xap"/>
          <param name="onError" value="onSilverlightError" />
          <param name="background" value="white" />
          <param name="minRuntimeVersion" value="5.0.61118.0" />
          <param name="autoUpgrade" value="true" />
          <a href="http://go.microsoft.com/fwlink/?LinkID=149156&v=5.0.61118.0" style="text-decoration:none">
               <img src="http://go.microsoft.com/fwlink/?LinkId=161376" alt="Get Microsoft Silverlight" style="border-style:none"/>
          </a>
        </object><iframe id="_sl_historyFrame" style="visibility:hidden;height:0px;width:0px;border:0px"></iframe></div>


At the silverlight object class,  we have registered the page as javascriptable object with following line

HtmlPage.RegisterScriptableObject("Page", this);

public MainPage()
        {
            InitializeComponent();
            _users = GenerateList();
            HtmlPage.RegisterScriptableObject("Page", this);
        }


The function looks simple that I just want to call the Silverlight function to search the user, unfortunately. This error message below always popped up.

When I debug the process, it indicate that the control did not contain a Content element.  This Error
var silverLightControl = document.getElementById("silverlightControl");

It will load the Div Control instead of the object container that host the silverlight object.  After I set the id to be silverlightControl for the object tag. then  search function funtion well and access the SetUser function in the silverlight object.
   <div>
        <object data="data:application/x-silverlight-2," type="application/x-silverlight-2" width="100%" height="100%" id="silverlightControl">
          <param name="source" value="ClientBin/SLAspxCommunication.xap"/>
          <param name="onError" value="onSilverlightError" />
          <param name="background" value="white" />
          <param name="minRuntimeVersion" value="5.0.61118.0" />
          <param name="autoUpgrade" value="true" />
          <a href="http://go.microsoft.com/fwlink/?LinkID=149156&v=5.0.61118.0" style="text-decoration:none">
               <img src="http://go.microsoft.com/fwlink/?LinkId=161376" alt="Get Microsoft Silverlight" style="border-style:none"/>
          </a>
        </object><iframe id="_sl_historyFrame" style="visibility:hidden;height:0px;width:0px;border:0px"></iframe></div>


European Cloud Silverlight 5 Hosting – HostForLIFE.eu :: How to Set Focus Control in Silverlight 5

clock September 1, 2014 12:42 by author Onit

In this article I will going to show you about focusing any element in Silverlight, Silverlight 5 is an application framework for writing and running rich Internet applications, with features and purposes similar to those of Adobe Flash. Just supposed that we had a login panel as he very first screen after validation we will navigate to another page. So when I am talking about the login panel we will have two input fields (textboxes) to insert username and password and looking from thge user's point of view we want that the username textbox field is to be focused.


Create a Silverlight Application

Before we jump more into the content about focus control first we should create a Silverlight application, just named it (for example: "FocusingControlInSilverlightApplication", use one textbox, passwordbox and button for the login interface.

It will looked like below:

Set Focus to the username textbox

So as we know we have a function something like Focus() to make it focused but it is not going to work for the very first time. Here is the reason, when we will run the application the Silverlight Plugin is not yet focused. Unless until we focus that Plugin in we can't focus any control in Silverlight application. To make it happen we have to simply add a single line of code on the loaded event which will look like and focus the Plugin

public MainPage()
        {
            InitializeComponent();

            this.Loaded += new RoutedEventHandler(MainPage_Loaded);
        }

        void MainPage_Loaded(object sender, RoutedEventArgs e)
        {
            //First focus the silverlight plogin and than focus the control.
            HtmlPage.Plugin.Focus(); (1)
            userNameTextBox.Focus();(2)
        }

Line one is focusing the Silverlight Plugin.
Focus that element.
But we need to add the following to the namespace import section.


using System.Windows.Browser;


Now run the application and you will find the control focused.

Once the Silverlight Plugin is focused, the simple Focus() function will work. Suppose we want to set the focus to the passwordbox; now after the Silverlight Plugin is focused so any event let say we add a focus button beside the login button and on click event of that button let's add the following

void focusButton_Click(object sender, RoutedEventArgs e)
        {
            //After Silverlight Plug in is focused
            passwordTextBox.Focus();
        }

And the screen will look like:

Click on the focus button and your passwordTextBox will be focused; the reason being is we have already focused the Plugin.

I just want to point to that since our login page is the very first page so we need to focus it using code behind. If suppose you have already clicked any of the Silverlight controls or the page itself, we have gotten the Plugin focused; after that if we want to focus any control, we can simply use the control.Focus() method.

Alternative

We do have an alternative to focus the Plugin at the very first moment of page load. As we know for every Silverlight application we get a .aspx and .html page created automatically.

This page has got the .xap file integrated in them which looks like:

<body>

    <form id="form1" runat="server" style="height:100%">
    <div id="silverlightControlHost">
        <object id="focusingControlInSilverlightApplicationTestPageXaml"  data="data:application/x-silverlight-2," type="application/x-silverlight-2" width="100%" height="100%">
                     <param name="source" value="ClientBin/FocusingControlInSilverlightApplication.xap"/>
                     <param name="onError" value="onSilverlightError" />
                     <param name="background" value="white" />
                     <param name="minRuntimeVersion" value="4.0.50826.0" />
                     <param name="autoUpgrade" value="true" />
                     <a href="http://go.microsoft.com/fwlink/?LinkID=149156&v=4.0.50826.0" style="text-decoration:none">
                               <img src="http://go.microsoft.com/fwlink/?LinkId=161376" alt="Get Microsoft Silverlight" style="border-style:none"/>
                     </a>
              </object><iframe id="_sl_historyFrame" style="visibility:hidden;height:0px;width:0px;border:0px"></iframe></div>
    </form>
</body>


Including some JavaScript. So let's include the id attribute for the object tag and give some name; in my case it is "focusingControlInSilverlightApplicationTestPageXaml" and add the following function to the JavaScript section:


function FocusPlugin() {

            document.getElementById('focusingControlInSilverlightApplicationTestPageXaml').focus();
}

And on the body part of HTML add the following:


<body onload="FocusPlugin()">


This will do the work; you don't need to write anything in the code behind. At the very first moment when the .aspx or .html (test pages) loads it will focus the corresponding Plugin and there after only control.focus() method will focus the control.


European Silverlight 5 Hosting - Amsterdam :: Enable SSL for WCF Service

clock September 17, 2013 11:55 by author Ronny

We will shows you step-by-step how to enable SSL for a WCF service with as little fuss as possible. Let’s get started…

Step 1 – The Service

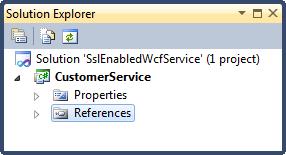
First we are going to create a simple and easy-to-use WCF service. Start up Visual Studio 2010 and create a new blank solution called “SslEnabledWcfService”. Next add a new class library project to it called “CustomerService”.

Add a reference to the System.ServiceModel and System.Runtime.Serialization assemblies to the CustomerService project. Add a new interface called ICustomerService to the project that defines the service contract.

[ServiceContract]
public interface ICustomerService
{
    [OperationContract]
    IEnumerable<Customer> GetCustomers();
}
The service returns a collection of customers. Each customer is represented by an instance of the Customer class.
[DataContract]
public class Customer
{
    [DataMember]
    public Guid Id { get; set; }

    [DataMember]
    public string FirstName { get; set; }

    [DataMember]
    public string LastName { get; set; }
}

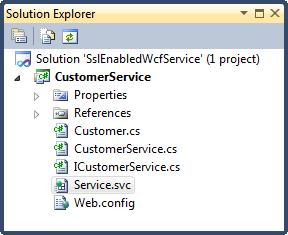
Go ahead and add a file called Customer.cs. Copy and paste the code listed above.
The actual service implementation is very simple. It returns a list of customers which I create on the fly. No use in dealing with a database, or another persistant data store for this post. Let’s keep things as simple as possible.

[ServiceBehavior]
public class CustomerService : ICustomerService
{
    private IEnumerable<Customer> LoadCustomers()
    {
        //...
    }

    public IEnumerable<Customer> GetCustomers()
    {
        var customers = new List<Customer>();
        customers.AddRange(LoadCustomers());
        return customers;
    }
}


Check out the source code accompanying this post for the full code of the CustomerService class.

Step 2 – Configuration
OK, now it’s time to add some configuration for our service. The host process (IIS) needs this to be able to figure out how to host the service. First add a new application configuration file called Web.config to the CustomerService project.

First you need to list the service in the <system.serviceModel> node.

<system.serviceModel>
  <services>
    <service name="CustomerService.CustomerService"
              behaviorConfiguration="MyServiceBehavior">
       
      <endpoint address=""
                binding="basicHttpBinding"
                bindingConfiguration="TransportSecurity"
                contract="CustomerService.ICustomerService" />
       
      <endpoint address="mex"
                binding="mexHttpsBinding"
                contract="IMetadataExchange" />     
    </service>
  </services>
   
  <!--...-->
</system.serviceModel>


As you can see the service is linked to a custom service behavior called “MyServiceBehavior”. You need to define this behavior in the <behaviors> node of the <system.serviceModel> node.

<behaviors>

<serviceBehaviors>
    <behavior name="MyServiceBehavior">
      <serviceMetadata httpsGetEnabled="true" httpsGetUrl="" />
      <serviceDebug includeExceptionDetailInFaults="false"/>
    </behavior>
  </serviceBehaviors>     
</behaviors>


Note that the httpsGetEnabled property of the behavior is set to true. This allows us to retrieve metadata for the service using an HTTPS/GET request. Handy for creating our client proxies later on. The first endpoint (non-mex) of the service is also tied to a custom binding (basicHttpBinding) called TransportSecurity.

<bindings>
    <basicHttpBinding>
      <binding name="TransportSecurity">
        <security mode="Transport">
          <transport clientCredentialType="None" />
        </security>
      </binding>
    </basicHttpBinding>
</bindings>

It is on the binding level that you must specify which security model the service uses. Here we set the mode to Transport (SSL) and turn off any type of client authentication.

Step 3 – Hosting The Service
The service has been created and configured. Time to host it. I’m using IIS 7.5 (7.5.7600.16385) on Windows 7 for this purpose. Create a new text file called “Service.svc”. Note the .svc extension!

Add it to the CustomerService project.


It only contains one line, namely:

<%@ ServiceHost Language="C#"
      
         Service="CustomerService.CustomerService"
                CodeBehind="CustomerService.cs" %>

Here you identify the service, the language used and the location of the code behind file.

Open up Windows Explorer and navigate to the default installation folder for IIS (C:\inetpub). I started with a clean installation to make things easy. Since I don’t host any other sites locally I deleted everything I found within the wwwroot subfolder. You might want to create a subfolder within the wwwroot folder to host your service. Once you have done so create a new directory called bin within the wwwroot folder or your custom subfolder.

To host the service you must copy the following files to the directory in which you host your service:

Service.svc
Web.config
CustomerService.dll (\bin)

You must copy the compiled CustomerService.dll assembly (and any other dependent assemblies) inside the bin folder! Just set your solution configuration to Release, rebuild your solution and copy the necessary files as described.

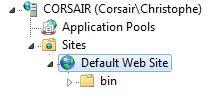
Almost there, we just need to configure IIS. Start up the Internet Information Services (IIS) Manager and navigate to the Default Web Site node in the left pane.


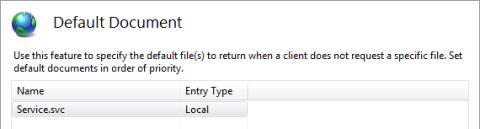
Double click on the Default Document displayed in the middle pane under the IIS group.

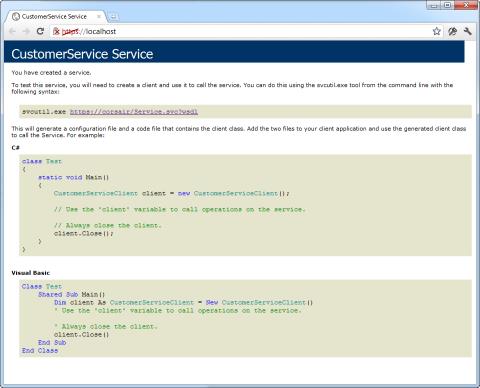
Remove all the documents listed there and afterwards add a new document called Service.svc. When we navigate to http://localhost we want IIS to serve up the Service.svc document by default.

Open your favorite browser (*cough* Chrome * cough*) and navigate to http://localhost. You’ll be greeted by the following error page:

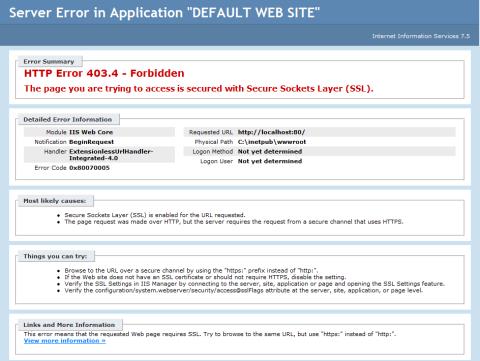
The page is secured and cannot be accessed via http. Exactly what we want! You can try and access it via https://localhost, but this will result in a page not found error as we have not yet configured SSL.

Step 4 – SSL Certificate
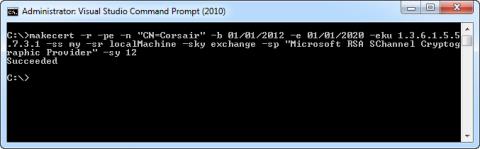
Before you can configure your service to use SSL you need a valid SSL certificate. Luckily you can create one yourself for development / testing purposes instead of purchasing one. Using the makecert.exe command-line utility you can create your own certificates. Let’s quickly create a certificate. Start up an elevated Visual Studio Command Prompt and enter the following command:

makecert -r -pe -n “CN=YourComputerName” -b 01/01/2012 -e 01/01/2020
-eku 1.3.6.1.5.5.7.3.1 -ss my -sr localMachine -sky exchange -sp
"Microsoft RSA SChannel Cryptographic Provider" -sy 12

Make sure to replace the term "YourComputerName" with your actual computer’s name. After executing the command you should get a simple "succeeded" message.

Step 5 – Enable SSL
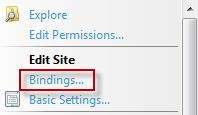
Alright, we have our SSL certificate. Let’s bind it to our service. Go back to IIS Manager and select the Default Web Site node. In the right pane click on the "Bindings…" link.

In the Site Bindings popup click on the Add button to add a new binding.

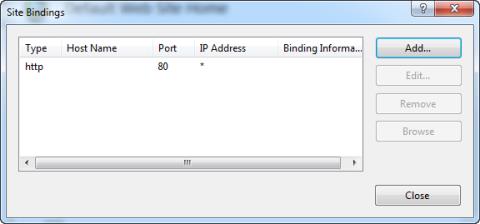
and enter the following data to enable SSL for your site:

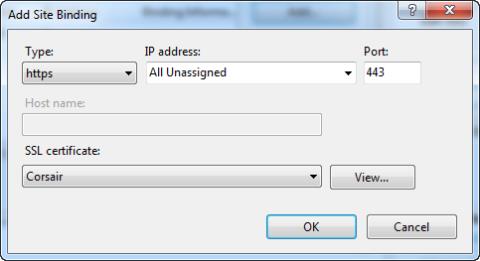
Be sure to select the SSL certificate you created earlier! Just click OK to add the binding and close the Site Bindings popup afterwards. Restart your web site and navigate to https://localhost. This time it’ll work, but you’ll probably get a warning message because of your untrusted SSL certificate. Just ignore it.

Step 6 – Consume The Service
Now that we have our service running in IIS and secured with SSL let’s test it. Time to consume the service. Add a new console application to the solution called ClientApp. Add a service reference to our newly created WCF service.

When adding the service reference Visual Studio will report a problem with the SSL certificate.

Just click Yes to proceed. The message is shown because the certificate has not been issued by a company you have chosen to trust. After you’ve created the service reference you can consume the service. Let’s display a list of the customers.

using (var proxy = new CustomerServiceClient())
{
    var customers = proxy.GetCustomers();
    foreach(var customer in customers)
    {
        Console.WriteLine(String.Format("{0} {1}", customer.FirstName, customer.LastName));
    }
}

When you try to execute this code you’ll get the following exception:

The client application does not trust the service. You can fix this by inspecting the certificate which the service hands over to the client. You need to hook up a handler for the ServicePointManager’s ServerCertifcateValidationCallback.

ServicePointManager.ServerCertificateValidationCallback += customXertificateValidation; When this callback is triggered you can inspect the server certificate.

private static bool customXertificateValidation(object sender, X509Certificate cert,
    X509Chain chain, SslPolicyErrors error)
{
    var certificate = (X509Certificate2) cert;

    // Inspect the server certficiate here to validate
    // that you are dealing with the correct server.
    // If so return true, if not return false.
    return true;
}

We’re finally there. If you run the client application now it will correctly list the customers returned by the SSL-enabled WCF service.


European Silverlight 4 Hosting :: UserControls and the dreaded “name already exists in the tree”

clock January 27, 2012 09:45 by author Scott

I was doing some work with Silverlight the other week which involved using UserControls where the control named itself. That is, a situation such as;

<UserControl x:Name=”foo”>

<!—Content of control –>

</UserControl>

and, under unpredictable circumstances I was finding that I kept hitting a semi-random error when running my code which was something along the lines of;


“The name already exists in the tree: foo”

I spent an awfully long time on this and hence the blog post to try and perhaps save you some time in the future. I took long enough on it to come up with a simple repro scenario which looks something like this;


and so in words I have a ListBox which displays instances of UserControl1 and that control is just a StackPanel which contains 2 instances of UserControl2 and that control happens to name itself in its definition.

I found that if I ran this application a few times then sometimes it would work fine and sometimes it would fail with the dreaded exception and so I asked internally whether that was expected and it was confirmed as a bug in the Silverlight 4 runtime which has been fixed in Silverlight 5.

In my particular case, I could work around the bug anyway because I was naming that user control in order to use it for some bindings and the workaround I used was to create those bindings from code instead.


European Silverlight 5 Hosting :: Get the Data From Database, Update it and Then Save it Back to Database

clock January 10, 2012 09:40 by author Scott

Lets start by updating the Code Behind of the Mainage.xaml .

Step 1:

Add a event handler for RowEditEnded .

This would give me the updated values of the Row . With this I would be able to update the update the cell and commit it. This event would help me trace the updated values . This event handler is to be added in the constrcutor of the Mainpage.xaml .

articleDataGrid.RowEditEnded += new EventHandler<DataGridRowEditEndedEventArgs>(articleDataGrid_RowEditEnded);


Step 2:

Implement the event handler for RowEditEnded .

I simply put the code to update the article and saving the context in the block .

void
articleDataGrid_RowEditEnded(object sender, DataGridRowEditEndedEventArgs e)
{
   
try
    {
        if (e.EditAction == DataGridEditAction.Commit)
        {

            articleId = ((Article)e.Row.DataContext).ArticleID;

            Article art = (from article in context.Articles
                          where article.ArticleID == articleId
                          select article).First();

            art.ArticleID = ((Article)e.Row.DataContext).ArticleID;
            art.AuthorID = ((Article)e.Row.DataContext).AuthorID;
            art.Body = ((Article)e.Row.DataContext).Body;
            art.Title = ((Article)e.Row.DataContext).Title;


            context.SubmitChanges();

            MessageBox.Show("Article was sucessfully Updated"); 

        }
    }
    catch (Exception ex)
    {
        MessageBox.Show("Updating Article failed :" + ex.Message);
    }

}

Step 3 :

Make sure you load the context in the Constructor of the MainPage class .

context.Load(context.GetArticlesQuery());

We are done. Run the App. Modify the Body or the Title . The Field would be sucessfully updated .


So we are done with Updation . I still need to add the validation to this .

Lets add validation then .

For this example we will go for basic validation . Just go ahead and add a Required attribute to the Domainservice Metadata that was generated .

Your Final Metadata class (DataDomainService.metadata.cs ) would look like as follows :

DataDomainService.metadata.cs

namespace SL2wayWCFRia.Web
{
    using System;
    using System.Collections.Generic;
    using System.ComponentModel;
    using System.ComponentModel.DataAnnotations;
    using System.Linq;
    using System.ServiceModel.DomainServices.Hosting;
    using System.ServiceModel.DomainServices.Server;


    // The MetadataTypeAttribute identifies ArticleMetadata as the class
   
// that carries additional metadata for the Article class.
    [MetadataTypeAttribute(typeof(Article.ArticleMetadata))]
    public partial class
Article
    {
 
       
// This class allows you to attach custom attributes to properties
       
// of the Article class.
       
//
       
// For example, the following marks the Xyz property as a
       
// required property and specifies the format for valid values:
       
//    [Required]
       
//    [RegularExpression("[A-Z][A-Za-z0-9]*")]
       
//    [StringLength(32)]
       
//    public string Xyz { get; set; }
        internal sealed class
ArticleMetadata
        {


            // Metadata classes are not meant to be instantiated.
            private ArticleMetadata()
            {
            }


            [Required]
            public int ArticleID { get; set; }


            [Required]|
            public Nullable<int> AuthorID { get; set; }


            [Required]
            public string Body { get; set; }


            [Required]
            public string Title { get; set; }
        }
    }
}


Now give it a run .

Make the AuthorId field empty and press tab to move to the next field you would get a message as shown below :


European Silverlight 4 WCF Hosting :: How to Solve IIS specified authentication schemes 'Basic, Anonymous'

clock December 21, 2011 08:13 by author Scott

This is an error message that sometimes you can find it when you host your WCF site:

IIS specified authentication schemes 'Basic, Anonymous', but the binding only supports specification of exactly one authentication scheme. Valid authentication schemes are Digest, Negotiate, NTLM, Basic, or Anonymous. Change the IIS settings so that only a single authentication scheme is used."

To resolve this problem on an IIS 7.0 server, add the following to the web.config file to disable Basic authentication:

<
system.webServer> 
     <security> 
            <authentication> 
                <basicAuthentication enabled="false" 
/>
            </authentication> 
     </security> 
</system.webServer> 

Note that Anonymous authentication can also be disabled using:

<anonymousAuthentication enabled="false" />

If your site is hosted on an IIS 6.0 server, please contact technical support to disable appropriate authentication on the application containing the WCF service.

OR

You can ask your provider to disable Anonymous authentication for you on IIS. Good luck.


European Silverlight Hosting :: Collections and Data Structures in Silverlight

clock November 10, 2011 05:29 by author Scott

Closely related data can be handled more efficiently when grouped together into a collection. Instead of writing separate code to handle each individual object, you can use the same code to process all the elements of a collection.

To manage a collection, use the Array class and the System.Collections classes to add, remove, and modify either individual elements of the collection or a range of elements. An entire collection can even be copied to another collection.

Some Collections classes have sorting capabilities, and most are indexed. Memory management is handled automatically, and the capacity of a collection is expanded as required. Synchronization provides thread safety when accessing members of the collection. Some Collections classes can generate wrappers that make the collection read-only or fixed-size. Any Collections class can generate it's own enumerator that makes it easy to iterate through the elements.

In the .NET Framework version 2.0, generic collection classes provide new functionality and make it easy to create strongly typed collections. See the System.Collections.Generic and System.Collections.ObjectModel namespaces.
The LINQ to Objects feature allows you to use LINQ queries to access in-memory objects as long as the object type implements IEnumerable or IEnumerable<(Of <(<T>)>)>. LINQ queries provide a common pattern for accessing data; they are typically more concise and readable than standard foreach loops; and provide filtering, ordering and grouping capabilities. LINQ queries can also improve performance.

Defining Collections

A collection is a set of similarly typed objects that are grouped together.

Objects of any type can be grouped into a single collection of the type Object to take advantage of constructs that are inherent in the language. For example, the C# foreach statement (for each in Visual Basic) expects all objects in the collection to be of a single type.

However, in a collection of type Object, additional processing is done on the elements individually, such as boxing and unboxing or conversions, which affect the performance of the collection. Boxing and unboxing typically occur if storing or retrieving a value type in a collection of type Object.

Generic collections, such as List<(Of <(<'T>)>)> avoid these performance hits if the type of the element is the type that the collection is intended for. In addition, strongly typed collections automatically perform type validation of each element added to the collection.

All collections that directly or indirectly implement the ICollection interface or the ICollection<(Of <(<'T>)>)> generic interface share several features in addition to methods that add, remove, or search elements:

An Enumerator

An enumerator is an object that iterates through it's associated collection. It can be thought of as a movable pointer to any element in the collection. An enumerator can be associated with only one collection, but a collection can have multiple enumerators. The C# foreach statement (for each in Visual Basic) uses the enumerator and hides the complexity of manipulating the enumerator.

Synchronization Members

Synchronization provides thread safety when accessing elements of the collection. The collections are not thread safe by default. Only a few classes in the System.Collections namespaces provide a Synchronize method that creates a thread-safe wrapper over the collection. However, all classes in all System.Collections namespaces provide a SyncRoot property that can be used by derived classes to create their own thread-safe wrapper. An IsSynchronized property is also provided to determine whether the collection is thread safe. Synchronization is not available in the ICollection<(Of <(<'T>)>)> generic interface.

The CopyTo method

All collections can be copied to an array using the CopyTo method; however, the order of the elements in the new array is based on the sequence in which the enumerator returns them. The resulting array is always one-dimensional with a lower bound of zero.

Note that the ICollection<(Of <(<'T>)>)> generic interface has additional members, which the non-generic interface does not include.

The following features are implemented in some classes in the System.Collections namespaces:

Capacity and Count

The capacity of a collection is the number of elements it can contain. The count of a collection is the number of elements it actually contains.

All collections in the System.Collections namespaces automatically expand in capacity when the current capacity is reached. The memory is reallocated, and the elements are copied from the old collection to the new one. This reduces the code required to use the collection; however, the performance of the collection might still be negatively affected. The best way to avoid poor performance caused by multiple reallocations is to set the initial capacity to be the estimated size of the collection.

Lower Bound

The lower bound of a collection is the index of it's first element. All indexed collections in the System.Collections namespaces have a lower bound of zero. Arrays have a lower bound of zero by default, but a different lower bound can be defined when creating an instance of the Array class using CreateInstance.

System.Collections classes can generally be categorized into three types:

Commonly used collections

These are the common variations of data collections, such as hash tables, queues, stacks, dictionaries, and lists. Commonly used collections have generic versions and non-generic versions.

Bit collections

These are collections whose elements are bit flags. They behave slightly differently from other collections.
Be sure to choose a collection class carefully. Because each collection has it's own functionality, each also has it's own limitations.

Commonly used Collection Types

Collection types are the common variations of data collections, such as hash tables, queues, stacks, dictionaries, and lists.

Collections are based on the ICollection interface, the IList interface, the IDictionary interface, or their generic counterparts. The IList interface and the IDictionary interface are both derived from the ICollection interface;
therefore, all collections are based on the ICollection interface either directly or indirectly.

Every element contains a value in collections based on the IList interface (such as Array, or List<(Of <(<'T>)>)>) or based directly on the ICollection interface LinkedList<(Of <(<'T>)>)>).

Every collection based on the ICollection interface (such as the Dictionary<(Of <(<'TKey, TValue>)>)> generic class) contains both a key and a value.

The KeyedCollection<(Of <(<'TKey, TItem>)>)> class is unique because it is a list of values with keys embedded within the values and, therefore, it behaves like a list and like a dictionary.

Collections can vary, depending on how the elements are stored, how they are sorted, how searches are performed, and how comparisons are made. The elements of a Dictionary<(Of <(<'TKey, TValue>)>)> are accessible only by the key of the element, but the elements of a KeyedCollection<(Of <(<'TKey, TItem>)>)> are accessible either by the key or by the index of the element. The indexes in all collections are zero-based, except Array, which allows arrays that are not zero-based.

Array Collection Type

The Array class is not part of the System.Collections namespaces. However, it is still a collection because it is based on the IList interface.

The rank of an Array object is the number of dimensions in the Array. An Array can have one or more ranks.
The lower bound of an Array is the index of it's first element. An Array can have any lower bound. It has a lower bound of zero by default, but a different lower bound can be defined when creating an instance of the Array class using CreateInstance.

Unlike the classes in the System.Collections namespaces, Array has a fixed capacity. To increase the capacity, you must create a new Array object with the required capacity, copy the elements from the old Array object to the new one, and delete the old Array.

List Collection Types

The generic List<(Of <(<'T>)>)> class provides features that are offered in most System.Collections classes but are not in the Array class. For example:

- The capacity of an Array is fixed, whereas the capacity of a List<(Of <(<'T>)>)> is automatically expanded as required. If the value of the Capacity property changes, the memory reallocation and copying of elements occur automatically.
- The List<(Of <(<'T>)>)> class provide methods that add, insert, or remove a range of elements. In Array, you can get or set the value of only one element at a time.
- The List<(Of <(<'T>)>)> provides methods that return read-only and fixed-size wrappers to the collection. The Array class does not.

On the other hand, Array offers some flexibility that List<(Of <(<'T>)>)> does not. For example:

- You can set the lower bound of an Array, but the lower bound of a List<(Of <(<'T>)>)> is always zero.
- An Array can have multiple dimensions, while a List<(Of <(<'T>)>)> always has exactly one dimension.

Most situations that call for an array can use a List<(Of <(<'T>)>)> instead; they are easier to use and, in general, have performance similar to an array of the same type.

Array is in the System namespace; List<(Of <(<'T>)>)> is in the System.Collections.Generic namespace.

Dictionary Collection Types

You can use the Dictionary<(Of <(<'TKey, TValue>)>)> generic class which implements the IDictionary interface. The Dictionary<(Of <(<'TKey, TValue>)>)> generic class also implements the IDictionary<(Of <(<'TKey, TValue>)>)> generic interface. Therefore, each element in these collections is a key-and-value pair.

Queue Collection Types

The Queue<(Of <(<'T>)>)> generic class is a first-in-first-out (FIFO) collection class that implements the ICollection interface and the ICollection<(Of <(<'T>)>)> generic interface.

The Queue<(Of <(<'T>)>)> and Stack<(Of <(<'T>)>)> generic classes are useful when you need temporary storage for information, that is, when you might want to discard an element after retrieving it's value. Use Queue<(Of <(<'T>)>)> if you need to access the information in the same order that it is stored in the collection. Use Stack<(Of <(<'T>)>)> if you need to access the information in reverse order.

Three main operations can be performed on a Queue<(Of <(<'T>)>)> and it's elements:

- The Enqueue method adds an element to the end of the queue.
- The Dequeue method removes the oldest element from the start of the queue.
- The Peek method returns the oldest element from the start of the queue but does not remove it from the queue.

Stack Collection Types

The Stack<(Of <(<'T>)>)> generic class is a last-in-first-out (LIFO) collection class that implements the ICollection interface. The Stack<(Of <(<'T>)>)> generic class also implements the ICollection<(Of <(<'T>)>)> generic interface.
Use a queue if you need to access the information in the same order that it is stored in the collection. Use a stack if you need to access the information in reverse order.

A common use for a stack is preserving variable states during calls to other procedures.

Three main operations can be performed on a stack and it's elements:

- The Push method inserts an element at the top of the stack.
- The Pop method removes an element at the top of the stack.
- The Peek method returns an element at the top of the stack but does not remove it from the stack.

Bit Collection Type

Bit collections are collections whose elements are bit flags. Because each element is a bit instead of an object, these collections behave slightly differently from other collections.

The BitArray class is a collection class in which the capacity is always the same as the count. Elements are added to a BitArray by increasing the Length property; elements are deleted by decreasing the Length property. The BitArray class provides methods that are not found in other collections, including those that allow multiple elements to be modified at once using a filter, such as And, Or, Xor , Not, and SetAll.


About HostForLIFE.eu

HostForLIFE.eu is European Windows Hosting Provider which focuses on Windows Platform only. We deliver on-demand hosting solutions including Shared hosting, Reseller Hosting, Cloud Hosting, Dedicated Servers, and IT as a Service for companies of all sizes.

We have offered the latest Windows 2016 Hosting, ASP.NET Core 2.2.1 Hosting, ASP.NET MVC 6 Hosting and SQL 2017 Hosting.


Tag cloud

Sign in