European Silverlight 4 & Silverlight 5 Hosting BLOG

BLOG about Silverlight 5 Hosting and Its Techologies - Dedicated to European Windows Hosting Customer

Silverlight 5 Hosting France - HostForLIFE.eu :: Create an Exception Logger in Silverlight

clock June 21, 2019 11:42 by author Peter

In this post I'll describe the way to handle the exceptions in Silverlight. Whereas running the Silverlight application, if any exception happens it'll attend Silverlight.js and show within the internet explorer as a javascript error. Within the debugging purpose of read typically it's cumbersome to see wherever truly the exception happened.

LogWindow.xaml
This is an easy user control that has an easy textbox:
<TextBox
AcceptsReturn="True"
TextAlignment="Left"
TextWrapping="NoWrap"
VerticalScrollBarVisibility="Visible"
x:Name="logText"
FontFamily="Courier New"
FontSize="12" IsReadOnly="True" HorizontalScrollBarVisibility="Auto" />

Logger.cs
This class are used to print the exception and notice the stacktrace. it's an enum for the exception types viz. DEBUG,INFO,WARN,ERROR and FATAL.This class contains an easy delegate to add text to the log window.
The static property _instance is about by the LogWindow.xaml.cs go in the load event as:
Logger._instance = logText;
So that it will print whatever exception happenes in your application. The LogException methodology expects exception object because the parameter and find the exception information using the StackFrame class.

StackFrame frame = new StackFrame(true);
callerSignature =  string.Format("@{0}:{1}:{2}", frame.GetMethod(), frame.GetFileName(), frame.GetFileLineNumber());


To use this method in your catch block you just simply need to call the static method as:
Catch(Exception ex)
{
Logger.LogException(ex);
}

Hope this tutorial works for you!


Silverlight 5 Hosting - HostForLIFE.eu :: How to Resolve and Avoid Crashes in Silverlight 5?

clock March 30, 2016 20:26 by author Anthony

Some websites require a plugin to display its content properly. When a web page containing a particular contains, eat plugin will automatically run and execute the code and render the content that is specifically aimed at the area of the web. One plugin that can do this is Silverlight. Silverlight is a product of Microsoft. Microsoft Silverlight is a cross-browser plug-in powered by the .NET that allows you to view certain multimedia such as high quality video or interactive web. But when you have problem with the content of the video or interactive web browsing, you may need updating or need to install Microsoft Silverlight on your device. Sometimes a web browser crashes can be caused by Silverlight that is not functioning properly.

If that happens, then it must be overcome so that web browsers can work as usual. So in this article, I will discuss about how to cope with a crash on the Silverlight plugin, and also how to prevent Silverlight from crashing.

STEP 1

Make sure the Silverlight plugin has been installed properly. Please try to run your web browser, and download Silverlight. Once downloaded, run the installation file. If completed please close your web browser and then run it back to see to it whether the issue has been resolved.

STEP 2

Try to reset Internet Explorer Internet Privacy Settings. Click Tools> Internet Options> Privacy, and select Sites. Then simply enter the URL of the web that you want to visit that requires the Silverlight application. Then click OK. Then please restart Internet Explorer to test Silverlight.

STEP 3

Disable the Silverlight plugin from Google Chrome your web browser, then restart your browser. Type about: plugins in the address bar. Then click the Disable button that is located next to Microsoft Silverlight. Then close the plugin tab, repeat this process and then click Enable to restart Silverlight.

STEP 4

Change the name of the file MSPR.HDS associated with Silverlight. Run Windows Explorer on your computer, open the file C:\ProgramData\Microsoft\PlayReady. Then click on MSPR.HDS file, right click and select "Rename", please rename the file with the name you want.

STEP 5

Close your web browser, and then try to run it again to test Silverlight.


How To Prevent Silverlight from crashes?

Google Chrome users may not be able to enjoy this plugin automatically. To overcome this problem can perform the following steps so that you can enjoy Silverlight in Google Chrome

  • Open your Google Chrome browser, type chrome://banners/#enable-NPAPI in the address bar and press enter.
  • Click Enable.
  • If you are using Silverlight in websites such as Netflix, Amazon Instant Video, you only need to right click on the content in question and select Run this plugin.
  • Now you can experience the difference when using Microsoft Silverlight plugin.


HostForLIFE.eu Silverlight 5 Hosting

HostForLIFE.eu revolutionized hosting with Plesk Control Panel, a Web-based interface that provides customers with 24x7 access to their server and site configuration tools. Plesk completes requests in seconds. It is included free with each hosting account. Renowned for its comprehensive functionality - beyond other hosting control panels - and ease of use, Plesk Control Panel is available only to HostForLIFE's customers. They offer a highly redundant, carrier-class architecture, designed around the needs of shared hosting customers.


Silverlight 5 Hosting France - HostForLife.eu :: How to Use Silverlight to Run an Elevated Trust Applications

clock June 23, 2015 06:39 by author Rebecca

In this article, you will see how to run an Elevated Trust Application within the Browser using Silverlight 5 Beta. For this demonstration, you will first create a Silverlight application by using Visual Studio 2010 with Silverlight Version 5.

Step 1

We will rename the application as 'TrustedAppsInBrowser' as shown below:

Step 2

Make sure you choose Silverlight version 5.0. Now let's add a reference of a API 'Microsoft.CSharp.dll' to our Silverlight application. Browse this API from the path 'C:\Program Files (x86)\Microsoft SDKs\Silverlight\v4.0\Libraries\Client'. Then, design the MainPage.xaml. and replace <Grid></Grid> with following code:

<Grid x:Name="LayoutRoot" Background="Black">         <Grid.RowDefinitions>             <RowDefinition Height="44*" />             <RowDefinition Height="44*" />             <RowDefinition Height="44*" />             <RowDefinition Height="170*" />         </Grid.RowDefinitions>         <StackPanel Orientation="Horizontal" Grid.Row="0">             <TextBlock Text="TO - :" Foreground="Yellow" FontSize="14"         HorizontalAlignment="Center" VerticalAlignment="Center"/>             <TextBox x:Name="txtTO" Width="350" Height="30"/>         </StackPanel>         <StackPanel Orientation="Horizontal" Grid.Row="1">             <TextBlock Text="CC - :" Foreground="Yellow" FontSize="14"         HorizontalAlignment="Center" VerticalAlignment="Center"/>             <TextBox x:Name="txtCC" Width="350" Height="30"/>         </StackPanel>         <StackPanel Orientation="Horizontal" Grid.Row="2">             <TextBlock Text="Subject - :" Foreground="Yellow" FontSize="14"         HorizontalAlignment="Center" VerticalAlignment="Center"/>             <TextBox x:Name="txtsubject" Width="315" Height="30"/>         </StackPanel>         <StackPanel Orientation="Vertical" Grid.Row="3">             <TextBox x:Name="txtmessage" Width="400" Height="120"         HorizontalAlignment="Left" VerticalAlignment="Top" />             <StackPanel Orientation="Horizontal" HorizontalAlignment="Center">                 <Button x:Name="btnSend" Content="Send" Height="30" Width="100"          Click="btnSend_Click"/>                 <Button x:Name="btncancel" Content="Cancel" Height="30" Width="100" />             </StackPanel>         </StackPanel> </Grid>

Step 3

Now let's import a namespace to our code behind:

using System.Runtime.InteropServices.Automation;

Step 4

Now run your application and click on the 'Send' button. You will get an exception as shown below:

The operation is not supported in this context. You cannot call COM components directly from the browser due to security reasons. However you can achieve the same by making this Silverlight Application as an Out-Of-Browser application with Elevated Trust. You have to run this application in the Browser. To run this application in the browser, you must set this application to run Out-Of-Browser with Elevated Trust. Right click the Silverlight Application and go to Properties. Choose checkbox 'Enable running application Out of the browser' and click on 'Out of browser settings' button. From the setting window, chose a checkbox 'Require Elevated trust when running outside the browser'.

Step 5

Now you will have to follow the steps given below for enabling our Silverlight application to run within the browser, with Elevated trust.

1: Go to Start and click on Run.  Type 'RegEdit'. This will open the 'Registry Editor' window. Now the most important thing is that If you running the app on a 32 bit machine, you will have to find:

· HKEY_LOCAL_MACHINE\Software\Microsoft\Silverlight\

and if you are running on a 64-bit machine, you will have to find:

· HKEY_LOCAL_MACHINE\Software\Wow6432Node\Microsoft\Silverlight\

I took the reference of MSDN for this path. My computer is 64-bit, so I have chosen the second option. Once you find the above path in the registry, make a change to 'UpdateConsentMode' from '0' to '1' as shown below:

2: Now the second step is to Sign the .XAP file of our Silverlight application with code signing certificate. Right click t Sheilverlight application and go to properties. Choose ‘Signing from the left hand side’ and check the checkbox 'Sign the .XAP file' as shown below:

Now click on the button 'Create Test Certificate'. Enter the password and confirm password and click 'OK' button.

3: Now click on the 'More Details' button highlighted in blue colour. This will show you a 'Certificate' window. Click on the 'Install Certificate' button as shown below:

Clicking on the button brings up the 'Certificate Import wizard'. Click on the 'Next' button and choose 'Place all certificates in the following store'. Click on the Browse button. This will show you a 'Certificate Store'. Choose 'Trusted Publisher' and finish the wizard. Now repeat the same step to install this certificate in 'Trusted Root Certification Authorities'.

That's it! You are done with the configuration. Now hit 'F5' to launch the Silverlight application in a browser. Fill the details and click on the 'Send' button. This will show you a Internet Security dialog box. Click on the 'Allow' button and you will see the output as shown below:

HostForLIFE.eu Silverlight 5 Hosting
HostForLIFE.eu is European Windows Hosting Provider which focuses on Windows Platform only. We deliver on-demand hosting solutions including Shared hosting, Reseller Hosting, Cloud Hosting, Dedicated Servers, and IT as a Service for companies of all sizes. We have customers from around the globe, spread across every continent. We serve the hosting needs of the business and professional, government and nonprofit, entertainment and personal use market segments.


Silverlight 6 Hosting Spain - HostForLIFE.eu :: StringFormat and CurrentCulture in Silverlight

clock March 10, 2015 07:46 by author Peter

I recently got a note around a pestering issue in utilizing StringFormat as a part of XAML binding expressions and how it doesn't respect current user’s culture settings. This is genuine that there is an issue in that it doesn't in WPF or Silverlight. In the event that you don't hear what I'm saying, Silverlight acquainted the capacity with utilization StringFormat in data binding expressions (WPF has had this since 3.5 SP1) so you could do some formatting in-line in your binding.  Like this:

<TextBlock Text="{Binding Path=CurrentDate, StringFormat=Current Timestamp is: \{0:G\}}" />

This would bring about content that future organized straightforwardly utilizing your string Formatter without the requirement for code-behind or any non specific ValueConverter. This is an extremely accommodating gimmick for organizing UI values and at times trading ValueConverters for straightforward assignments.

The issue is that StringFormat isn't regarding the client's way of life settings. Take for instance this complete XAML:
<StackPanel x:Name="FooContainer">
<TextBlock x:Name="CultureInfo" />
<TextBlock x:Name="UICultureInfo" />
<TextBlock Text="{Binding Path=CurrentDate, StringFormat=Current Timestamp is: \{0:G\}}" />
<TextBlock x:Name="CostField" Text="{Binding Path=Cost, StringFormat=Cost is: \{0:c\}}" />
 <toolkit:GlobalCalendar  />
</StackPanel>

This is being sure to a straightforward item that uncovered two properties for the reasons of showing: CurrentDate (DateTime) and Cost (double). Utilizing my standard US-English settings and territorial inclination the result would be:

Presently, give me a chance to tell my Silverlight application that I have an alternate culture information.  I can do this without having to force a language pack installation of sorts and completely change my machine. Including the way of culture/uiculture params to the <object> tag does the trap. I'll transform it to "de-de" for German. Here is the new output:

Indeed the settings perceive an alternate culture, StringFormat is not doing what I anticipate. I would have expected an alternate date show for German settings (d.m.yyyy) and an alternate currency display instead of dollars.

Shockingly this is an issue in StringFormat at this time, however there is a simple workaround that if you are creating a localized app you can add to your code that shouldn’t affect your default language settings either.  In my constructor I add this line of code:
this.Language = XmlLanguage.GetLanguage(Thread.CurrentThread.CurrentCulture.Name);

This advises the markup system to utilize the current culture settings as the UI language. XmlLanguage is a piece of the System.Windows.Markup namespace, so guarantee you get that out explicitly or add a using statement.  Now refreshing my German settings sample I get:

Not surprisingly. Changing (or removing the explicit setting of culture in my  <object> tag) back to my default culture settings brings about my US-English preferences being used and no need for me to change the XAML.

HostForLIFE.eu Silverlight 5 Hosting
HostForLIFE.eu is European Windows Hosting Provider which focuses on Windows Platform only. We deliver on-demand hosting solutions including Shared hosting, Reseller Hosting, Cloud Hosting, Dedicated Servers, and IT as a Service for companies of all sizes. We have customers from around the globe, spread across every continent. We serve the hosting needs of the business and professional, government and nonprofit, entertainment and personal use market segments.


Silverlight 5 Hosting - HostForLIFE.eu :: Using Stack Panel Layout in Silverlight

clock March 3, 2015 08:11 by author Peter

In this article let us figure out how to utilize Stack panel Layout in a Silverlight application. StackPanel is an alternate most critical board in Silverlight. It is predominantly helpful when we need to demonstrate some of your Silverlight components either Horizontally or Vertically.

Of course, open visual studio and select Silverlight project. We can perceive that there is a Grid format in our MainPage.xaml. Delete the default Grid layout and just drag and drop the Stack panel Layout into our application. The code for this looks like as:
<StackPanel Orientation="Vertical" Background="White" Height="200" Width="100">
            <Rectangle Height="50" Width="100" Fill="Red" />
            <Rectangle Height="50" Width="100" Fill="Blue" />
           <Rectangle Height="50" Width="100" Fill="Gray" />
            <Rectangle Height="50" Width="100" Fill="Goldenrod" />      
</StackPanel>

From the above code we can perceive that I put 4 rectangles in our Stack panel layout. What's more I have given a worth "Vertical" to the property "Orientation" of Stack board design. It implies that all the four rectangles will allign in vertical request. Presently give us a chance to assume we need all the rectangles to be adjusted in level request, then we ought to give the worth "Flat" to the property "Introduction" of Stack board format.

The code for this looks like as:
Presently give us a chance to assume we need all the rectangles to be adjusted in flat request, then we ought to give value “Horizontal” to the property “Orientation”  of Stack panel layout. The code for this looks like as
<StackPanel Orientation="Horizontal" Background="White" Height="100" Width="300">
            <Rectangle Height="100" Width="60" Fill="Red" />
            <Rectangle Height="100" Width="60" Fill="Blue" />
            <Rectangle Height="100" Width="60" Fill="gray" />
            <Rectangle Height="100" Width="60" Fill="Goldenrod" />      
</StackPanel>

And this is the output:

Here is the sample code for the above explanation:

MainPage.xaml
<UserControl x:Class="SilverlightApplication1.MainPage"
    xmlns=http://schemas.microsoft.com/winfx/2006/xaml/presentation
    xmlns:x=http://schemas.microsoft.com/winfx/2006/xaml
    xmlns:d=http://schemas.microsoft.com/expression/blend/2008
    xmlns:mc=http://schemas.openxmlformats.org/markup-compatibility/2006
    mc:Ignorable="d"
    d:DesignHeight="300" d:DesignWidth="400">
    <StackPanel Orientation="Vertical" Background="White" Height="200" Width="100">          

            <Rectangle Height="50" Width="100" Fill="Red" />
            <Rectangle Height="50" Width="100" Fill="Blue" />
            <Rectangle Height="50" Width="100" Fill="Gray" />
            <Rectangle Height="50" Width="100" Fill="Goldenrod" />     
    </StackPanel>
</UserControl>

That above code will give you rectangles with vertical alignment. If you want horizontal alignment then replace complete code between <StackPanel> and </StackPanel> with the horizontal code.

HostForLIFE.eu Silverlight 5 Hosting
HostForLIFE.eu is European Windows Hosting Provider which focuses on Windows Platform only. We deliver on-demand hosting solutions including Shared hosting, Reseller Hosting, Cloud Hosting, Dedicated Servers, and IT as a Service for companies of all sizes. We have customers from around the globe, spread across every continent. We serve the hosting needs of the business and professional, government and nonprofit, entertainment and personal use market segments.


Silverlight 5 Hosting Germany - HostForLIFE.eu :: Using "ClickMode" Property for Button control in Silverlight

clock January 27, 2015 06:35 by author Peter

In this article let us see the distinctive methods for utilizing the property Clickmode for a Button Control in a Silverlight application. Of course, open the visual studio and select the Silverlight 5 project.

First let us drag 3 different Button and TextBlock controls to Stack Panel as shown below into MainPage.xaml. Here I utilized a property called "ClickMode" for all the three button controls, But the value assigned to it is diverse.

For the first button I allocated the quality Hover to the ClickMode property, It implies that the click event handler happens at whatever point the mouse is floated onto this button.

For the second button, I allocated the quality Press to the ClickMode property, It implies that the click occasion handler happens at whatever point the mouse is clicked on this catch.  For the third button I assigned the value Release to the ClickMode property, It implies that the click event handler happens at whatever point the mouse is discharged from this button.

<Button x:Name="btn1" Margin ="5" HorizontalAlignment="Left"
Foreground="Black" Width="320" Click="OnClick1"
Content="On Mouse Hover this text will appear below" ClickMode="Hover" />
<TextBlock x:Name="text1" Margin ="0,8,0,0" />
<Button x:Name="btn2" Margin ="5,5,5,5"  HorizontalAlignment="Left"
Foreground="Black" Width="320" Click="OnClick2"
Content="On Button Press this text will appear below" ClickMode="Press" />
<TextBlock x:Name="text2" Margin="0,8,0,0" />
<Button x:Name="btn3" Margin ="5,5,5,5" HorizontalAlignment="Left"           

Click="OnClick3" Width="320" Content="On Button Release this text will appear    below" ClickMode="Release"/>
<TextBlock x:Name="text3" Margin ="0,8,0,0" />

Now i am writing the code for button click events in the MainPage.xaml.cs
public MainPage()
        {
            InitializeComponent();
        }
        void OnClick1(object sender, RoutedEventArgs e)
        {
            btn1.Foreground = new SolidColorBrush(Colors.Blue);
            text1.Text = "On Mouse Hover this text will appear below.";
            text2.Text = "";
            text3.Text = "";
        }
        void OnClick2(object sender, RoutedEventArgs e)
        {
            btn2.Foreground = new SolidColorBrush(Colors.Green);
            text1.Text = "";
            text2.Text = "On Button Press this text will appear below.";
            text3.Text = "";
        }
        void OnClick3(object sender, RoutedEventArgs e)
        {
            btn1.Foreground = new SolidColorBrush(Colors.Green);
            btn2.Foreground = new SolidColorBrush(Colors.Blue);
            text1.Text = "";
            text2.Text = "";
            text3.Text = "On Button Release this text will appear below.";
        }

Just refresh it. And here is the output.

Output for the first Button looks like:

Output for the second Button looks like:

Output for the third Button looks like: 

HostForLIFE.eu Silverlight 5 Hosting
HostForLIFE.eu is European Windows Hosting Provider which focuses on Windows Platform only. We deliver on-demand hosting solutions including Shared hosting, Reseller Hosting, Cloud Hosting, Dedicated Servers, and IT as a Service for companies of all sizes. We have customers from around the globe, spread across every continent. We serve the hosting needs of the business and professional, government and nonprofit, entertainment and personal use market segments.


Silverlight 5 Hosting France - HostForLIFE.eu :: Async Web Service Calls using Delegates in Silverlight

clock January 6, 2015 06:57 by author Peter

In this post, I've been using Web-Service brings in Silverlight for various years now in a group of different applications with the unwieldy async BeginGetResponse, callback, EndGetResponse syntax. It's all been working extraordinary, I joyfully have a layout for this and can bash any new service integrations pretty quickly and has not been getting in the way. For a straightforward Get request they look something like this:

public string server = "123.123.123.123";
public void GetExample()
{
    String url = "http://" + server + "/getexample";
    try
    {
        HttpWebRequest request = (HttpWebRequest)WebRequest.Create(url);
        IAsyncResult result = null;
        result = request.BeginGetResponse(GetExampleCallback, request);
    }
    catch (Exception)
    {
    }
}
void GetExampleCallback(IAsyncResult ar)
{
    var request = ar.AsyncState as HttpWebRequest;
    var response = request.EndGetResponse(ar) as HttpWebResponse;
    using (var reader = new StreamReader(response.GetResponseStream()))
    {
        string result = reader.ReadToEnd();
        // now do something with this
    }
}

Which is all great and I typically have some extra code here to callback to a representative which can then do something, for example, show the result nonconcurrently with the regular playing around of recovering this onto the GUI string using a BeginInvoke Dispatch.
It then gets somewhat more muddled when you need to make a post ask for and need to push the XML parameters in an alternate asynch BeginGetRequestStream capacity which means you're getting callback after callback.

Simple enough, these can be packaged into a class for every Webservice work and can utilize some templating to diminish the exertion, yet's regardless it really dull. I've remain faithful to it in light of the fact that it meets expectations, I have an example and normally its not all that much inconvenience and once done means I can concentrate on the other fascinating bits of the application.

What I thought of resembles this:
using System.Threading.Tasks;

public string server = "123.123.123.123";
public void GetExample2()
{
    String url = "http://" + server + "/getexample2";
    try  
 {
        HttpWebRequest request = (HttpWebRequest)WebRequest.Create(url);
        IAsyncResult result = null;
        ManualResetEvent mre = new ManualResetEvent(false);
        result = request.BeginGetResponse((cb) =>
        {
            // Callback
            using (var response = request.EndGetResponse(cb) as HttpWebResponse)
            {
                using (var reader = new StreamReader(response.GetResponseStream()))
                {
                }
            }
            mre.Set();
        }, request);
        mre.WaitOne();
  }
    catch (Exception)
    {
    }
}

Essentially this is to handle the offbeat nature. In the event that you run this in the debugger you can see the BeginGetResponse call being made. Waitone() which is the typical string stream of the operation. You can then see the debugger bounce move down to the callback. The mre.set then sets the stream to proceed in the fundamental string once the callback has completed.


European Silverlight 5 Hosting – HostForLIFE.eu :: Tips - The Easiest way to Reading URL-Parameters in Silverlight

clock August 15, 2014 08:38 by author Onit

In this guide we will showed you how to read the URL-Parameters in Silverlight this article will showed you the easiest way to read it. In CRM there is a setting that you can “pass-param”. If you are on a CRM Form you get keys like “typename” and “id”.

Below is the Complete list of CRM:

Parameter

Name

Description

typename

Entity Name

Name of the entity

type

Entity Type Code

Integer that uniquely identifies the entity in a specific organization

id

Object GUID

GUID that represents a record.

orgname

Organization Name

Unique name of the organization.

userlcid

User Language Code

Language code identifier that is being used by the current user.

orglcid

Organization Language Code

Language code identifier that represents the base language for the organization.


For Example is like

[something].aspx?id=%7bB2232821-A775-DF11-8DD1-00155DBA3809%7d&orglcid=1033&orgname=adventureworkscycle&type=1&typename=account&userlcid=1033

If you have the Silverlight in the Sitemap you don’t get (of course), typename, type and id. You can read them in your Silverlight:

IDictionary<string, string> QueryString = HtmlPage.Document.QueryString;
 string orgname, entityname;

 if (QueryString.ContainsKey("orgname"))
     orgname = QueryString["orgname"];

 if (QueryString.ContainsKey("typename"))
     entityname = QueryString["typename"];


European Silverlight 5 Hosting – HostForLIFE.eu :: How to Create Multi-Click Event in Silverlight 5

clock August 6, 2014 07:22 by author Onit

Silverlight 5 has given us a new property in the MouseButtonEventArgs called Click Count. Before the release of this Silverlight 5, there are no implementation of “double click” event, you need to write your code to implement that. But instead of giving double click event, the Silverlight gave us the ability to tracking how much clicking we done. But there’s a limitation of the clickcount, and in this article will look at creating a solution to resolve it.

Implement ClickCount

For this post we will be using a simple test harness that look like this:

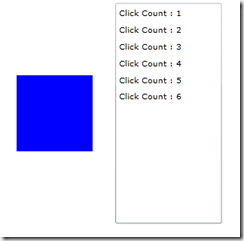
The blue box on the left is going to be our click area.  The right side is a simple ListBox with the ItemsSource set to an ObservableCollection<string>.  And here is what the XAML looks like:

<Grid x:Name="LayoutRoot" Background="White">
    <Grid.ColumnDefinitions>
        <ColumnDefinition/>
        <ColumnDefinition/>
    </Grid.ColumnDefinitions>
       
    <Rectangle Fill="Blue"
               Width="100"
               Height="100"
               VerticalAlignment="Center"
               HorizontalAlignment="Center"/>
       
    <ListBox x:Name="lbClicks"
             Margin="5,5,5,5"
             HorizontalAlignment="Stretch"
             VerticalAlignment="Stretch"
             Grid.Column="1"/>
</Grid>

You can use the code below for the code behind that xaml

private ObservableCollection<string> _events =
             new ObservableCollection<string>();
public MainPage()
{
    InitializeComponent();
    lbClicks.ItemsSource = _events;
}

look at the first example. To track the ClickCount we need to add the MouseLeftButtonDown event. Add the code below to our rectangle in XAML:

<Rectangle Fill="Blue"
            Width="100"
            Height="100"
            VerticalAlignment="Center"
            HorizontalAlignment="Center"         
MouseLeftButtonDown="Rectangle_MouseLeftButtonDown"/>

In our event handler, we can easily track the click count by adding a new string to our _events collection.  You will notice that the ClickCount will increase each time you click the mouse button if you are quick enough.  Pause in the clicking for a moment and the ClickCount will reset!.

private void Rectangle_MouseLeftButtonDown(object sender,
                                  MouseButtonEventArgs e)
{
       _events.Add("Click Count : " + e.ClickCount);
}

You can see that we can track a double click or triple click or a click-15 if we want.
All we would need to add is a conditional statement based off of the ClickCount property.

if(e.ClickCount == 2)

{
  MessageBox.Show("Double click");
}

Issue

however, While this is an interesting solution for the missing functionality, it does have a missing component that will cause you some grief.  Instead of our conditional statement that we had above, what if our code looked something like this:

if(e.ClickCount == 1)
{
  MessageBox.Show("Single click");
}
else if(e.ClickCount == 2)
{
  MessageBox.Show("Double click");}
}

If you run this code, you will notice that you will never fire the “Double click” MessageBox.  This is because the moment the first MessageBox is displayed, the focus is taken away from our rectangle and thus the ClickCount is started over when we come back to it.  This means that attempting to implement two events is a bit tricky.

How to make it worked!

So How to track multiple click?  You need to write some code.  In order to create a reusable solutionwe decide to implement solution as a behavior.  This will allow us to add a multiple click handler to any UIElement in XAML without having to do a bunch of wiring.  However, the code is straight forward enough you can easily remove it and create your own reusable solution.

Every time a user clicks on your object a DispatcherTimer is stopped and then started.  In addition we track the latest sender object and the ClickCount.  Once the user stops clicking on your object, the DispatcherTimer is allowed to hit the Click event and we fire an event giving the latest ClickCount and the sending object.

Our code for the behavior will looks like this:
public class MultiClick : Behavior<UIElement>

{
    private DispatcherTimer _timer;
    private int _clickCount;
    private object _sender;

    public MultiClick()
    {
        _timer = new DispatcherTimer()
             {Interval = new TimeSpan(0, 0, 0, 0, 250)};
        _timer.Tick += _timer_Tick;
    }

    #region events and delegates

    public delegate void MouseMultiClickHandler(object sender,
                                              int clickCount);
    public event MouseMultiClickHandler MouseMultiClick;

    #endregion

    #region Behavior Overrides
    protected override void OnAttached()
    {
        base.OnAttached();
        AssociatedObject.MouseLeftButtonDown
        += AssociatedObject_MouseLeftButtonDown;
    }

    protected override void OnDetaching()
    {
        base.OnDetaching();
        AssociatedObject.MouseLeftButtonDown
        -= AssociatedObject_MouseLeftButtonDown;
    }
    #endregion

    #region EventHandlers

    void _timer_Tick(object sender, EventArgs e)
    {
        _timer.Stop();

        if (MouseMultiClick != null)
            MouseMultiClick(_sender, _clickCount);
    }

    void AssociatedObject_MouseLeftButtonDown(object sender,
                                   MouseButtonEventArgs e)
    {
        _timer.Stop();
        _clickCount = e.ClickCount;
        _sender = sender;
        _timer.Start();

    }

    #endregion

}

The OnAttached/OnDetaching methods are how the Behavior is attached to the object, an UIElement is our case.  The AssociatedObject is simply to object that the Behavior is attached to.  As we discussed before, the DispatcherTimer is stopped and started when the user clicks on the object.  Once the DispatcherTimer hits the Click event, it(dispatcher time) will stop stopped, a MouseMultiClick event is fired and the Behavior waits for the next MouseLeftButtonDown event.

**Note: Its important to set the time at 200 milliseconds. And no longer than that you may get unexpected results.

This is how we use our behavior, Here is what are Rectangle looks like with our Behavior.  I have also removed the MouseLeftButtonDown event.

<Rectangle Fill="Blue"
            Width="100"
            Height="100"
            VerticalAlignment="Center"
            HorizontalAlignment="Center">
    <i:Interaction.Behaviors>
        <local:MultiClick MouseMultiClick="MultiClick_MouseMultiClick"/>
    </i:Interaction.Behaviors>
</Rectangle>

You can see we attached to the MouseMultiClick event we created in our Behavior.  The code behind is pretty much identical to our original code behind, where we are simply tracking the event:

private void MultiClick_MouseMultiClick(object sender,
                                       int clickCount)
{
    _events.Add("Multi Click : " + clickCount);
}
  If you run the project again, you will now see that instead of getting an event for every click, you only get one event for each round of clicking.  So you can track single, double, triple, etc.  From there you can implement your code based on your project needs.


Silverlight 5 Hosting Germany - HostForLIFE.eu :: How to access controls in DataGrid TemplateColumn header?

clock June 12, 2014 08:36 by author Peter

A data grid view is a rectangular control made of columns and rows. I have a DataGrid where I have included some controls in column header. Each column is a Template column. These controls appear just below the column header which are used for entering filter information. Here's the issue on my code on Silverlight 5.

VisualTreeHelper class helps to iterate through the visual tree of the xaml. Using it we can find the child and parent controls of the rendered controls. Lets check the Visual Tree of the rendered control using Silverlight Spy.

The Following Method do a search over the child controls with in a control recursively and returns the control based on Name.

private object GetChildControl(DependencyObject parent, string controlName)


    Object tempObj = null;
    int count = VisualTreeHelper.GetChildrenCount(parent);
    for (int counter = 0; counter < count; counter++)
    {
        //Get The Child Control based on Index
        tempObj = VisualTreeHelper.GetChild(parent, counter);
        //If Control's name Property matches with the argument control
        //name supplied then Return Control
        if ((tempObj as DependencyObject).GetValue(NameProperty).ToString() == controlName)
            return tempObj;
        else //Else Search Recursively
        {
            tempObj = GetChildControl(tempObj as DependencyObject, controlName);
            if (tempObj != null)
                return tempObj;
        }
    }
    return null;
}

Make sure that the same has to be delegated to UI thread using Dispatcher.As the controls created using UI Thread can not be accessed from other thread.
//Access the Grid Header Controls
Dispatcher.BeginInvoke(delegate
{
    var hyperlinkControl = GetChildControl(dataGrid1, "hlSort");
    var checkControl = GetChildControl(dataGrid1, "chkSelectAll");
});


About HostForLIFE.eu

HostForLIFE.eu is European Windows Hosting Provider which focuses on Windows Platform only. We deliver on-demand hosting solutions including Shared hosting, Reseller Hosting, Cloud Hosting, Dedicated Servers, and IT as a Service for companies of all sizes.

We have offered the latest Windows 2016 Hosting, ASP.NET Core 2.2.1 Hosting, ASP.NET MVC 6 Hosting and SQL 2017 Hosting.


Tag cloud

Sign in