European Silverlight 4 & Silverlight 5 Hosting BLOG

BLOG about Silverlight 5 Hosting and Its Techologies - Dedicated to European Windows Hosting Customer

European Silverlight 6 Hosting - HostForLIFE.eu :: PasswordBox control in Silverlight using C#

clock July 31, 2018 11:15 by author Peter

PasswordBox control
PasswordBox control is used to hide the characters a user is typing for privacy and security reasons. It is essential to use this control whenever you are receiving a password from a user.

Creating a Password in XAML
<PasswordBox Height="23" HorizontalAlignment="Left" Margin="10,10,0,0" Name="PasswordBox1" VerticalAlignment="Top" Width="120" />
The Width and Height attributes of the PasswordBox element represent the width and the height of a Password. The Name attribute represents the name of the control, which is a unique identifier of a control. The default view of the PasswordBox control looks like this.


Creating a PasswordBox control at run time
PasswordBox pwd = new PasswordBox();    
pwd.Height = 30
pwd.Width = 200
pwd.MaxLength = 25
pwd.PasswordChar = "*"
LayoutRoot.Children.Add(pwd)


Properties - These are the following properties of the PasswordBox control.

  • Width - The Width property of the Passwordbox control represent the width of a PasswordBox.
  • Height -  The Height property of the Passwordbox control represent the width of a PasswordBox.
  • MaxLength - The MaxLength property is used to get and set the maximum number of characters you can enter in a PasswordBox.
  • Password property - The Password property is used to get and set the current password in a PasswordBox.
  • PasswordChar - PasswordChar property is used to get and set the masking character for the PasswordBox. The default masking character is a dot(.).
  • VerticalAlignment - VerticalAlignment is used to Gets or sets the vertical alignment characteristics applied to this element when it is composed within a parent element such as a panel or items control.
  • HorizontalAlignment - HorizontalAlignment is used to Get or set the horizontal alignment characteristics applied to this element when it is composed within a parent element.
  • Name - Name property is used to Get and set the identifying name of the element.


Using the property PasswordChar
The default masking character is a dot(.) but we can change masking character . to * or other char. For example we change property PasswordChar =* and then enter password in the box. It will looks like this.
Output looks like this.

Using MaxLength property
The maxLenth property Defines the maximum number of character that we enter in the PasswordBox control. For example - suppose we sets the MaxLenth property = 6 then it will take only 6 char after 6 char it will stop to take character automatically.
Output looks like this.

fig3.gif

Using Background property
Set the background property to display the background color of the control. Output looks like this.

We can also select a background image in PasswordBox control.

<PasswordBox.Background>
<ImageBrush ImageSource="/SilverlightApplication34;component/Images/flowers-image.jpg" />
</PasswordBox.Background>


Using foreground property
Set the Foreground property to display the char color of the control.
Output looks like this.


European Silverlight 6 Hosting - HostForLIFE.eu :: Creating a Beautiful Splash Screen For Silverlight Applications

clock July 26, 2018 08:18 by author Peter

There are many other great articles and blog posts on how to create simple Silverlight Splash Screens. This article adds on top of them and helps you design a more complex splash screen with Story Boards and Floating Text Blocks. I am not a great designer and thus I am taking a design que from Telerik's Silverlight Demos splash screen. They have some amazing designers and their splash screen is an amazing example of that. If you have not already noticed it please visit http://demos.telerik.com/silverlight/ and have a look yourself. We will try to replicate the same behavior in our splash screen. Here is a step-by-step guide to do this.

1. Create your XAML
In order to add the splash screen you will first need to add a new Silverlight 1.0 JavaScript (we will refer to it as SLJS for the sake of writing simplicity) page on your server side code.

Since you cannot modify this file in Blend, I created a new Silverlight project and created a new Silverlight User control in it.
Once I had completed the design of this page in Blend, I copied the content to the Silverlight JS page on the server side.
I had to make a few modifications that are listed below.

  • First delete the x:class namespace as that is not supported on a SLJS page
  • Also delete the underlying code file (in my case it was SplashScreen.xaml.cs)
  • I added a storyboard animation to float the text from left to right

<Grid.Resources>
  <Storyboardx:Name="sb1"RepeatBehavior="1x"Completed="onCompleted">
    <DoubleAnimationDuration="0:0:5"To="255"
    Storyboard.TargetProperty="X"Storyboard.TargetName="myTranslate"d:IsOptimized="True"/>
  </Storyboard>
</Grid.Resources>

 
Based on your design, the following content may change (I designed it to match the same as Telerik's splash page):
<Grid Background="#FFF4F4F4" RenderTransformOrigin="0.5,0.5"> <Grid.RowDefinitions> <RowDefinition Height="120"/> <RowDefinition Height="32"/> <RowDefinition Height="8"/> <RowDefinition Height="20"/>
 <RowDefinition Height="375*"/> </Grid.RowDefinitions> <TextBlock HorizontalAlignment="Left" TextWrapping="Wrap" Grid.Row="0" Text="Silverlight" VerticalAlignment="Top" Height="153" Width="806" FontSize="133.333"
Foreground="#FFEEEEEE" Grid.RowSpan="3"/> <!--<StackPanel Orientation="Horizontal" Grid.Row="1" Margin="100,0,0,0" >
<Image Source="/Content/np_logo.PNG" Margin="0,0,5,0" Width="32" />
<TextBlock Text="Netpractise" FontSize="26.667" Foreground="Black"  FontFamily="Moire Light" x:Name="editing" FontWeight="ExtraBold" Height="32"/>
</StackPanel>--> <Image Source="/Content/np.PNG" Grid.Row="1" Margin="100,0,0,0" HorizontalAlignment="Left" /> <Rectangle Height="5" Fill="#FFA0DA0A" Width="200" HorizontalAlignment="Left"  Margin="100,0,0,0"
Grid.Row="2"/> <!--<TextBlock Text="digital communication innovation" Loaded="onTextBoxDigitalLoaded" Margin="100,0,0,0"  HorizontalAlignment="Left" FontFamily="Moire" FontSize="13.333" Height="16" Grid.Row="3"/>-->
<Image Source="/Content/baseline.PNG"  Margin="100,0,0,0" Width="300"  HorizontalAlignment="Left" Grid.Row="3"/> <!-- Progress bar--> <Rectangle Fill="#FF24A9F3" Height="5" HorizontalAlignment="Left" x:Name="uxProgress"
Grid.Row="2"/> <!--floating text boxes--> <TextBlock x:Name="textBlock" HorizontalAlignment="Left" TextWrapping="Wrap" Text="Be it Videos, Images, Flash or Audio we support all."
VerticalAlignment="Center" Grid.Row="4" Height="400"
Width="510" Foreground="#FF24A9F3" FontSize="48" FontFamily="Segoe WP Light" RenderTransformOrigin="0.5,0.5"
Loaded="onTextBoxLoaded" Margin="20,0,0,0"> <TextBlock.RenderTransform> <TransformGroup> <TranslateTransform x:Name="myTranslate"/> </TransformGroup> </TextBlock.RenderTransform> <!--The story board can be placed
within this to run from XAML or JS functions can be used.--> <!--<TextBlock.Triggers>
<EventTrigger RoutedEvent="TextBlock.Loaded">
<BeginStoryboard>
</BeginStoryboard>
</EventTrigger>               
</TextBlock.Triggers>--> </TextBlock> <TextBlock x:Name="txtProgressPercentage" Grid.Row="4" HorizontalAlignment="Right" Margin="0,-150,-170,0" VerticalAlignment="Center" TextWrapping="Wrap" Height="358" Width="651"
FontSize="300" Foreground="#FFE4E4E4"/> </Grid>


2. Code the logic in JavaScript file
When you add a new SLJS page in your application, it also creates an underlying .js file where you can write your code logic.
All I had to do was to create 3 functions in it ; they are:

onSourceDownloadProgressChanged

This is to update the progress bar and the big textblock that shows % update in numbers.
var i = 0;
function onSourceDownloadProgressChanged(sender, eventArgs)
{
sender.findName("txtProgressPercentage").Text = Math.round(Math.round((eventArgs.progress * 1000)) / 10, 1).toString();
//get browser width   var width = window.document.body.clientWidth;
sender.findName("uxProgress").Width = (width * eventArgs.progress);
}
 

onTextBoxLoaded
This is to trigger the first story board.
function onTextBoxLoaded(sender, eventArgs)
{
// Retrieve the Storyboard and begin it.     sender.findName("sb1").begin();
}


onCompleted
This is to change the Text of the floating Text box and start the Storyboard again with updated text.
function onCompleted(sender, eventArgs)
{
try{
i++;
sender.findName("myTranslate").X = 0;
switch (i) {
case 1:
sender.findName("textBlock").Text = "This is my first content";
break;
case 2:
sender.findName("textBlock").Text = "This is my second content";
break;
case 3:
sender.findName("textBlock").Text = "This is my third content.";
break;
case 4:
sender.findName("textBlock").Text = "This is my fourth content";
break;
case 5:
sender.findName("textBlock").Text = "This is my fifth content.";
break;
case 6:
sender.findName("textBlock").Text = "This is my sixth content";
i = 1;
break;
}
}catch(e){
}
sender.findName("sb1").begin();


I have 6 text block contents that show up on the screen one by one. You can have as many as you want and can also pull them from a collection if that's what you need.

3. Updating the Default.html or Default.aspx page
This is an important and the last step to hook the splash screen we created to our Silverlight application.
Just add a few parameters and a link to the JavaScript file just below the </head> tag.
<script type="text/javascript" src="splashscreen.js"></script>

The following new parameters go in <div id="silverlightControlHost">:
<param name="splashscreensource" value="SplashScreen.xaml" /> <param name="onSourceDownloadProgressChanged" value="onSourceDownloadProgressChanged" />

The first parameter just tells your app which splash screen to load at startup and the second one calls the js function that eventually updates the progress bar and % progress textblock with numbers.


European Silverlight 6 Hosting - HostForLIFE.eu :: Fixing Win32 Unhandled Exception in Silverlight Web App

clock July 24, 2018 08:49 by author Peter

Today while testing we encountered a strange scenario in our Silverlight Web App. We were getting a System Win 32 error when running the deployed application. unfortunately the error was not reproducible when running the app in debug (F5) mode.

Here is a snapshot of the exception message.

When starting a new instance of Visual Studio to debug this JIT issue all we got was that there was a Stack Overflow causing this issue. But that's all; no source code or stack trace to pinpoint the exact code that was causing the trouble.

How often do you get in a scenario where you can see a bug in deployed or published code but not in debug mode giving you no option to pinpoint the exact code causing the trouble? Believe me, it happens to me all the time.
 
I pop-in many Message Boxes in the methods that I feel could be erroneous & keep deleting them when I am sure that the method is not the one I am looking for.
 
Returnng to the issue today, I have a record in my Silverlight Grid, which when double-clicked should open a child window having the details & this part of the code was the culprit. Feels great to zero-in & find the guilty.
 
So the problem is in the child window looking forward tells me it's a TextBox that has the ValidatesOnDataErrors property set to true.

Here was how it was layed out on the screen:
<TextBox Text="{Binding ProfileName,ElementName=RadWinEditMenuProfile, Mode=TwoWay, NotifyOnValidationError=True, ValidatesOnExceptions=True,ValidatesOnDataErrors=True, TargetNullValue=''}"
 x:Name="txtBoxProfile" MaxLength="50" />
 
Notice the  ValidatesOnDataErrors=True property.
So next step was to remove it & Voila! It worked. No error this time.  But wait, we have that property set for a reason. We want to force the TextBox to show an error on all data validation errors. Having that figured out I knew the next thing we need to look into was the code that was doing the data validation.

Here is the code used for it:
Public ReadOnly Property [Error] As String Implements System.ComponentModel.IDataErrorInfo.Error
    Get
        Return _Errors
    End Get
End Property

Default Public ReadOnly Property Item(propertyName As String) As String Implements System.ComponentModel.IDataErrorInfo.Item
    Get
        Select Case propertyName
            Case "ProfileName"
                If String.IsNullOrWhiteSpace(ProfileName) = False Then
                    'ProfileName = ProfileName.Trim
                    If context.MenuProfiles.Any(Function(t) t.Id <> SelectedProfile.Id AndAlso t.ProfileName.ToLower.Trim = ProfileName.ToLower.Trim) Then
                        _Errors = _ErrorsText
                        Return "Profile Name is already in use."
                    ElseIf Regex.IsMatch(ProfileName.ToLower.Trim, CustomDeclaration.REG_NAME) = False Then
                        _Errors = _ErrorsText
                        Return CustomDeclaration.INVALID_NAME
                    End If
                End If
                Exit Select
        End Select
        Return Nothing
    End Get
End Property
Private _ProfileName As String
Public Property ProfileName() As String
    Get
        Return SelectedProfile.ProfileName
    End Get
    Set(ByVal value As String)
        _ProfileName = value
        SelectedProfile.ProfileName = value
        NotifyPropertyChanged("ProfileName")
    End Set
End Property

This is a standard implementation of IDataErrorInfo, so I will not get into the gory details of it and go directly to the code that was the issue.
Note that I have commented-out the line:
'ProfileName = ProfileName.Trim
 
This was the exact line of code causing the issue. I was trimming the property & then assigning it back, that in turn was calling the setter of the property & that in turn was calling the validation again.
 
Evidently, these two caused an infinite loop L L Not a good deal. This was the reason why we were getting the Stack Overflow error.  Commenting out that line & using trim wherever we were actually using the property.

For example:
Changed ProfileName.ToLower to ProfileName.ToLower.Trim fixed the issue once & for all. Nice & Cool.
 
So the next time you hit a stack overflow in your published code try to pin point the code & check if you are not implementing IDataErrorInfo or any other 2 properties that are dependent on each other like I was implementing it.


European Silverlight 6 Hosting - HostForLIFE.eu :: Add Silverlight Into a Web Page

clock July 19, 2018 09:24 by author Peter

This article explains how to add Silverlight into a web page using HTML. Use the following procedure to do this.

  • Create a Silverlight application
  • Add some TextBox and button to the XAML file
  • Write the logic on the click event of the button in the .cs file
  • Add a HTML page and add some tags to access the Silverlight generated .xap file

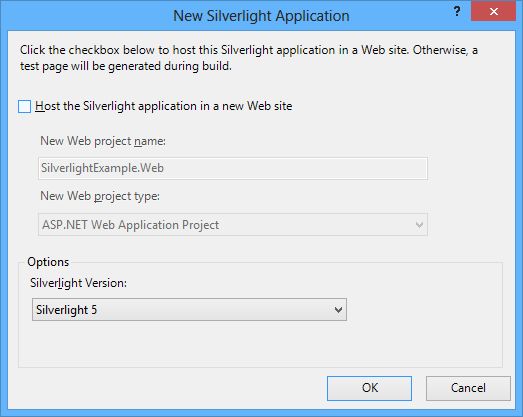
Step 1: Create a new project of Silverlight application named "SilverlightExample".

Uncheck the checkbox to not create a web project for hosting the Silverlight.


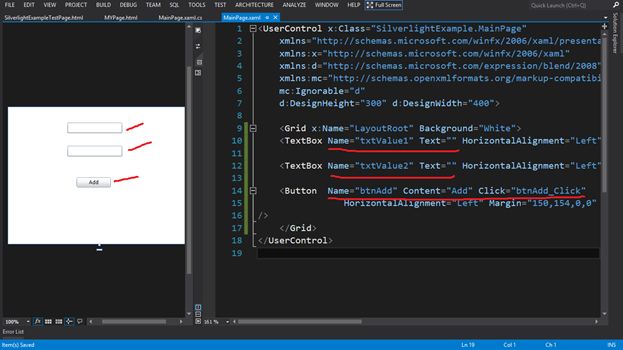
Step 2: In the default page named "MainPage.xaml", add 2 Textboxes for getting the input named "txtvalue1" and "txtvalue2" with blank text by default ( text=””) and add a button named "btnAdd" with content "Add". Then create onClick event of the button.
<TextBox Name="txtValue1" Text="" HorizontalAlignment="Left" Height="23" Margin="130,34,0,0" TextWrapping="Wrap"  VerticalAlignment="Top" Width="120"/>
<TextBox Name="txtValue2" Text="" HorizontalAlignment="Left" Height="23" Margin="130,85,0,0" TextWrapping="Wrap"  VerticalAlignment="Top" Width="120"/>
<Button  Name="btnAdd" Content="Add" Click="btnAdd_Click" HorizontalAlignment="Left" Margin="150,154,0,0" VerticalAlignment="Top" Width="75" />

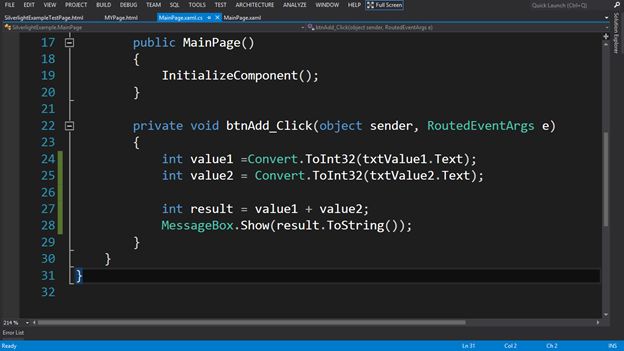
Step 3: Write the code in the section of the onclick event of the button in "MainPage.xaml.cs" that will add the values of the textboxes and show the addition via alert message.
int value1 = Convert.ToInt32(txtValue1.Text);
int value2 = Convert.ToInt32(txtValue2.Text);
int result = value1 + value2;
MessageBox.Show(result.ToString());

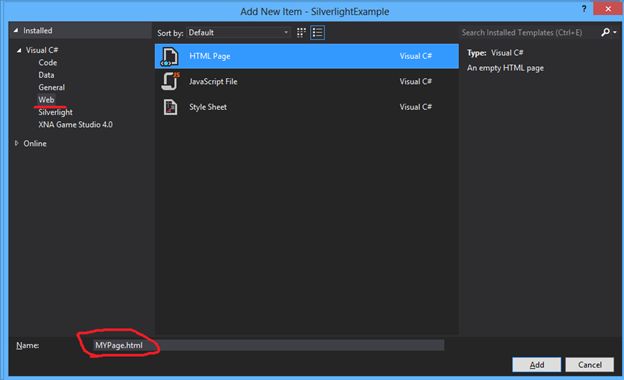
Step 4: Now add a HTML Page named "MYPage.html" into the application.

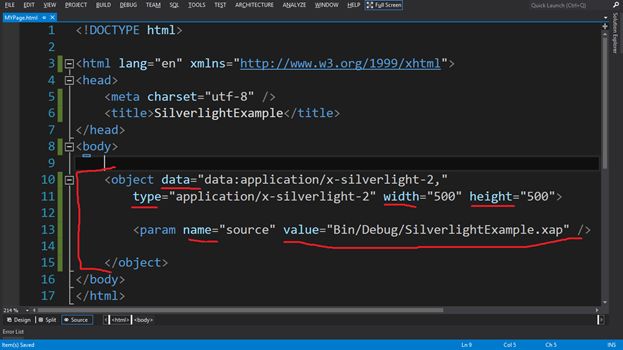
Add an <object> tag to the HTML page with data, type, width and height attributes and <param> element with name and value attributes.
<object data="data:application/x-silverlight-2," type="application/x-silverlight-2"
     width="500" height="500">
    <param name="source" value="Bin/Debug/SilverlightExample.xap" />
</object>

  • data attribute and its value are recommended to avoid performance issues on some browsers.
  • type attribute and the specific value shown are also required. This value uses the Silverlight MIME type to identify the plug-in and the required version.
  • width and height attributes are required for cross-browser compatibility.
  • the <param> element named source is required and indicates the location and name of your application file.

Note: .xap exists in the bin/Debug folder, that's why value="Bin/Debug/SilverlightExample.xap".

Open the HTML file using a browser.

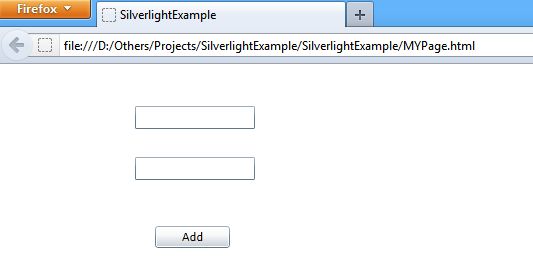
Open the html file via browser
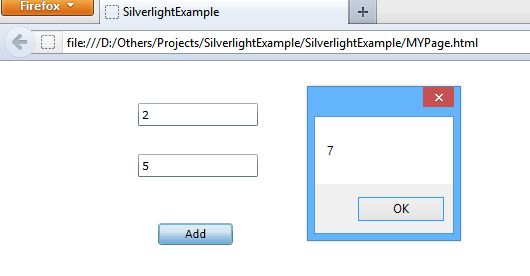
Enter the 2 integer values into the textboxes respectively and press the button to see the ouput.

You can also create the .html file anywhere in your system and put the Silverlight generated .xap file with in the same folder, but in this case you need to write the value="SilverlightExample.xap" because now the .xap and .html files are in the same folder or location.


European Silverlight 6 Hosting - HostForLIFE.eu :: Use Map in Silverlight to show the location

clock July 17, 2018 08:58 by author Peter

Silverlight can support maps in a page to show a particular location. Silverlight provides the Bing map control. To use the bing map you need use two dll files name as Microsoft.Maps.MapControl and another one is Microsoft.Maps.MapControl.Common. Reference of this two dll is must to work with bing map.

By right clicking on the Add Reference on the project name in Solution Explorer, you can add references of these two dlls. 

Once the references are added, you can use the map control as following in your .xaml page:
xmlns:mc=http://schemas.openxmlformats.org/markup-compatibility/2006 
xmlns:m="clr-namespace:Microsoft.Maps.MapControl;assembly=Microsoft.Maps.MapControl"

The first mc is for the common map dll and second for the other dll name as MapControl. 

Now, in the Grid control add the map control like below:

<m:Map x:Name="testMapUs" CredentialsProvider="XXXXXXXXXX" ScaleVisibility="Collapsed" LogoVisibility="Collapsed" CopyrightVisibility="Collapsed" Background="White" Mode="Road" Center="" ZoomLevel="12"> 
<m:Pushpin Location="00.00000,-00.00000"/> 
</m:Map>

As shown above

The CredentialProvider is the key which can provide the credential to use the map that you can get it form this website.

http://www.bing.com/mapindia/?mkt=en-in

Also from this website, you will get the actual location that you want to show in your map control.

<m:Pushpin/> tag can show the pushpin location on your map so user can get the exact location directly.

You will also get an longitude of your location from the above site. As per shown above when you use this control it show Logo, Copyright text and scale on  the map. If you do not need to display these, you can remove it by setting its Visibility property to Collapsed. 

There is different modes in the map like Road and Aerial. To change the mode of the map there is one property name as Mode="Aerial". In both mode aerial and road, you can have possible to set the zoom level as per your requirement.


European Silverlight 6 Hosting - HostForLIFE.eu :: Spire For WPF, .NET And Silverlight Applications From E-ICEBLUE

clock July 12, 2018 08:35 by author Peter

This article is about my views on Spire.doc which I tried for development purposes on my personal site. Now, I would like to discuss a few points about it. Recently, I came across a tool for .NET developers named Spire, which has more features and is an easy GUI interface tool for clients. E-ICEBLUE has a large number of tools and helps developers  a lot with different streams like .NET, Windows Presentation Foundation, and Silverlight. E-ICEBLUE also helps in providing customer support towards all products for their clients.

Tools from E-ICEBLUE

For .NET

  • Office for .NET
  • OfficeViewer for .NET
  • Doc for .NET
  • DocViewer for .NET
  • XLS for .NET
  • Spreadsheet for .NET
  • Presentation for .NET
  • PDF for .NET
  • PDFViewer for .NET
  • PDFViewer for ASP.NET
  • DataExport for .NET

For WPF

  • Office for WPF
  • Doc for WPF
  • DocViewer for WPF
  • XLS for WPF
  • PDF for WPF
  • PDFViewer for WPF

For Silverlight

  • Office for Silverlight
  • Doc for Silverlight
  • XLS for Silverlight
  • PDF for Silverlight

I tried using Spire.Office for my developments on .NET and WPF.

  • Helps in opening all the file formats.
  • Develop your .NET applications with easy GUI.
  • Surf for your APIs with the help of the "HELP document" available with the software.
  • Helps in opening Word documents, Spreadsheets, PDFs, and your project files on .NET applications including WPF, ASP.NET, WinForms, Web Services, etc.
  • You have all options here which you can find in MS-Office, like find & replace, copy/paste, review your documents, working with extensions, etc.
  • Helps in the conversion of various file formats – Excel sheets – adding digital signatures, etc.

I tried working with WPF projects with Data Binding, Animations, MVVM model, developing a media player, isolated storage, etc., and I feel Spire helps us with all features that Microsoft Visual Studio has in it.

Still, Spire works in a large scale on conversion of file formats, merging the data, exporting the data, accessing all data file formats, and multiple printing orientations etc.


European Silverlight 6 Hosting - HostForLIFE.eu :: Update Data Using Silverlight RIA Enabled ServiceToday

clock July 10, 2018 11:28 by author Peter

Update Data Using Silverlight RIA Enabled ServiceToday, in this article let's play around with one of the interesting and most useful concepts in Silverlight.

Question: What is update data using Silverlight RIA enabled service?
In simple terms "This application enables to update the data in the database with help of Silverlight RIA enabled service. It uses base platform of entity framework to communicate with database".

Step 1: Create a database named "Company" with employee table in it.

Step 2: Open up Visual Studio and create a new Silverlight application enabled with RIA Services
Step 3: When the project is created. Right-click on RIA Service project and add new entity data model framework and set it up for previously created database.
Step 4: Again right click on RIA service project and add Domain Service Class as new item.
Step 5: Complete code of EmployeeDomain.cs looks like this (Domain Service Class)
namespace SilverlightRIAInsert.Web
{
using System;
using System.Collections.Generic;
using System.ComponentModel;
using System.ComponentModel.DataAnnotations;
using System.Data;
using System.Linq;
using System.ServiceModel.DomainServices.EntityFramework;
using System.ServiceModel.DomainServices.Hosting;
using System.ServiceModel.DomainServices.Server;
// Implements application logic using the CompanyEntities context.
// TODO: Add your application logic to these methods or in additional methods.
// TODO: Wire up authentication (Windows/ASP.NET Forms) and uncomment the following to disable anonymous access
// Also consider adding roles to restrict access as appropriate.
// [RequiresAuthentication][EnableClientAccess()]
public class EmployeeDomain : LinqToEntitiesDomainService<CompanyEntities>
{
    // TODO:// Consider constraining the results of your query method.  If you need additional input you can
    // add parameters to this method or create additional query methods with different names.
    // To support paging you will need to add ordering to the 'Employee'
    query.public IQueryable<Employee> GetEmployee()
    {
        return this.ObjectContext.Employee;
    }
    public void InsertEmployee(Employee employee)
    {
        if ((employee.EntityState != EntityState.Detached))
        {
            this.ObjectContext.ObjectStateManager.ChangeObjectState(employee, EntityState.Added);
        }
        else{this.ObjectContext.Employee.AddObject(employee);
        }
    }
    public void UpdateEmployee(Employee currentEmployee)
    {
        this.ObjectContext.Employee.AttachAsModified(currentEmployee, this.ChangeSet.GetOriginal(currentEmployee));
    }
    public void DeleteEmployee(Employee employee)
    {
        if ((employee.EntityState != EntityState.Detached))
        {
            this.ObjectContext.ObjectStateManager.ChangeObjectState(employee, EntityState.Deleted);
        }
        else{this.ObjectContext.Employee.Attach(employee);
           this.ObjectContext.Employee.DeleteObject(employee);
        }
    }
}
}


Step 6: Now rebuild the solution file.
Step 7: The complete code of MainPage.xaml looks like this:
<usercontrolx:class="SilverlightRIAInsert.MainPage"xmlns="http://schemas.microsoft.com/winfx/2006/xaml/presentation"
xmlns:x="http://schemas.microsoft.com/winfx/2006/xaml"xmlns:d="http://schemas.microsoft.com/expression/blend/2008"
xmlns:mc="http://schemas.openxmlformats.org/markup-compatibility/2006"mc:ignorable="d"
d:designheight="300"d:designwidth="543">
<Gridx:Name="LayoutRoot"Width="608">
<TextBlockHeight="23"HorizontalAlignment="Left"Margin="152,29,0,0"Name="textBlock1"Text="Id"FontFamily="Verdana"FontSize="15"VerticalAlignment="Top"/>
<TextBoxHeight="23"HorizontalAlignment="Left"Margin="252,25,0,0"Name="textBox1"VerticalAlignment="Top"Width="120"/>
<TextBlockHeight="23"HorizontalAlignment="Left"Margin="150,72,0,0"Name="textBlock2"Text="FirstName"FontFamily="Verdana"FontSize="15"VerticalAlignment="Top"/>
<TextBoxHeight="23"HorizontalAlignment="Left"Margin="252,68,0,0"Name="textBox2"VerticalAlignment="Top"Width="120"/>
<TextBlockHeight="23"HorizontalAlignment="Left"Margin="150,113,0,0"Name="textBlock3"Text="LastName"FontFamily="Verdana"FontSize="15"VerticalAlignment="Top"/>
<TextBoxHeight="23"HorizontalAlignment="Left"Margin="252,113,0,0"Name="textBox3"VerticalAlignment="Top"Width="120"/>
<ButtonContent="Update"FontFamily="Verdana"FontSize="19"Background="DeepSkyBlue"Height="44"HorizontalAlignment="Left"Margin="252,206,0,0"Name="button1"VerticalAlignment="Top"Width="120"Click="button1_Click"/>
<TextBoxHeight="23"HorizontalAlignment="Left"Margin="252,155,0,0"Name="textBox4"VerticalAlignment="Top"Width="120"/>
<TextBlockHeight="23"HorizontalAlignment="Left"Margin="152,155,0,0"Name="textBlock4"Text="Age"FontFamily="Verdana"FontSize="16"VerticalAlignment="Top"/>
</Grid>"
</usercontrol>


Step 8: The complete code of MainPage.xaml.cs looks like this:
using System;
using System.Collections.Generic;
using System.Linq;
using System.Net;
using System.ServiceModel.DomainServices.Client;
using System.Windows;
using System.Windows.Controls;
using System.Windows.Documents;
using System.Windows.Input;
using System.Windows.Media;
using System.Windows.Media.Animation;
using System.Windows.Shapes;
using SilverlightRIAUpdate.Web;
namespace SilverlightRIAUpdate
{
public partial class MainPage : UserControl
{
    public MainPage()
    {
        InitializeComponent();
    }
    EmployeeDomain objDomain = new EmployeeDomain();
    private void button1_Click(object sender, RoutedEventArgs e)
    {
        EntityQuery<Employee> query = objDomain.GetEmployeeQuery();
        objDomain.Load(query, UpdateLoad, null);
        MessageBox.Show("Data Updated Successfully");
    }
    public void UpdateLoad(LoadOperation<Employee> emp)
    {
        foreach (Employee e in objDomain.Employees)
        {
            if (e.Id == int.Parse(textBox1.Text))
           {
                e.FirstName = textBox2.Text;
                e.LastName = textBox3.Text;
                e.Age = int.Parse(textBox4.Text);
                objDomain.SubmitChanges();
                break;
            }
        }
    }
}
}


About HostForLIFE.eu

HostForLIFE.eu is European Windows Hosting Provider which focuses on Windows Platform only. We deliver on-demand hosting solutions including Shared hosting, Reseller Hosting, Cloud Hosting, Dedicated Servers, and IT as a Service for companies of all sizes.

We have offered the latest Windows 2016 Hosting, ASP.NET Core 2.2.1 Hosting, ASP.NET MVC 6 Hosting and SQL 2017 Hosting.


Tag cloud

Sign in