European Silverlight 4 & Silverlight 5 Hosting BLOG

BLOG about Silverlight 5 Hosting and Its Techologies - Dedicated to European Windows Hosting Customer

European Silverlight 6 Hosting - HostForLIFE.eu :: Add Silverlight Into a Web Page

clock July 19, 2018 09:24 by author Peter

This article explains how to add Silverlight into a web page using HTML. Use the following procedure to do this.

  • Create a Silverlight application
  • Add some TextBox and button to the XAML file
  • Write the logic on the click event of the button in the .cs file
  • Add a HTML page and add some tags to access the Silverlight generated .xap file

Step 1: Create a new project of Silverlight application named "SilverlightExample".

Uncheck the checkbox to not create a web project for hosting the Silverlight.


Step 2: In the default page named "MainPage.xaml", add 2 Textboxes for getting the input named "txtvalue1" and "txtvalue2" with blank text by default ( text=””) and add a button named "btnAdd" with content "Add". Then create onClick event of the button.
<TextBox Name="txtValue1" Text="" HorizontalAlignment="Left" Height="23" Margin="130,34,0,0" TextWrapping="Wrap"  VerticalAlignment="Top" Width="120"/>
<TextBox Name="txtValue2" Text="" HorizontalAlignment="Left" Height="23" Margin="130,85,0,0" TextWrapping="Wrap"  VerticalAlignment="Top" Width="120"/>
<Button  Name="btnAdd" Content="Add" Click="btnAdd_Click" HorizontalAlignment="Left" Margin="150,154,0,0" VerticalAlignment="Top" Width="75" />

Step 3: Write the code in the section of the onclick event of the button in "MainPage.xaml.cs" that will add the values of the textboxes and show the addition via alert message.
int value1 = Convert.ToInt32(txtValue1.Text);
int value2 = Convert.ToInt32(txtValue2.Text);
int result = value1 + value2;
MessageBox.Show(result.ToString());

Step 4: Now add a HTML Page named "MYPage.html" into the application.

Add an <object> tag to the HTML page with data, type, width and height attributes and <param> element with name and value attributes.
<object data="data:application/x-silverlight-2," type="application/x-silverlight-2"
     width="500" height="500">
    <param name="source" value="Bin/Debug/SilverlightExample.xap" />
</object>

  • data attribute and its value are recommended to avoid performance issues on some browsers.
  • type attribute and the specific value shown are also required. This value uses the Silverlight MIME type to identify the plug-in and the required version.
  • width and height attributes are required for cross-browser compatibility.
  • the <param> element named source is required and indicates the location and name of your application file.

Note: .xap exists in the bin/Debug folder, that's why value="Bin/Debug/SilverlightExample.xap".

Open the HTML file using a browser.

Open the html file via browser
Enter the 2 integer values into the textboxes respectively and press the button to see the ouput.

You can also create the .html file anywhere in your system and put the Silverlight generated .xap file with in the same folder, but in this case you need to write the value="SilverlightExample.xap" because now the .xap and .html files are in the same folder or location.


European Silverlight 6 Hosting - HostForLIFE.eu :: Use Map in Silverlight to show the location

clock July 17, 2018 08:58 by author Peter

Silverlight can support maps in a page to show a particular location. Silverlight provides the Bing map control. To use the bing map you need use two dll files name as Microsoft.Maps.MapControl and another one is Microsoft.Maps.MapControl.Common. Reference of this two dll is must to work with bing map.

By right clicking on the Add Reference on the project name in Solution Explorer, you can add references of these two dlls. 

Once the references are added, you can use the map control as following in your .xaml page:
xmlns:mc=http://schemas.openxmlformats.org/markup-compatibility/2006 
xmlns:m="clr-namespace:Microsoft.Maps.MapControl;assembly=Microsoft.Maps.MapControl"

The first mc is for the common map dll and second for the other dll name as MapControl. 

Now, in the Grid control add the map control like below:

<m:Map x:Name="testMapUs" CredentialsProvider="XXXXXXXXXX" ScaleVisibility="Collapsed" LogoVisibility="Collapsed" CopyrightVisibility="Collapsed" Background="White" Mode="Road" Center="" ZoomLevel="12"> 
<m:Pushpin Location="00.00000,-00.00000"/> 
</m:Map>

As shown above

The CredentialProvider is the key which can provide the credential to use the map that you can get it form this website.

http://www.bing.com/mapindia/?mkt=en-in

Also from this website, you will get the actual location that you want to show in your map control.

<m:Pushpin/> tag can show the pushpin location on your map so user can get the exact location directly.

You will also get an longitude of your location from the above site. As per shown above when you use this control it show Logo, Copyright text and scale on  the map. If you do not need to display these, you can remove it by setting its Visibility property to Collapsed. 

There is different modes in the map like Road and Aerial. To change the mode of the map there is one property name as Mode="Aerial". In both mode aerial and road, you can have possible to set the zoom level as per your requirement.


European Silverlight 6 Hosting - HostForLIFE.eu :: Spire For WPF, .NET And Silverlight Applications From E-ICEBLUE

clock July 12, 2018 08:35 by author Peter

This article is about my views on Spire.doc which I tried for development purposes on my personal site. Now, I would like to discuss a few points about it. Recently, I came across a tool for .NET developers named Spire, which has more features and is an easy GUI interface tool for clients. E-ICEBLUE has a large number of tools and helps developers  a lot with different streams like .NET, Windows Presentation Foundation, and Silverlight. E-ICEBLUE also helps in providing customer support towards all products for their clients.

Tools from E-ICEBLUE

For .NET

  • Office for .NET
  • OfficeViewer for .NET
  • Doc for .NET
  • DocViewer for .NET
  • XLS for .NET
  • Spreadsheet for .NET
  • Presentation for .NET
  • PDF for .NET
  • PDFViewer for .NET
  • PDFViewer for ASP.NET
  • DataExport for .NET

For WPF

  • Office for WPF
  • Doc for WPF
  • DocViewer for WPF
  • XLS for WPF
  • PDF for WPF
  • PDFViewer for WPF

For Silverlight

  • Office for Silverlight
  • Doc for Silverlight
  • XLS for Silverlight
  • PDF for Silverlight

I tried using Spire.Office for my developments on .NET and WPF.

  • Helps in opening all the file formats.
  • Develop your .NET applications with easy GUI.
  • Surf for your APIs with the help of the "HELP document" available with the software.
  • Helps in opening Word documents, Spreadsheets, PDFs, and your project files on .NET applications including WPF, ASP.NET, WinForms, Web Services, etc.
  • You have all options here which you can find in MS-Office, like find & replace, copy/paste, review your documents, working with extensions, etc.
  • Helps in the conversion of various file formats – Excel sheets – adding digital signatures, etc.

I tried working with WPF projects with Data Binding, Animations, MVVM model, developing a media player, isolated storage, etc., and I feel Spire helps us with all features that Microsoft Visual Studio has in it.

Still, Spire works in a large scale on conversion of file formats, merging the data, exporting the data, accessing all data file formats, and multiple printing orientations etc.


European Silverlight 6 Hosting - HostForLIFE.eu :: Update Data Using Silverlight RIA Enabled ServiceToday

clock July 10, 2018 11:28 by author Peter

Update Data Using Silverlight RIA Enabled ServiceToday, in this article let's play around with one of the interesting and most useful concepts in Silverlight.

Question: What is update data using Silverlight RIA enabled service?
In simple terms "This application enables to update the data in the database with help of Silverlight RIA enabled service. It uses base platform of entity framework to communicate with database".

Step 1: Create a database named "Company" with employee table in it.

Step 2: Open up Visual Studio and create a new Silverlight application enabled with RIA Services
Step 3: When the project is created. Right-click on RIA Service project and add new entity data model framework and set it up for previously created database.
Step 4: Again right click on RIA service project and add Domain Service Class as new item.
Step 5: Complete code of EmployeeDomain.cs looks like this (Domain Service Class)
namespace SilverlightRIAInsert.Web
{
using System;
using System.Collections.Generic;
using System.ComponentModel;
using System.ComponentModel.DataAnnotations;
using System.Data;
using System.Linq;
using System.ServiceModel.DomainServices.EntityFramework;
using System.ServiceModel.DomainServices.Hosting;
using System.ServiceModel.DomainServices.Server;
// Implements application logic using the CompanyEntities context.
// TODO: Add your application logic to these methods or in additional methods.
// TODO: Wire up authentication (Windows/ASP.NET Forms) and uncomment the following to disable anonymous access
// Also consider adding roles to restrict access as appropriate.
// [RequiresAuthentication][EnableClientAccess()]
public class EmployeeDomain : LinqToEntitiesDomainService<CompanyEntities>
{
    // TODO:// Consider constraining the results of your query method.  If you need additional input you can
    // add parameters to this method or create additional query methods with different names.
    // To support paging you will need to add ordering to the 'Employee'
    query.public IQueryable<Employee> GetEmployee()
    {
        return this.ObjectContext.Employee;
    }
    public void InsertEmployee(Employee employee)
    {
        if ((employee.EntityState != EntityState.Detached))
        {
            this.ObjectContext.ObjectStateManager.ChangeObjectState(employee, EntityState.Added);
        }
        else{this.ObjectContext.Employee.AddObject(employee);
        }
    }
    public void UpdateEmployee(Employee currentEmployee)
    {
        this.ObjectContext.Employee.AttachAsModified(currentEmployee, this.ChangeSet.GetOriginal(currentEmployee));
    }
    public void DeleteEmployee(Employee employee)
    {
        if ((employee.EntityState != EntityState.Detached))
        {
            this.ObjectContext.ObjectStateManager.ChangeObjectState(employee, EntityState.Deleted);
        }
        else{this.ObjectContext.Employee.Attach(employee);
           this.ObjectContext.Employee.DeleteObject(employee);
        }
    }
}
}


Step 6: Now rebuild the solution file.
Step 7: The complete code of MainPage.xaml looks like this:
<usercontrolx:class="SilverlightRIAInsert.MainPage"xmlns="http://schemas.microsoft.com/winfx/2006/xaml/presentation"
xmlns:x="http://schemas.microsoft.com/winfx/2006/xaml"xmlns:d="http://schemas.microsoft.com/expression/blend/2008"
xmlns:mc="http://schemas.openxmlformats.org/markup-compatibility/2006"mc:ignorable="d"
d:designheight="300"d:designwidth="543">
<Gridx:Name="LayoutRoot"Width="608">
<TextBlockHeight="23"HorizontalAlignment="Left"Margin="152,29,0,0"Name="textBlock1"Text="Id"FontFamily="Verdana"FontSize="15"VerticalAlignment="Top"/>
<TextBoxHeight="23"HorizontalAlignment="Left"Margin="252,25,0,0"Name="textBox1"VerticalAlignment="Top"Width="120"/>
<TextBlockHeight="23"HorizontalAlignment="Left"Margin="150,72,0,0"Name="textBlock2"Text="FirstName"FontFamily="Verdana"FontSize="15"VerticalAlignment="Top"/>
<TextBoxHeight="23"HorizontalAlignment="Left"Margin="252,68,0,0"Name="textBox2"VerticalAlignment="Top"Width="120"/>
<TextBlockHeight="23"HorizontalAlignment="Left"Margin="150,113,0,0"Name="textBlock3"Text="LastName"FontFamily="Verdana"FontSize="15"VerticalAlignment="Top"/>
<TextBoxHeight="23"HorizontalAlignment="Left"Margin="252,113,0,0"Name="textBox3"VerticalAlignment="Top"Width="120"/>
<ButtonContent="Update"FontFamily="Verdana"FontSize="19"Background="DeepSkyBlue"Height="44"HorizontalAlignment="Left"Margin="252,206,0,0"Name="button1"VerticalAlignment="Top"Width="120"Click="button1_Click"/>
<TextBoxHeight="23"HorizontalAlignment="Left"Margin="252,155,0,0"Name="textBox4"VerticalAlignment="Top"Width="120"/>
<TextBlockHeight="23"HorizontalAlignment="Left"Margin="152,155,0,0"Name="textBlock4"Text="Age"FontFamily="Verdana"FontSize="16"VerticalAlignment="Top"/>
</Grid>"
</usercontrol>


Step 8: The complete code of MainPage.xaml.cs looks like this:
using System;
using System.Collections.Generic;
using System.Linq;
using System.Net;
using System.ServiceModel.DomainServices.Client;
using System.Windows;
using System.Windows.Controls;
using System.Windows.Documents;
using System.Windows.Input;
using System.Windows.Media;
using System.Windows.Media.Animation;
using System.Windows.Shapes;
using SilverlightRIAUpdate.Web;
namespace SilverlightRIAUpdate
{
public partial class MainPage : UserControl
{
    public MainPage()
    {
        InitializeComponent();
    }
    EmployeeDomain objDomain = new EmployeeDomain();
    private void button1_Click(object sender, RoutedEventArgs e)
    {
        EntityQuery<Employee> query = objDomain.GetEmployeeQuery();
        objDomain.Load(query, UpdateLoad, null);
        MessageBox.Show("Data Updated Successfully");
    }
    public void UpdateLoad(LoadOperation<Employee> emp)
    {
        foreach (Employee e in objDomain.Employees)
        {
            if (e.Id == int.Parse(textBox1.Text))
           {
                e.FirstName = textBox2.Text;
                e.LastName = textBox3.Text;
                e.Age = int.Parse(textBox4.Text);
                objDomain.SubmitChanges();
                break;
            }
        }
    }
}
}


European Silverlight Hosting - HostForlIFE.eu :: Storing Files in SQL Server using WCF RIA Services and Silverlight

clock November 24, 2016 05:32 by author Scott

We have worked on several Silverlight Line of Business applications that require storing documents and files in a secure environment. There are several ways to accomplish this but one approach that has been successful for us is to store the documents using FILESTREAM Storage in SQL Server 2008. 

This is the first of three articles which will describe how you can create a Silverlight LOB application that stores and displays documents using FILESTREAM Storage in SQL Server 2008. 

1. Configuring FILESTREAM in your database and WCF RIA Services setup. 
2. Uploading and Saving files to the database from a Silverlight LOB application. 
3. Viewing files stored in the FILESTREAM from a Silverlight LOB application. 

Configuring FILESTREAM in you database

The first thing I would recommend is to read about FILESTREAM. Here is a tutorial which describes FILESTREAM. 

Okay, now that you read the entire white paper we are ready to roll! 

Setting up your database

Your database needs to enable FILESTREAM on the instance of the SQL Server Database Engine. 

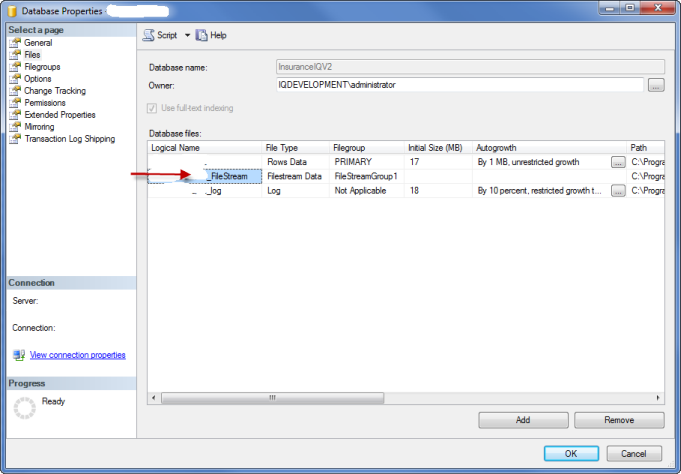
Now that the FILESTREAM is enabled for the server you need to configure your database.

The basic steps include: 

1. Create a Filegroup of type Filestream

2. Create a File for the new Filestream Group

Now that your  database can handle FILESTREAM, the next is to create the SQL Tables that will store documents using the FILESTREAM. In this example I will be using three tables:

- File - storage for the document via the FILESTREAM
- Document - metadata about the File
- Folder - Virtual folder for the document

File table script

CREATE TABLE [dbo].[File]( [FileID] [int] IDENTITY(1,1) NOT NULL, [DocumentFileId] [uniqueidentifier] ROWGUIDCOL NOT NULL, [DocumentFile] [varbinary](max) FILESTREAM NULL, CONSTRAINT [File_PK] PRIMARY KEY CLUSTERED ( [FileID] ASC )WITH (PAD_INDEX = OFF, STATISTICS_NORECOMPUTE = OFF, IGNORE_DUP_KEY = OFF, ALLOW_ROW_LOCKS = ON, ALLOW_PAGE_LOCKS = ON) ON [PRIMARY] FILESTREAM_ON [FileStreamGroup1], UNIQUE NONCLUSTERED ( [DocumentFileId] ASC )WITH (PAD_INDEX = OFF, STATISTICS_NORECOMPUTE = OFF, IGNORE_DUP_KEY = OFF, ALLOW_ROW_LOCKS = ON, ALLOW_PAGE_LOCKS = ON) ON [PRIMARY] ) ON [PRIMARY] FILESTREAM_ON [FileStreamGroup1]

One thing we have found is that you only want to access the File table when you are ready to display the document. If you include this table in RIA Service Domain Service it will really slow things down—a lot. That is why we separated the metadata from the FILESTREAM into two tables - File and Document. 

Document table

You can add as many columns for metadata as needed for your project.  

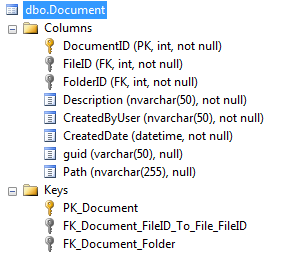
A few things to notice:

1. This table contains a description and some metadata about the file. We use this table to bind a list of documents in a treeview or gridview control.
2. The guid field is used to create a second unique field. More to come on this in part 3.
3. Path will store the actual file name (e.g. MyDocument.pdf). We need this field so we can determine the type of file that is stored in the database (more on this in part 3).
4. FolderID points to a Folder table (see below). We use this table to organize documents in Folders.
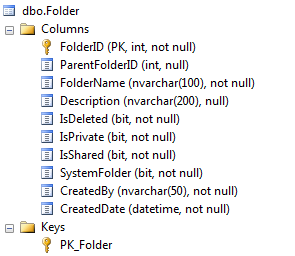
Folder table

We use the ParentFolderID to enable nested folders.  

Okay, now our database is configured for FILESTREAM and we have the necessary tables to store documents. We are creating a Silverlight LOB application using WCF RIA Services, so assuming we already have our Silverlight project created our next steps will be:

1. Add/Update Entity Framework Entity Data Model (*.edmx) in the project. Include the File, Document, and Folder tables.
2. Add/Update Domain Service class and metadata for the three tables.

Tip - I like to include two methods when returning a Document. One that includes the File (i.e. Heavy version) and one that does not include the File (i.e. Lightweight version). This gives me flexibility on the client side. 

public Document GetDocumentById(int documentId) { return this.ObjectContext.Documents.Where(d => d.DocumentID == documentId).FirstOrDefault(); } public Document GetDocumentWithFileById(int documentId) { return this.ObjectContext.Documents.Include("File") .Where(d => d.DocumentID == documentId).FirstOrDefault(); }

To get a list of documents for a folder I use the following query. This can be bound to a gridview control. 

public IQueryable GetDocumentsByFolderId(int folderId) { return this.ObjectContext.Folders .Include("Document") .Where(f => f.FolderID == folderId).OrderByDescending(com => com.Document.CreatedDate); } 


European Silverlight 5 Hosting - HostForLIFE.eu :: How to Implement AutoComplete Text in Silverlight

clock October 5, 2016 23:59 by author Scott

Introduction

Silverlight is evolving with a lot of new features in each and every version release. The AutoComplete text feature is one such example. In this article I will demonstrate the implementation of the AutoComplete text feature in a Silverlight application. I will also create a sample Silverlight application to help explain the code. I have used Silverlight 4.0 and Visual Studio 2010 for developing the sample application.

AutoComplete Functionality

AutoComplete text functionality is not only a fancy effect but it's also a pretty useful feature from a user prospective and this feature is available in most of the latest applications. As the user enters text in a text box, a list of values gets populated and are listed in a similar fashion to that of a drop down based on the entered text. So the user is able to see the possible suggestions and can select a value from them or they also have the freedom to enter their own text as the base control is a textbox.

Some popular websites implementing the auto complete functionality are www.google.com,www.youtube.com, etc.,

Silverlight AutoCompleteBox Control

Implementing the autocomplete functionality in a Silverlight application is pretty straight forward because of the availability of the AutoCompleteBox control. This control is available in Silverlight 3.0 and higher versions. The developer only needs to set the ItemSource property of the AutoCompleteBox control with the value collection that is to be listed. The rest will be taken care by the control itself. 

Below are some of the useful settings that can be leveraged from the AutoCompleteBox control.

  1. FilterMode – Specifies the filter mode to display the data (StartsWith, Contains, Equals, etc.,)
  2. MinimumPrefixLength – Minimum prefix length for the auto complete feature to be triggered
  3. MaxDropDownHeight – Maximum height of the dropdown
  4. IsTextCompletionEnabled – If set to true then the first match found during the filtering process will be populated in the TextBox


Silverlight AutoCompleteBox Implementation

In this section we will create a sample Silverlight window implementing the autocomplete text feature. In the MainWindow.xaml add an AutoCompleteBox control and set the basic properties. Below is the code:

<UserControl xmlns:sdk="http://schemas.microsoft.com/winfx/2006/xaml/presentation/sdk"  
    x:Class="AutoCompleteBoxSample.MainPage"
    xmlns=http://schemas.microsoft.com/winfx/2006/xaml/presentation
    xmlns:x=http://schemas.microsoft.com/winfx/2006/xaml
    xmlns:d=http://schemas.microsoft.com/expression/blend/2008
    xmlns:mc=http://schemas.openxmlformats.org/markup-compatibility/2006
    mc:Ignorable="d"
    d:DesignHeight="300" d:DesignWidth="400">

    <Grid x:Name="LayoutRoot" Background="White">
        <Canvas>
            <sdk:Label Content="Enter the city: " Margin="46,76,264,198" />
            <sdk:AutoCompleteBox Height="28" H
orizontalAlignment="Left" Margin="142,77,0,0" FilterMode="StartsWith"
MinimumPrefixLength="1" MaxDropDownHeight="80" Name="autoCompleteBox1" VerticalAlignment="Top" Width="120"
Canvas.Left="-6" Canvas.Top="-5" />
        </Canvas>
    </Grid>
</UserControl>

namespace AutoCompleteBoxSample
{
    public partial class MainPage : UserControl
    {
        List<string> _cities;

        public MainPage()
        {
            InitializeComponent();
            autoCompleteBox1.ItemsSource = PopulateCities();
        }

        private IEnumerable PopulateCities()
        {
            _cities = new List<string>();
            _cities.Add("Boston");
            _cities.Add("Bangalore");
            _cities.Add("Birmingham");
            _cities.Add("Auckland");
            _cities.Add("Amsterdam");
            _cities.Add("Aspen");
            return _cities;
        }
    }
}

Run the application and you will see the figure below:


Using a DomainDataSource

In the above case we had the data directly in the application and it was hence hard-coded. In case if the data lies in the database, then the WCF RIA service and the DomainDataSource comes into play. Create a WCF RIA service and hook up the service to expose the data in the table through a generated data context method. Use a DomainDataSource to act as an ItemSource for the AutoCompleteBox control.

Below is the XAML code:

<Canvas>
     <riaControls:DomainDataSource AutoLoad="True"
                                      QueryName="GetCities"
                                      x:Name="CityDataSource">
          <riaControls:DomainDataSource.DomainContext>
                    <web:MyDatabaseContext />
          </riaControls:DomainDataSource.DomainContext>
     </riaControls:DomainDataSource>
     <sdk:Label Content="Enter the city: " Margin="46,76,264,198" />
<sdk:AutoCompleteBox Height="28" ItemsSource="{Binding Data, ElementName=CityDataSource}"
HorizontalAlignment="Left" Margin="142,77,0,0" FilterMode="StartsWith" MinimumPrefixLength="1" MaxDropDownHeight="80"
Name="autoCompleteBox1" VerticalAlignment="Top" Width="120" Canvas.Left="-6" Canvas.Top="-5" />
</Canvas>


European Silverlight 5 Hosting - Amsterdam :: How to Convert Silverlight 4 to Silverlight 5

clock August 9, 2013 08:09 by author Scott

When we open Silverlight 4 application in Silverlight 5 we get following errors

1) error  : Unable to read the project file 'Silverlight4App.csproj'.

2) Silverlight4App.csproj(137,3): The imported project "C:\Program Files\MSBuild\Microsoft\Silverlight\v4.0\Microsoft.Silverlight.CSharp.targets" was not found. Confirm that the path in the declaration is correct, and that the file exists on disk.


This error occurs as the application was earlier built using Silverlight-4 Reference. So while opening this in Silverlight-5, the Visual studio looks for the Silverlight 5 reference files but it cannot find it.

To resolve this error you will have to follow following steps:

1) Open the project in Visual studio.

2) Go to solution explorer

3) Right click on the project that is not loaded and click on edit the CSPROJ file

4) And then change the Target Frame Work version to 5.0

5) Save and close this file and again right click on the project which is not loaded and click on Reload project.

6) Now the project will be reloaded successfully.

By following above steps your Silverlight 4 application will be converted to Silverlight 5 application.

If in case you again want to go back to Silverlight 4 then just repeat the above steps and set the Target Framework version to “v4.0”.

Hope this helps!!


European Silverlight 5 Hosting - Amsterdam :: Silverlight Sorting and Grouping Feature

clock June 28, 2013 07:56 by author Scott

Using Silverlight and XAML, you can bind to a collection of data. Once that is done, you can then sort, filter, or group the data using a collection view. A collection view is similar to a layer on a binding source collection. It enables you to navigate and display the source collection based on queries to sort, filter, and group data, without having to change the underlying source collection itself. If a source collection implements the INotifyCollectionChanged interface, the changes raised by the CollectionChanged event are transmitted to the views. A single source collection can have multiple views associated with it.


I will show brief tutorial about sorting and grouping functionally through the PagedCollectionView class. Consider an example that demonstrates how to sort and group bound data in a collection using an
PagedCollectionView object.

Create a Silverlight application named CollectionsDemo.

Add the following markup to MainPage.xaml.

<UserControl xmlns:sdk="http://schemas.microsoft.com/winfx/2006/xaml/presentation/sdk"
    x:Class="CollectionsDemo.MainPage"
xmlns="http://schemas.microsoft.com/winfx/2006/xaml/presentation"
xmlns:x="http://schemas.microsoft.com/winfx/2006/xaml"
xmlns:d="http://schemas.microsoft.com/expression/blend/2008"
xmlns:mc="http://schemas.openxmlformats.org/markup-compatibility/2006"
xmlns:scm="clr-namespace:System.ComponentModel;assembly=System.Windows"
xmlns:dat="clr-namespace:System.Windows.Data;assembly=System.Windows"
xmlns:local="clr-namespace:CollectionsDemo"
mc:Ignorable="d"
d:DesignHeight="300" d:DesignWidth="400"

<Grid x:Name="LayoutRoot">
    <sdk:DataGrid Name="dgridMovies" ItemsSource="{Binding}" >
            <sdk:DataGrid.RowGroupHeaderStyles>
                <Style TargetType="sdk:DataGridRowGroupHeader">
                    <Setter Property="PropertyNameVisibility" Value="Collapsed" />
                    <Setter Property="Background" Value="PaleGreen"/>
                    <Setter Property="SublevelIndent" Value="25" />
                </Style>
            </sdk:DataGrid.RowGroupHeaderStyles>
        </sdk:DataGrid>
</Grid>
</UserControl>

The above markup creates a DataGrid and sets its ItemsSource property. The markup also sets style for the DataGrid rows.

Add the following code to MainPage.xaml.cs to create the Movies and Movie classes:

using System;
using System.Collections.Generic;
using System.Linq;
using System.Net;
using System.Windows;
using System.Windows.Controls;
using System.Windows.Documents;
using System.Windows.Input;
using System.Windows.Media;
using System.Windows.Media.Animation;
using System.Windows.Shapes;
using System.Collections.ObjectModel;
using System.Windows.Data;
using System.ComponentModel;

namespace CollectionsDemo
{
    public partial class MainPage : UserControl
    {
        public MainPage()
        {
            Movies movies = new Movies();
            InitializeComponent();

            // For sorting
            PagedCollectionView pg = new PagedCollectionView(movies);
            pg.SortDescriptions.Add(new SortDescription("Title", ListSortDirection.Ascending));
            dgridMovies.DataContext = pg;

            // For grouping
            pg.GroupDescriptions.Add(new PropertyGroupDescription("Year"));
            dgridMovies.DataContext = pg;
        }
    }

    // Represents a collection of movies
    public class Movies : ObservableCollection<Movie>
    {
        public Movies()
            : base()
        {
         Add(new Movie() { Title = "Sherlock Holmes - Game of Shadows", Year = "2011" });
         Add(new Movie() { Title = "ParaNormal Activity", Year = "2010" });
         Add(new Movie() { Title = "Michael Clayton", Year = "2010" });
         Add(new Movie() { Title = "A Separation", Year = "2011" });
         Add(new Movie() { Title = "Lost", Year = "2009" });
        }
    }

// Represents a Movie entity having two properties, Title and Year
    public class Movie
    {
        public string Title { get; set; }
        public string Year { get; set; }
    }
}

You will first create a PropertyGroupDescription object and pass the name of the property based on which sorting or grouping will take place. Then, add the PropertyGroupDescription to the SortDescriptions or GroupDescriptions collection of PagedCollectionView depending on which operation is to be performed.

These actions are done using the above code.

On executing, the output will be similar to Figure below. As you can see, the movie details are grouped by year and sorted according to title.


European Silverlight Hosting - Amsterdam :: Silverlight Watermark TextBox Behavior

clock April 29, 2013 10:48 by author Scott

Maybe there is a working solution for this already out there, but I created my own Silverlight Behavior for a basic TextBox Watermark which might be useful.

I wanted to use it like this in my XAML (look at the behaviors tag):

<TextBlock Margin="5">Watermarked textbox:</TextBlock>
<TextBox Margin="5">
    <Interactivity:Interaction.Behaviors>
        <local:Watermark Text="Watermark" Foreground="LightGray" />
    </Interactivity:Interaction.Behaviors>
</TextBox>

The result should be something like this:

To create a Behavior for Silverlight, you must get hold of the System.Windows.Interactivity assembly which ships with Expression Blend. In my system it’s located at:

c:\Program Files (x86)\Microsoft SDKs\Expression\Blend\Silverlight\v4.0\Libraries\System.Windows.Interactivity.dll

And the code for the Behavior:

public class Watermark : Behavior<TextBox>
{
    private bool _hasWatermark;
    private Brush _textBoxForeground;
 
    public String Text { get; set; }
    public Brush Foreground { get; set; }
 
    protected override void OnAttached()
    {
        _textBoxForeground = AssociatedObject.Foreground;
 
        base.OnAttached();
        if (Text != null)
            SetWatermarkText();
        AssociatedObject.GotFocus += GotFocus;
        AssociatedObject.LostFocus += LostFocus;
    }
 
    private void LostFocus(object sender, RoutedEventArgs e)
    {
        if (AssociatedObject.Text.Length == 0)
            if (Text != null)
                SetWatermarkText();
    }
 
    private void GotFocus(object sender, RoutedEventArgs e)
    {
        if (_hasWatermark)
            RemoveWatermarkText();
    }
 
    private void RemoveWatermarkText()
    {
        AssociatedObject.Foreground = _textBoxForeground;
        AssociatedObject.Text = "";
        _hasWatermark = false;
    }
 
    private void SetWatermarkText()
    {
        AssociatedObject.Foreground = Foreground;
        AssociatedObject.Text = Text;
        _hasWatermark = true;
    }
 
    protected override void OnDetaching()
    {
        base.OnDetaching();
        AssociatedObject.GotFocus -= GotFocus;
        AssociatedObject.LostFocus -= LostFocus;
    }
}

Like so many Watermark-solutions out there I’m hooking into the GotFocus/LostFocus events and to the work there. Works for me.


European Silverlight Hosting - Amsterdam :: Silverlight BlurEffect Example

clock March 11, 2013 07:12 by author Scott

In this article we will be seeing how to create Silverlight BlurEffect using Visual studio 2010.

Pixel shader effects in Silverlight allows you to add effects, such as gray scale, red eye removal, pixel brightness, and shadows, to rendered objects. There are two types of Pixel Shader effects in Silverlight. They are BlurEffect and DropShadowEffect. In this we will be seeing about BlurEffect and its properties.

Namespace: System.Windows.Media. Effects

Assembly: System.Windows

BlurEffect:

BlurEffect is used to represent an effect that we can apply to an object that simulates looking at the object through an out-of-focus lens. It is defined by the Radius property.

Radius:

This property is used to specify the amount of blur to apply to an object.

Without BlurEffect:

<Canvas Height="200" Width="200" Background="white">
        <Rectangle Height="50" Width="50" Fill="Orange" Canvas.Left="25" Canvas.Top="75"></Rectangle>
        <Rectangle Height="50" Width="50" Fill="White" Canvas.Left="75" Canvas.Top="75"></Rectangle>
        <Rectangle Height="50" Width="50" Fill="Green" Canvas.Left="125" Canvas.Top="75"></Rectangle>
</Canvas>

With BlurEffect:

<Canvas Height="200" Width="200" Background="white">
        <Canvas.Effect>
            <BlurEffect Radius="120"></BlurEffect>
        </Canvas.Effect>   
        <Rectangle Height="50" Width="50" Fill="Orange" Canvas.Left="25" Canvas.Top="75"></Rectangle>
        <Rectangle Height="50" Width="50" Fill="White" Canvas.Left="75" Canvas.Top="75"></Rectangle>
        <Rectangle Height="50" Width="50" Fill="Green" Canvas.Left="125" Canvas.Top="75"></Rectangle>
</Canvas>

Steps Involved:

Creating a Silverlight Application:

-
Open Visual Studio 2010. 
-
Go to File => New => Project. 
-
Select Silverlight from the Installed templates and choose the Silverlight Application template. 
-
Enter the Name and choose the location. 
-
Click OK. 
-
In the New Silverlight Application wizard check the "Host the Silverlight Application in a new Web site". 
-
Click OK.

Creating the UI:

Open MainPage.xaml file and replace the code with the following.

<UserControl x:Class="SilverlightBlurEffect.MainPage"
    xmlns=http://schemas.microsoft.com/winfx/2006/xaml/presentation
    xmlns:x=http://schemas.microsoft.com/winfx/2006/xaml
    xmlns:d=http://schemas.microsoft.com/expression/blend/2008
    xmlns:mc=http://schemas.openxmlformats.org/markup-compatibility/2006
    mc:Ignorable="d"
    d:DesignHeight="300" d:DesignWidth="400">
    <Canvas Height="200" Width="200" Background="white">
        <Canvas.Effect>
            <BlurEffect Radius="120"></BlurEffect>
        </Canvas.Effect>   
        <Rectangle Height="50" Width="50" Fill="Orange" Canvas.Left="25" Canvas.Top="75"></Rectangle>
        <Rectangle Height="50" Width="50" Fill="White" Canvas.Left="75" Canvas.Top="75"></Rectangle>
        <Rectangle Height="50" Width="50" Fill="Green" Canvas.Left="125" Canvas.Top="75"></Rectangle>
    </Canvas>
</UserControl>

To test it, please just build the solution and hit CTRL+F5


About HostForLIFE.eu

HostForLIFE.eu is European Windows Hosting Provider which focuses on Windows Platform only. We deliver on-demand hosting solutions including Shared hosting, Reseller Hosting, Cloud Hosting, Dedicated Servers, and IT as a Service for companies of all sizes.

We have offered the latest Windows 2016 Hosting, ASP.NET Core 2.2.1 Hosting, ASP.NET MVC 6 Hosting and SQL 2017 Hosting.


Tag cloud

Sign in