In this article, you will implement an AutoComplete TextBox in Silverlight Applications using C#. An AutoCompleteBox is just a kind of TextBox in which, when you start typing, items that match are displayed in a dropdown list and you can pick an item from the list.

Step 1
Create a New “Silverlight Application” in Visual Studio and name it as you chooce (I named mine AutoCompleteBox). Now a new Silverlight Application Page (MainPage.xaml) will be generated.
Step 2
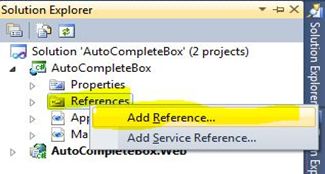
Now go to the Solution Explorer Window and right-click on "References" and click on "Add Reference".
Step 3
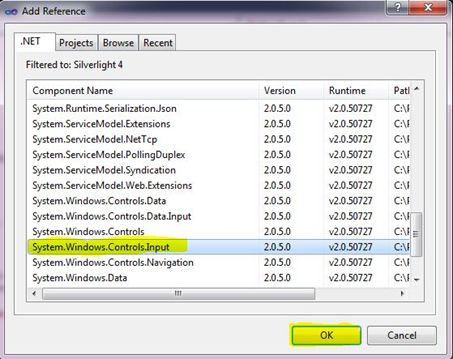
Now an "Add Reference" window will appear. Navigate to the .NET tab and search for System.Windows.Controls.Input reference and add it to your project.
Step 4
Now navigate to the MainPage.xaml portion in your project and add the following code for the reference:
xmlns:sdk="http://schemas.microsoft.com/winfx/2006/xaml/presentation/sdk"
Step 5
A reference is added to your project and now it's time to add the AutoCompleteBox. Navigate to the XAML code and in the Grid tag add the following code:
<sdk:AutoCompleteBox Name="Colors" Width="200" Height="25"/>
An AutoCompleteBox is added to your project (here I named it Colors but it's up to you what to use).
Step 6
Now it's time to add some data in the AutoCompleteBox. To do that navigate to the .cs file of your project MainPage.xaml.cs and add the following code to the MainPage() block:
public MainPage()
{
InitializeComponent();
this.Colors.ItemsSource = new string[]
{
"Aqua","Azure","Beige","Black","Blue","Brown","Cyan","Gold","Red","Green","Yellow"
};
}
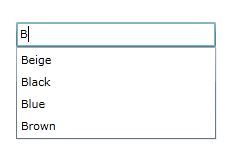
What we are doing is that we are simply adding the data to the AutoCompleteBox whenever the MainPage is Loaded. I am here adding Name of various colors for demo purposes, you can however add your own data. Now that's all; compile and run your project and whenever you type a letter into the AutoCompleteBox an intellisenese will appear with suggestions the same as you usually see in Visual Studio.
Step 7
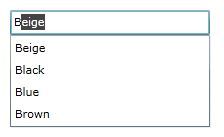
Now Suppose you want to Auto fill the suggestions in your AutoCompleteBox; for that you just need to add a property called IsTextCompletionEnabled to True in your XAML code like:
<sdk:AutoCompleteBox Name="Colors" Width="200" Height="25" IsTextCompletionEnabled="True"/>
Now compile and run your project; you will see that whenever you type a letter, the words related to it are automatically placed into the AutoCompleteBox.
HostForLIFE.eu Silverlight 6 Hosting
HostForLIFE.eu is European Windows Hosting Provider which focuses on Windows Platform only. We deliver on-demand hosting solutions including Shared hosting, Reseller Hosting, Cloud Hosting, Dedicated Servers, and IT as a Service for companies of all sizes. We have customers from around the globe, spread across every continent. We serve the hosting needs of the business and professional, government and nonprofit, entertainment and personal use market segments.
