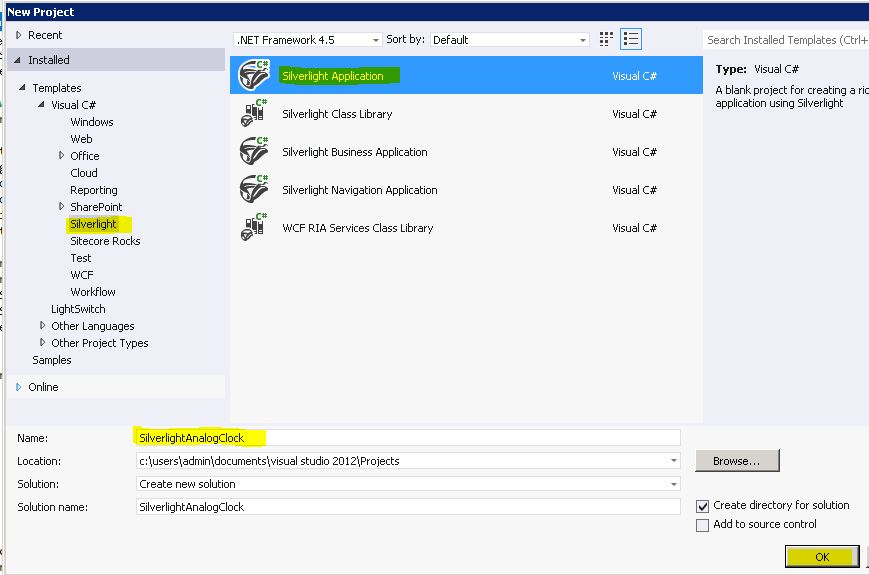
Step 1
Create a new project in Visual Studio and select "Silverlight Application".
Step 2
Open MainPage.xaml and add the following code.
<UserControl x:Class="SilverlightAnalogClock.MainPage"
xmlns="http://schemas.microsoft.com/winfx/2006/xaml/presentation"
xmlns:x="http://schemas.microsoft.com/winfx/2006/xaml"
xmlns:d="http://schemas.microsoft.com/expression/blend/2008"
xmlns:mc="http://schemas.openxmlformats.org/markup-compatibility/2006"
mc:Ignorable="d"
d:DesignHeight="300" d:DesignWidth="400">
<Grid x:Name="LayoutRoot" Background="White">
</Grid>
</UserControl>

Step 3
Open MainPage.xaml.cs and add the following code.
using System;
using System.Collections.Generic;
using System.Linq;
using System.Net;
using System.Windows;
using System.Windows.Controls;
using System.Windows.Documents;
using System.Windows.Input;
using System.Windows.Media;
using System.Windows.Media.Animation;
using System.Windows.Media.Imaging;
using System.Windows.Shapes;
namespace SilverlightAnalogClock
{
public partial class MainPage : UserControl
{
public Canvas ClockArea = null;
public Rectangle secondHand = null;
public Rectangle minuteHand = null;
public Rectangle hourHand = null;
public RotateTransform secondHandRotate = null;
public RotateTransform minuteHandRotate = null;
public RotateTransform hourHandRotate = null;
public Ellipse outerCircle = null;
public Point centerPoint;
public double HEIGHT = 0;
public double WIDTH = 0;
public double RADIUS = 0;
public MainPage()
{
InitializeComponent();
ClockArea = new Canvas()
{
Width = 300,
Height = 300,
HorizontalAlignment = HorizontalAlignment.Left,
VerticalAlignment = VerticalAlignment.Top
};
ClockArea.SetValue(Grid.RowProperty, 0);
ClockArea.SetValue(Grid.ColumnProperty, 0);
ClockArea.Margin = new Thickness(0, 0, 0, 0);
this.LayoutRoot.Children.Add(ClockArea);
WIDTH = ClockArea.Width;
HEIGHT = ClockArea.Height;
centerPoint.X = (WIDTH/2);
centerPoint.Y = (HEIGHT/2);
RADIUS = 400;
DrawClockFace();
Point TOPPOINT = new Point(0, 0);
DrawMinuteHand();
DrawSecondHand();
DrawHourHand();
DrawCenterCircle();
//Start the Clock
ClockStart();
}
public void ClockStart()
{
// Create and Start the Thread Timer
System.Windows.Threading.DispatcherTimer clockTimer = new System.Windows.Threading.DispatcherTimer();
clockTimer.Interval = new TimeSpan(0, 0, 0, 0, 1000);
clockTimer.Tick += new EventHandler(Clock_Tick);
clockTimer.Start();
}
// Get and Set the Angles of Each Hand at every Clock Ticks
public void Clock_Tick(object o, EventArgs sender)
{
double hourRotateValue = Convert.ToDouble(DateTime.Now.Hour.ToString());
double minuteRotateValue = Convert.ToDouble(DateTime.Now.Minute.ToString());
double secondRotateValue = Convert.ToDouble(DateTime.Now.Second.ToString());
hourRotateValue = (hourRotateValue + minuteRotateValue / 60) * 30;
minuteRotateValue = (minuteRotateValue + secondRotateValue / 60) * 6;
secondRotateValue = Convert.ToDouble(DateTime.Now.Second.ToString()) * 6;
minuteHandRotate.Angle = minuteRotateValue;
hourHandRotate.Angle = hourRotateValue;
secondHandRotate.Angle = secondRotateValue;
}
// Draw Center Circle
public void DrawCenterCircle()
{
Ellipse centerCircle = new Ellipse()
{
Width = 10,
Height = 10,
Stroke = new SolidColorBrush(Colors.Red),
Fill = new SolidColorBrush(Colors.Red),
HorizontalAlignment = HorizontalAlignment.Center,
VerticalAlignment = VerticalAlignment.Center
};
centerCircle.SetValue(Grid.RowProperty, 0);
centerCircle.SetValue(Grid.ColumnProperty, 0);
Canvas.SetLeft(centerCircle, (WIDTH / 2) - (centerCircle.Width / 2));
Canvas.SetTop(centerCircle, (HEIGHT / 2) - (centerCircle.Height / 2));
ClockArea.Children.Add(centerCircle);
}
// Draw Clock Face
public void DrawClockFace()
{
int smallCircle = 5;
Color c = Colors.Blue;
int p = 0;
// Draw Shadow of Outer Circle
Ellipse outerCircleShadow = new Ellipse()
{
Width = (WIDTH),
Height = (WIDTH),
Stroke = new SolidColorBrush(Colors.Gray),
StrokeThickness = 5,
HorizontalAlignment = HorizontalAlignment.Center,
VerticalAlignment = VerticalAlignment.Center
};
outerCircleShadow.SetValue(Grid.RowProperty, 0);
outerCircleShadow.SetValue(Grid.ColumnProperty, 0);
Canvas.SetLeft(outerCircleShadow, (WIDTH / 2) - (outerCircleShadow.Width / 2) + 6.5);
Canvas.SetTop(outerCircleShadow, (HEIGHT / 2) - (outerCircleShadow.Height / 2) + 6.5);
ClockArea.Children.Add(outerCircleShadow);
// Draw Outer Circle
outerCircle = new Ellipse()
{
Width = (WIDTH ),
Height = (WIDTH),
Stroke = new SolidColorBrush(Colors.Black),
StrokeThickness = 5,
HorizontalAlignment = HorizontalAlignment.Center,
VerticalAlignment = VerticalAlignment.Center
};
outerCircle.SetValue(Grid.RowProperty, 0);
outerCircle.SetValue(Grid.ColumnProperty, 0);
Canvas.SetLeft(outerCircle, (WIDTH / 2) - (outerCircle.Width / 2) + 4.5);
Canvas.SetTop(outerCircle, (HEIGHT / 2) - (outerCircle.Height / 2) + 4.5);
ClockArea.Children.Add(outerCircle);
outerCircle.Fill = new LinearGradientBrush()
{
EndPoint = new Point(1, 0),
GradientStops = new GradientStopCollection()
{
new GradientStop() { Color = Colors.White, Offset = 0 },
new GradientStop() { Color = Colors.Gray, Offset = 0.5 },
new GradientStop() { Color = Colors.White, Offset = 1 }
}
};
int clockDigits = 3;
double rad = (WIDTH/2) - 10.0f;
// 60 Innner Dots as Small Circle
for (double i = 0.0; i < 360.0; i += 6)
{
double angle = i * System.Math.PI / 180;
int x = (int)(centerPoint.X + rad * System.Math.Cos(angle));
int y = (int)(centerPoint.Y + rad * System.Math.Sin(angle));
if (p % 5 == 0)
{
smallCircle = 10;
c = Colors.Orange;
}
else
{
smallCircle = 5;
c = Colors.Blue;
}
if (p % 15 == 0)
{
TextBlock tb = new TextBlock();
tb.Text = clockDigits.ToString();
tb.FontSize = 24;
tb.SetValue(Grid.RowProperty, 0);
tb.SetValue(Grid.ColumnProperty, 0);
Canvas.SetLeft(tb, x );
Canvas.SetTop(tb, y);
if (clockDigits == 3)
{
Canvas.SetLeft(tb, x - 20);
Canvas.SetTop(tb, y - 10);
}
if (clockDigits == 6)
{
Canvas.SetLeft(tb, x);
Canvas.SetTop(tb, y - 30);
}
if (clockDigits == 9)
{
Canvas.SetLeft(tb, x + 15);
Canvas.SetTop(tb, y - 10);
}
if (clockDigits == 12)
{
Canvas.SetLeft(tb, x - 10);
Canvas.SetTop(tb, y + 5 );
}
ClockArea.Children.Add(tb);
clockDigits = clockDigits + 3;
}
p++;
Ellipse innerPoints = new Ellipse()
{
Width = smallCircle,
Height = smallCircle,
Stroke = new SolidColorBrush(c),
Fill = new SolidColorBrush(c),
HorizontalAlignment = HorizontalAlignment.Center,
VerticalAlignment = VerticalAlignment.Center
};
innerPoints.SetValue(Grid.RowProperty, 0);
innerPoints.SetValue(Grid.ColumnProperty, 0);
Canvas.SetLeft(innerPoints, x);
Canvas.SetTop(innerPoints, y);
ClockArea.Children.Add(innerPoints);
}
}
// Draw the Second Hand
public void DrawSecondHand()
{
double handLength = (HEIGHT / 2) - 20;
secondHand = new Rectangle()
{
Width = 1,
Height = handLength,
Stroke = new SolidColorBrush(Colors.Red),
Fill = new SolidColorBrush(Colors.Red),
HorizontalAlignment = HorizontalAlignment.Center,
VerticalAlignment = VerticalAlignment.Center
};
secondHand.SetValue(Grid.RowProperty, 0);
secondHand.SetValue(Grid.ColumnProperty, 0);
//Add Rotate Transformation
secondHandRotate = new RotateTransform();
secondHandRotate.Angle = 0;
//Set Center for Rotation
secondHandRotate.CenterX = Canvas.GetLeft(secondHand);
secondHandRotate.CenterY = secondHand.Height;
secondHand.RenderTransform = secondHandRotate;
//Set Initial Position of Hand
Canvas.SetTop(secondHand, centerPoint.Y - handLength);
Canvas.SetLeft(secondHand, WIDTH/2);
ClockArea.Children.Add(secondHand);
}
public void DrawMinuteHand()
{
double handLength = (HEIGHT / 2) - 50;
minuteHand = new Rectangle()
{
Width = 4,
Height = handLength,
Stroke = new SolidColorBrush(Colors.Black),
Fill = new SolidColorBrush(Colors.Black),
HorizontalAlignment = HorizontalAlignment.Center,
VerticalAlignment = VerticalAlignment.Center
};
minuteHand.SetValue(Grid.RowProperty, 0);
minuteHand.SetValue(Grid.ColumnProperty, 0);
minuteHandRotate = new RotateTransform();
minuteHandRotate.Angle = 0;
minuteHandRotate.CenterX = Canvas.GetLeft(minuteHand);
minuteHandRotate.CenterY = minuteHand.Height;
minuteHand.RenderTransform = minuteHandRotate;
Canvas.SetTop(minuteHand, centerPoint.Y - handLength);
Canvas.SetLeft(minuteHand, WIDTH / 2);
ClockArea.Children.Add(minuteHand);
}
public void DrawHourHand()
{
double handLength = (HEIGHT / 2) - 80;
hourHand = new Rectangle()
{
Width = 4,
Height = handLength,
Stroke = new SolidColorBrush(Colors.Black),
Fill = new SolidColorBrush(Colors.Black),
HorizontalAlignment = HorizontalAlignment.Center,
VerticalAlignment = VerticalAlignment.Center
};
hourHand.SetValue(Grid.RowProperty, 0);
hourHand.SetValue(Grid.ColumnProperty, 0);
hourHandRotate = new RotateTransform();
hourHandRotate.Angle = 0;
hourHandRotate.CenterX = Canvas.GetLeft(hourHand);
hourHandRotate.CenterY = hourHand.Height;
hourHand.RenderTransform = hourHandRotate;
Canvas.SetTop(hourHand, centerPoint.Y - handLength);
Canvas.SetLeft(hourHand, WIDTH / 2);
ClockArea.Children.Add(hourHand);
}
}
}
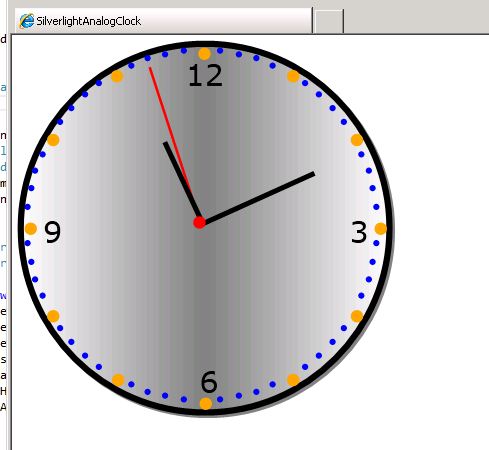
Output
Now execute and you will get a fully drawn Analog Clock.