European Silverlight 4 & Silverlight 5 Hosting BLOG

BLOG about Silverlight 5 Hosting and Its Techologies - Dedicated to European Windows Hosting Customer

European Silverlight 5 Hosting - Amsterdam :: ICustomTypeProvider in Silverlight 5

clock July 19, 2013 06:51 by author Scott

Why would I want to trick Silverlight into treating Dictionary values like real Properties?

There are scenarios when complex, data-intensive applications will need to data bind to keys/value pairs or generally determine the properties of a Class at runtime.  In cases where there could be large numbers of keys or the keys could change without an application re-deploy, this is a tricky problem to solve. 

In Silverlight 5, however, you can use ICustomTypeProvider to achieve the same goal in a clean fashion.

Data Facets

Some systems, such as Pivot Viewer, allow you to specify any number of pseudo-Properties about interesting items, which we’ll call Facets.  Using a structure like a Dictionary, we could specify any number of Facets.  Two-way data binding to these is problematic however since they aren’t real CLR properties.  In the full .NET Framework you can do tricks with ICustomTypeDescriptor, and now in Silverlight 5 we have System.Reflection.ICustomTypeProvider.
Let’s create a simple Facet class to represent data about the Facet we’d like to data bind to.

/// <summary>
/// Some facet of a dynamic type
/// </summary>
public class Facet
{
    /// <summary>
    /// Must be a valid CLR property name
    /// </summary>
    public string PropertyName { get; set; }

    public Type PropertyType { get; set; }

    //Couple of demo Facets

    public static Facet DynamicDemo0 = new Facet
    {
        PropertyName = "DynamicPropZero",
        PropertyType = typeof(string)
    };

    public static Facet DynamicDemo1 = new Facet
    {
        PropertyName = "DynamicPropOne",
        PropertyType = typeof(double)
    };
}

Next we’ll create an object with a regular CLR property and a dictionary to store key/value pairs.  These key value pairs will be made binding-friendly.

/// <summary>
/// An Class with normal properties, but also supporting dynamic properties
/// </summary>
public class FacetedObject : ICustomTypeProvider, INotifyPropertyChanged,
INotifyDataErrorInfo
{
    Dictionary<string, object> _facetValues;

    public object this[string key]
    {
        get
        {
            if (!_facetValues.ContainsKey(key))
            {
                return null;
            }
            return _facetValues[key];
        }
        set
        {
            _facetValues[key] = value;
            OnPropertyChanged(key);
        }
    }

The interesting thing here is the ICustomTypeProvider interface implementation. 

ICustomTypeProvider Implementation

On any CLR object you can call GetType().  If you’ve ever done any reflection programming you’re aware of all the rich runtime metadata about your classes that System.Type can provide.  System.Type is also an abstract class, and ICustomTypeProvider requires only a single method implementation:

public Type GetCustomType()
{
    return new FacetedObjectType<FacetedObject>(_currentFacets);
}

So, we can create a class that extends System.Type and do some interesting things.  We can trick the Silverlight runtime into thinking our Facets are real CLR Properties.  While my FacetObjectType<TSource> implementation is about 300 lines long, here’s the most interesting part:

/// <summary>
/// A custom System.Type implementation that can provide different Properties at runtime.
 All operations except those related to
/// Property logic delegated to the type of TSource
/// </summary>
/// <typeparam name="TSource"></typeparam>
public class FacetedObjectType<TSource> : System.Type
{
//snip…


    public override System.Reflection.PropertyInfo[] GetProperties(BindingFlags bindingAttr)
    {
        var properties = ProxyTargetType.GetProperties(bindingAttr);

        if (
           BindingFlags.Instance == (bindingAttr & BindingFlags.Instance)
        && BindingFlags.Public == (bindingAttr & BindingFlags.Public)
        )
        {
            var dynamicProperties = GetPublicDynamicProperties();
            var allprops = new List<PropertyInfo>();
            allprops.AddRange(properties);
            allprops.AddRange(dynamicProperties);
            return allprops.ToArray();
        }
        return properties;
    }
//snip…

So, for system types that implement ICustomTypeProvider, we can intercept important requests for reflection information and supplement that information.  In our case here, we can claim that properties exist that aren’t really on our class at compile time.  In terms of telling the runtime how to actually Get and Set these dynamic properties, we need to create a class that extends PropertyInfo.  Here’s a type called DynamicPropertyInfo, and the two most interesting methods:

public class DynamicPropertyInfo : PropertyInfo
{
    public DynamicPropertyInfo(Type propertyType, Type declaringType, string propertyName)
    {
        _propertyType = propertyType;
        _declaringType = declaringType;
        _name = propertyName;
    }

    public override object GetValue(object obj, BindingFlags invokeAttr, Binder binder,
        object[] index, System.Globalization.CultureInfo culture
    {
        var fo = obj as FacetedObject;
        return fo[Name];
    }

    public override void SetValue(object obj, object value, BindingFlags invokeAttr, Binder binder,
        object[] index, System.Globalization.CultureInfo culture)
    {
        var fo = obj as FacetedObject;
        fo[Name] = value;
    }

In here, we can just use the this[] indexer of our FacetedObject class to get and set values.

Demo App

To show how this concept works, let’s create a Silverlight 5 application with a DataGrid.  We’re going to get the datagrid to display “properties” that technically speaking are not there.  First we’ll create a couple of Facets assigned to FacetedObject by default called “DynamicPropZero” and “DynamicPropOne”.  For these two we can create DataGridColumns along with an actual compile-time Property of FacetedObject.

            <sdk:DataGrid.Columns>
                <
sdk:DataGridTextColumn Header="Id" IsReadOnly="True" Binding="{Binding Id}" />
                <
sdk:DataGridTemplateColumn Header="Dynamic Property 0">
                    <
sdk:DataGridTemplateColumn.CellTemplate>
                        <
DataTemplate>
                            <
TextBox Text="{Binding DynamicPropZero, Mode=TwoWay,
                               
NotifyOnValidationError=True,
                               
ValidatesOnNotifyDataErrors=True,                              ValidatesOnDataErrors=True,ValidatesOnExceptions=True}"/>
                        </
DataTemplate>
                    </
sdk:DataGridTemplateColumn.CellTemplate>
                </
sdk:DataGridTemplateColumn>
                <
sdk:DataGridTextColumn Header="Dynamic Property 1"
                                       
Binding="{Binding DynamicPropOne, Mode=TwoWay}" />
            </
sdk:DataGrid.Columns>

Here’s the code we’re using to create the sample data in our main ViewModel.  Note that we're going to explose the dictionary values as properties.

public class ShellViewModel : INotifyPropertyChanged
{
    public ShellViewModel()
    {
        Items = new ObservableCollection<FacetedObject>();
        var d0 = new FacetedObject();
        d0[Facet.DynamicDemo0.PropertyName] = "I'm a property!";
        d0[Facet.DynamicDemo1.PropertyName] = 42.42;

        var d1 = new FacetedObject();
        d1[Facet.DynamicDemo0.PropertyName] = "Would you like to be a property too?";
        Items.Add(d0);
        Items.Add(d1);

And as you can see, it works:
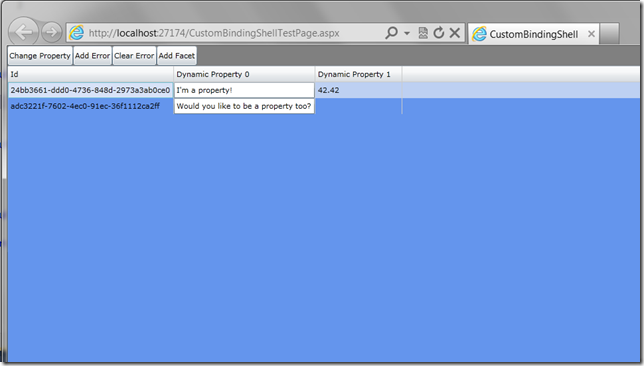
Notice the buttons above the DataGrid.  These dynamic properties wouldn’t be very useful unless they are first-class citizens, and they are.  Note that FacetedObject also implements INotifyPropertyChanged and INotifyDataErrorInfo.  By clicking the buttons we fire commands that affect changes in code, and the UI reflects the changes for the dynamic properties.
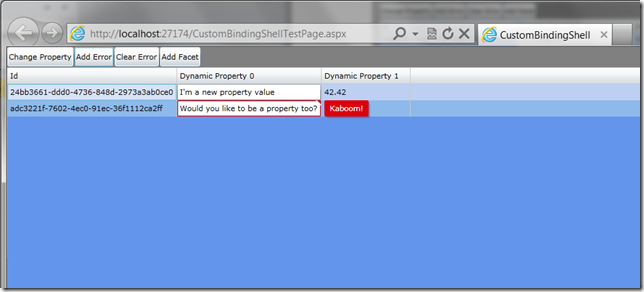
Now, recall at the beginning that I said this could be completely dynamic and that we could actually create both the Facet data and visuals in a data driven fashion at runtime.  Clicking on the Add Facet button demonstrates this.
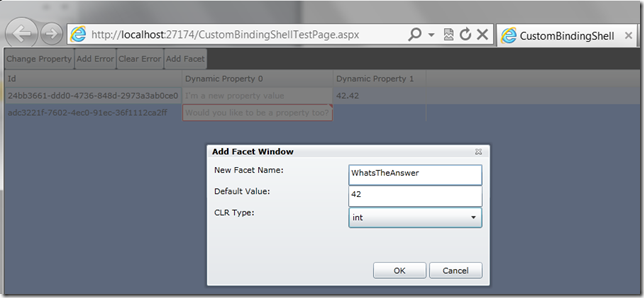
After clicking OK, we can do some work to add this Fact to the items on the ViewModel, and also dynamically create a new DataGridColumn to display the data.

public void AddNewFacet(string name, object defaultValue, string clrType)
{
    var typeDict = new Dictionary<string, Type>();
    typeDict["string"] = typeof(string);
    typeDict["int"] = typeof(int);
    typeDict["double"] = typeof(double);

    //1. Create a new Facet
    var newFacet = new Facet
    {
        PropertyName = name,
        PropertyType = typeDict[clrType]
    };

    //2. Tell objects to clear out cached state
    //3. Assign a default value we can see in the UI
    var vm = DataContext as ShellViewModel;   

    foreach (var item in vm.Items)
    {
        item.AddFacet(newFacet);
        item[newFacet.PropertyName] = defaultValue;
    }

    //4. create visuals to bind to new facet
    var sb = new StringBuilder("<DataTemplate
xmlns=\"http://schemas.microsoft.com/winfx/2006/xaml/presentation\" >")
    .Append("<TextBox Text=\"{Binding  ")
    .Append(name)
    .Append(", Mode=TwoWay}\" />")
    .Append("</DataTemplate>");

    var dt = (DataTemplate)XamlReader.Load(sb.ToString());
    var column = new DataGridTemplateColumn();
    column.Header = name;
    column.CellTemplate = dt;
    FacetGrid.Columns.Add(column);
}

Our new DynamicProperty is now shown in the DataGrid and we can edit it with two-way binding support:
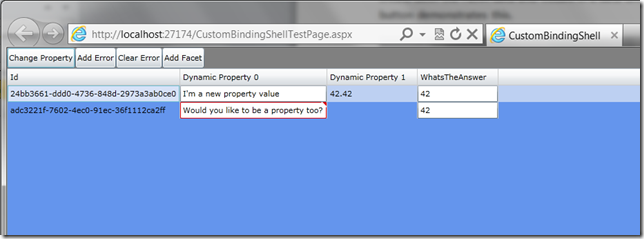
For some, this last piece of code will look like the worst kind of voodoo, but there are cases where your requirements will dictate this level of flexibility and this combination of techniques will help you get there.


European Silverlight 5 Hosting - Amsterdam :: Animation in Silverlight 5 Using VisualStateManager.LoadTransition

clock July 5, 2013 06:24 by author Scott

I was quite happy to see the all those sleek new additions to silverlight 5. I will be addressing all of them one by one. For the timebeing i will show how to give that nice and smooth initial animation when a control is loading. Before silverlight 5, this was pretty time consuming as you required to write all those custom animation codes and have their triggers in place. Now all you need to do is the following :

<Grid>
<VisualStateManager.LoadTransition>
<LoadTransition StartXOffset="300" GeneratedDuration="0:0:1.0" StartOpacity="0.2">
<LoadTransition.GeneratedEasingFunction>
<CircleEase/>
</LoadTransition.GeneratedEasingFunction>
</LoadTransition>
</VisualStateManager.LoadTransition>
</Grid>

As we can see above, its a very simple usage. All we need to do is add the VisualStateManager.LoadTransition to our Grid. The parameters are quite self explanatory :

  • StartXOffset : The intial x co-ordinate from which to start the transition
  • GeneratedDuration : The amount of time it would animate
  • StartOpacity : The initial Opacity. Here it start with an initial opacity of 20%
  • Also notice that we have added an easing function of type CircleEase. (More details on it at : http://msdn.microsoft.com/en-us/library/ee308751.aspx)


European Silverlight 5 Hosting - Amsterdam :: Silverlight Sorting and Grouping Feature

clock June 28, 2013 07:56 by author Scott

Using Silverlight and XAML, you can bind to a collection of data. Once that is done, you can then sort, filter, or group the data using a collection view. A collection view is similar to a layer on a binding source collection. It enables you to navigate and display the source collection based on queries to sort, filter, and group data, without having to change the underlying source collection itself. If a source collection implements the INotifyCollectionChanged interface, the changes raised by the CollectionChanged event are transmitted to the views. A single source collection can have multiple views associated with it.


I will show brief tutorial about sorting and grouping functionally through the PagedCollectionView class. Consider an example that demonstrates how to sort and group bound data in a collection using an
PagedCollectionView object.

Create a Silverlight application named CollectionsDemo.

Add the following markup to MainPage.xaml.

<UserControl xmlns:sdk="http://schemas.microsoft.com/winfx/2006/xaml/presentation/sdk"
    x:Class="CollectionsDemo.MainPage"
xmlns="http://schemas.microsoft.com/winfx/2006/xaml/presentation"
xmlns:x="http://schemas.microsoft.com/winfx/2006/xaml"
xmlns:d="http://schemas.microsoft.com/expression/blend/2008"
xmlns:mc="http://schemas.openxmlformats.org/markup-compatibility/2006"
xmlns:scm="clr-namespace:System.ComponentModel;assembly=System.Windows"
xmlns:dat="clr-namespace:System.Windows.Data;assembly=System.Windows"
xmlns:local="clr-namespace:CollectionsDemo"
mc:Ignorable="d"
d:DesignHeight="300" d:DesignWidth="400"

<Grid x:Name="LayoutRoot">
    <sdk:DataGrid Name="dgridMovies" ItemsSource="{Binding}" >
            <sdk:DataGrid.RowGroupHeaderStyles>
                <Style TargetType="sdk:DataGridRowGroupHeader">
                    <Setter Property="PropertyNameVisibility" Value="Collapsed" />
                    <Setter Property="Background" Value="PaleGreen"/>
                    <Setter Property="SublevelIndent" Value="25" />
                </Style>
            </sdk:DataGrid.RowGroupHeaderStyles>
        </sdk:DataGrid>
</Grid>
</UserControl>

The above markup creates a DataGrid and sets its ItemsSource property. The markup also sets style for the DataGrid rows.

Add the following code to MainPage.xaml.cs to create the Movies and Movie classes:

using System;
using System.Collections.Generic;
using System.Linq;
using System.Net;
using System.Windows;
using System.Windows.Controls;
using System.Windows.Documents;
using System.Windows.Input;
using System.Windows.Media;
using System.Windows.Media.Animation;
using System.Windows.Shapes;
using System.Collections.ObjectModel;
using System.Windows.Data;
using System.ComponentModel;

namespace CollectionsDemo
{
    public partial class MainPage : UserControl
    {
        public MainPage()
        {
            Movies movies = new Movies();
            InitializeComponent();

            // For sorting
            PagedCollectionView pg = new PagedCollectionView(movies);
            pg.SortDescriptions.Add(new SortDescription("Title", ListSortDirection.Ascending));
            dgridMovies.DataContext = pg;

            // For grouping
            pg.GroupDescriptions.Add(new PropertyGroupDescription("Year"));
            dgridMovies.DataContext = pg;
        }
    }

    // Represents a collection of movies
    public class Movies : ObservableCollection<Movie>
    {
        public Movies()
            : base()
        {
         Add(new Movie() { Title = "Sherlock Holmes - Game of Shadows", Year = "2011" });
         Add(new Movie() { Title = "ParaNormal Activity", Year = "2010" });
         Add(new Movie() { Title = "Michael Clayton", Year = "2010" });
         Add(new Movie() { Title = "A Separation", Year = "2011" });
         Add(new Movie() { Title = "Lost", Year = "2009" });
        }
    }

// Represents a Movie entity having two properties, Title and Year
    public class Movie
    {
        public string Title { get; set; }
        public string Year { get; set; }
    }
}

You will first create a PropertyGroupDescription object and pass the name of the property based on which sorting or grouping will take place. Then, add the PropertyGroupDescription to the SortDescriptions or GroupDescriptions collection of PagedCollectionView depending on which operation is to be performed.

These actions are done using the above code.

On executing, the output will be similar to Figure below. As you can see, the movie details are grouped by year and sorted according to title.


European WCF Hosting - Amsterdam :: How to Create WCF Service with SOAP/REST Endpoints

clock June 10, 2013 08:35 by author Scott

In this post I am going to describe a solution to the following problem.  I would like to create a single WCF Service and expose it via a standard SOAP endpoint and REST endpoint using Entity Framework, WCF and WCF REST.  Then I would like to consume it from WinRT from two different view models working against the same view.  This is an exercise of research into data options in WinRT.

First of, let’s create a service.  I am going to use the following data class:

    public class Session
    {
        public int SessionID { get; set; }
        public string Title { get; set; }
        public string Description { get; set; }
        public string Speaker { get; set; }
        public DateTime When { get; set; }
    }

My data context for EF Code First is just as simple:

    public class Context : DbContext
    {
        public Context() :
            base("Name=VSLive")
        {
        }
        public DbSet<Session> Sessions { get; set; }

        protected override void OnModelCreating(DbModelBuilder modelBuilder)
        {
            base.OnModelCreating(modelBuilder);
            modelBuilder.Entity<Session>().Property(p => p.Title).HasMaxLength(100).IsRequired();
            modelBuilder.Entity<Session>().Property(p => p.Speaker).HasMaxLength(50).IsRequired();
            modelBuilder.Entity<Session>().Property(p => p.Description).IsRequired();
            modelBuilder.Entity<Session>().Property(p => p.When).IsRequired();
        }
    }

Now, the service.  I am just going to perform basis CRUD opertions.  The key to the service is my interface that I am going to decorate with both SOAP(OperationContract) and REST(WebGet or WebInvoke) attributes.

    [ServiceContract]

    public interface IVSLiveService
    {
        [OperationContract]
        [WebGet(UriTemplate = "/GetList", RequestFormat = WebMessageFormat.Json, ResponseFormat = WebMessageFormat.Json)]
        Session[] GetList();

        [OperationContract]
        [WebInvoke(UriTemplate = "/Create", RequestFormat = WebMessageFormat.Json, ResponseFormat = WebMessageFormat.Json)]
        Session Create(Session session);


        [OperationContract]
        [WebInvoke(UriTemplate = "/Update", RequestFormat = WebMessageFormat.Json, ResponseFormat = WebMessageFormat.Json)]
        Session Update(Session session);

        [OperationContract]
        [WebInvoke(UriTemplate = "/Delete?sessionId={sessionId}", RequestFormat = WebMessageFormat.Json, ResponseFormat = WebMessageFormat.Json)]
        void Delete(int sessionId);

    }

The implementation is not quite as interesting, but for the same of completeness of this post, here it goes:

using System.Data.Entity;
using System.Linq;
using System.ServiceModel;
using System.ServiceModel.Activation;
using WinRT.Data;
using WinRT.DataAccess;

namespace WcfService
{
    [AspNetCompatibilityRequirements(
      RequirementsMode = AspNetCompatibilityRequirementsMode.Allowed)]
    [ServiceBehavior(InstanceContextMode = InstanceContextMode.PerCall)]
    public class VSLiveService : IVSLiveService
    {
        public VSLiveService()
        {
            Database.SetInitializer(new Initializer());
        }

        public Session[] GetList()
        {
            using (var context = new Context())
            {
                context.Configuration.LazyLoadingEnabled = false;
                context.Configuration.ProxyCreationEnabled = false;
                return context.Sessions.ToArray();
            }
        }

        public Session Create(Session session)
        {
            using (var context = new Context())
            {
                context.Sessions.Add(session);
                context.SaveChanges();
            }
            return session;
        }


        public Session Update(Session session)
        {
            using (var context = new Context())
            {
                context.Entry(session).State = System.Data.EntityState.Modified;
                context.SaveChanges();
            }
            return session;
        }

        public void Delete(int sessionID)
        {
            using (var context = new Context())
            {
                var session = new Session { SessionID = sessionID };
                context.Entry(session).State = System.Data.EntityState.Deleted;
                context.SaveChanges();
            }
        }
    }
}

Now, the part that took me the longest to figure out: web.config.

I have single service node, and I have two endpoints for it, using the same contract, but two different bindings and behaviors.  I am putting entire web.config:

<?xml version="1.0"?>
<configuration>
  <connectionStrings>
    <add
          name="VSLive"
          connectionString="Server=.;Database=VSLive;Trusted_Connection=True;"
          providerName="System.Data.SqlClient"/>
  </connectionStrings>

  <system.web>
    <compilation debug="true" targetFramework="4.0" />
  </system.web>
  <system.serviceModel>
    <behaviors>
      <endpointBehaviors>
        <behavior name="jsonBehavior">
          <webHttp/>
        </behavior>
      </endpointBehaviors>    
      <serviceBehaviors>
        <behavior>
          <!-- To avoid disclosing metadata information, set the value below to false and remove the metadata endpoint above before deployment -->
          <serviceMetadata httpGetEnabled="true"/>
          <!—To receive exception details in faults for debugging purposes, set the value below to true.  Set to false before deployment to avoid disclosing exception information -->
          <serviceDebug includeExceptionDetailInFaults="true"/>
        </behavior>
      </serviceBehaviors>
    </behaviors>
    <bindings>
      <basicHttpBinding>
        <binding
          name="VSLiveService_BasicHttpBinding"
          maxBufferSize="1000000"
          maxReceivedMessageSize="1000000">
          <readerQuotas
            maxBytesPerRead="1000000"
            maxArrayLength="1000000"
            maxDepth="1024"
            maxStringContentLength="1000000"/>
        </binding>
      </basicHttpBinding>
      <webHttpBinding>
        <binding
           name="VSLiveService_WebHttpBinding"
           maxBufferSize="1000000"
           maxReceivedMessageSize="1000000">
          <readerQuotas
            maxBytesPerRead="1000000"
            maxArrayLength="1000000"
            maxDepth="1024"
            maxStringContentLength="1000000"/>
        </binding>
      </webHttpBinding>

    </bindings>
    <services>
      <service name="WcfService.VSLiveService">
        <endpoint
          address="soap"
          binding="basicHttpBinding"
          bindingConfiguration="VSLiveService_BasicHttpBinding"
          contract="WcfService.IVSLiveService"/>
        <endpoint
            address="rest"
            binding="webHttpBinding"
            behaviorConfiguration="jsonBehavior"
            bindingConfiguration="VSLiveService_WebHttpBinding"
            contract="WcfService.IVSLiveService"/>
      </service>
    </services>
    <serviceHostingEnvironment multipleSiteBindingsEnabled="true" />
  </system.serviceModel>
  <system.webServer>
    <modules runAllManagedModulesForAllRequests="true"/>
  </system.webServer>
  <system.diagnostics>
    <sources>
      <source name="System.ServiceModel"
              switchValue="Information, ActivityTracing"
              propagateActivity="true">
        <listeners>
          <add name="traceListener"
              type="System.Diagnostics.XmlWriterTraceListener"
              initializeData= "c:\Traces.svclog" />
        </listeners>
      </source>
    </sources>
  </system.diagnostics>
</configuration>

As you can see above, SOAP endpoint comes first, and it is using basicHttpBinding.  My REST endpoint is second, and it is using webHttpBinding  I am asing a behavior configuration to the latter one, enabling webHttp get/post methods.

This is all nice and simple, and you can now test it in browser.

Today, I am documenting REST consumption.

I am using HttpClient class to accomplish this task.  For example, here is how I am going to get the list of sessions.

        public async Task LoadData()
        {
            IsBusy = true;
            _client = new HttpClient();
            _client.MaxResponseContentBufferSize = int.MaxValue;
            var response = await _client.SendAsync(new HttpRequestMessage(HttpMethod.Get, new Uri(_serviceUri + "GetList")));

            var data = response.Content.ReadAsString();

            DataContractJsonSerializer serializer = new DataContractJsonSerializer(typeof(List<Session>));
            using (var stream = new MemoryStream(Encoding.UTF8.GetBytes(data)))
            {
                var list = serializer.ReadObject(stream) as List<Session>;
                Sessions = new ExtendedObservableCollection<Session>(list);
            }
            IsBusy = false;
        }

A few points about the code above.  I should have wrapped the call inside Try/Catch, I am just skipping it for the sake of a demo and to minimize the code I am showing.  I am using standard serializer to convert my JSON message into an object.  I also have a little progress ring that is playing while server communication is going on, and that is what my IsBusy property above is bound to. 

Now, let’s take a look at Create/Update call.  It is just as simple, but I am using Post method of HttpClient and I am creating a string content to post by converting Session object to JSON, again using the same serializer.

        public async void OnSave(object parameter)
        {
            if (SelectedSession != null)
            {
                IsBusy = true;
                string method = "Update";
                if (selectedSession.SessionID == 0)
                {
                    method = "Create";
                }
                _client = new HttpClient();
                _client.MaxResponseContentBufferSize = int.MaxValue;
                var content = new StringContent(ConvertSessionToJson());
                content.Headers.ContentType = new System.Net.Http.Headers.MediaTypeHeaderValue("application/json");
                var response = await _client.PostAsync(new Uri(_serviceUri + method), content);

                var data = response.Content.ReadAsString();

                var session = ConvertJsonToSession(data);
                Sessions[Sessions.IndexOf(selectedSession)] = session;
                SelectedSession = session;
                IsBusy = false;
            }
        }

For delete method I am also using Post method, just my content is blank and my ID is passed to the server as query string parameter

        public async void OnDelete(Session parameter)
        {
            if (parameter != null)
            {
                if (parameter.SessionID > 0)
                {
                    IsBusy = true;
                    _client = new HttpClient();
                    _client.MaxResponseContentBufferSize = int.MaxValue;
                    var content = new StringContent(string.Empty);
                    content.Headers.ContentType = new System.Net.Http.Headers.MediaTypeHeaderValue("application/json");
                    var response = await _client.PostAsync(new Uri(_serviceUri + "Delete?sessionId=" + parameter.SessionID.ToString()), content);

                    var data = response.Content.ReadAsString();
                    Sessions.Remove(parameter);
                    IsBusy = false;
                }
                else
                {
                    Sessions.Remove(parameter);
                    IsBusy = false;
                }
            }
        }


European WCF Hosting - Amsterdam :: How to Host WCF Service in IIS 8 (Windows Server 2012)

clock April 25, 2013 06:56 by author Scott

This blog cover brief information how to host your WCF service in IIS8 (Windows Server 2012).

Here is the solution.

Server Roles

1. First make sure you have enabled IIS function and .net 3.5 in Features.
For the IIS features, please remember to enable ASP.NET3.5 and ASP.NET 4.5

2. Second, check the IIS Hostable WebCore
3. Finally, I think the most important is this:

Check Application Sever->Web Server (IIS) Support

I have also check the HTTP Activation in Windows Process Activation Service Support, but I do not know if it is required.

For the freatures,

1. Check all items in .NET 3.5
2. Check WCF Service in .NET 4.5

That’s it.

Last but not least, I have register the WCF Service from

C:\Windows\Microsoft.NET\Framework\v3.0\Windows Communication Foundation\ServiceModelReg.exe –i

Run the above in command line.


European Silverlight 5 Hosting - Amsterdam :: Using MVVM to Show Busy Indicator in Silverlight

clock February 25, 2013 05:05 by author Scott

Introduction

When using Silverlight, everything is asynchronous. It seems to be the trend, the same goes for Windows 8. This means that you will need to inform the user about progress in the background.

Silverlight uses the BusyIndicator for this behavior. Using MVVM, it might be a bit harder to implement the BusyIndicator in a correct way, but Catel provides the IPleaseWaitService for years which can be mocked easily during test scenarios.

However, it didn’t support a busy indicator per view yet. This fact has changed today, as you can see in the screenshot below:

A long requested feature in Catel was the support for tags in the ServiceLocator. The ServiceLocator is the IoC solution that Catel provides by default. A customer of Catel recently required the busy indicators to show up per view. I thought a bit about it and this could be solved by the recently (read: this week) introduction of the tags in the ServiceLocator.

Setting up the views

The view is responsible for registering the service. This can easily be done using the Catel user controls. Create a view like you always do, then use the following code-behind:

   1:  protected override void OnViewModelChanged()
   2:  {
   3:      var serviceLocator = ServiceLocator.Default;
   4:  
   5:      var viewModel = ViewModel;
   6:      if (viewModel != null)
   7:      {
   8:          serviceLocator.RegisterInstance(typeof (IPleaseWaitService), new PleaseWaitService(this), viewModel);
   9:      }
  10:  }

This code will be executed when the ViewModel property of the control changes. The view registers a view specific instance of the PleaseWaitService service in the ServiceLocator. It uses the new view model as tag so that will be used to distinguish the services.

Setting up the view models

The view model can retrieve the PleaseWaitService very easily because the tag is itself. To show the view specific please wait service, use this code:

   1:  var pleaseWaitService = GetService<IPleaseWaitService>(this);
   2:  pleaseWaitService.Show();

To hide the window again, use this code:

   1:  var pleaseWaitService = GetService<IPleaseWaitService>(this);
   2:  pleaseWaitService.Hide();

Customizing the PleaseWaitService

Customizing the please wait service is very, very easy. Just override the class like this:

   1:  public class MyCustomPleaseWaitService : PleaseWaitService
   2:  {
   3:      protected override FrameworkElement CreateBusyIndicator()
   4:      {
   5:          var busyIndicator = new MyBusyIndicatorControl();
   6:          
   7:          busyIndicator.SetBinding(System.Windows.Controls.BusyIndicator.BusyContentProperty, new Binding("Status"));
   8:          busyIndicator.SetBinding(System.Windows.Controls.BusyIndicator.IsBusyProperty, new Binding("IsBusy"));
   9:          
  10:          return busyIndicator();
  11:      }
  12:  }

The base implementation will automatically take care that the data context is updated and that the control is centered as required.


European Silverlight Hosting - Amsterdam :: How to Enable Dynamic Compression in IIS 7/7.5

clock February 18, 2013 07:47 by author Scott

In this tutorial I will show you how to enable dynamic compression in IIS 7. For other post of dynamic compression, please just see our last post.

You’ll see this error message when you haven’t setup dynamic compression on your IIS:

“The dynamic content compression module is not installed.”

Ok, let’s start the tutorial:

1. Open server manager

2. Roles --> IIS

3. Role Services (scroll down) --> Add Role Services

4. Add desired role (Web Server --> Performance > Dynamic Content Compression)

5. Wait till finish.

To enable this feature, here are the steps:

1. Open server manager

2. Roles --> Web Server (IIS) --> Internet Information Services (IIS) Manager

3. Then, go to your site --> your website

4. IISà compression

And dynamic compression has been enable on your server. Hope this tutorial is interesting.


European Silverlight Hosting - Amsterdam :: Dynamic Compression in IIS 7

clock February 5, 2013 10:17 by author Scott

This is the question from one of our clients. The client insisted on returning large datasets, well in excess of 10,000 records. I will leave the story of figuring out how to properly specify the MaxItemsInObjectGraph service behavior attribute for some other post, but the other problem I was constantly aware of, was the data size returned from the server. With all filters set to max, the data set was well in excess of 30 megabytes. This might not be a big problem on a local network, but if some of your users are located across the big pond called Atlantic, you might want to compress your data before shipping it over.

Now, the IIS 7 console only allows you to enable or disable static compression, but it does not let you control which dynamic types are being compressed as well as the level of compression desired for each content type.

The command you are supposed to use instead is AppCmd.exe located in C:\Windows\System32\inetsrv directory.

So here are three sample commands that helped me reduce the size of my WCF RIA Domain Service's binary response by 80%. Needless to say I was pleasantly shocked.

Enable compression on WebDevel webserver (when you have multiple servers and want to do it specifically for each)


C:\Windows\System32\inetsrv>Appcmd.exe set config "WebDevel" -section:urlCompression -doStaticCompression:true -doDynamicCompression:true


Add mime-type application/msbin1 to dynamic compression list (service wide)


C:\Windows\System32\inetsrv>Appcmd.exe set config -section:system.webServer/httpCompression /+"dynamicTypes.[mimeType='application/msbin1',enabled='True']" /commit:apphost


Set compression levels for static and dynamic content (service wide)


C:\Windows\System32\inetsrv>Appcmd.exe set config -section:httpCompression -[name='gzip'].staticCompressionLevel:9 -[name='gzip'].dynamicCompressionLevel:5


European Silverlight Hosting - Amsterdam :: Silverlight FluentDataGrid

clock January 24, 2013 07:14 by author Scott

Almost every application to work with the data we have to work with the tables for display to the user of any data which it has applied. For users familiar applications such pages and comfortable enough, but not always easy to implement a particular display logic for complex data structures such as the customer wants them to be. We give a simple example, let us have the lists A and B, are related by 1: n, each element of the list B contains three attributes - the key, the record type and value, types of records that can be repeated. Suppose we want to display the record of A, so that each row of A list displays all values ​​from the list B, the record type is used as a title 

Students (List A) 

Id

Name

1

John

2

Alex

3

Sara

Marks (List B) 

Id

Student

Category

Value

1

1

C#

5

2

1

Java

3

1

HTML & CSS

4

4

2

C#

4

5

3

Java

3

We need to get the following table:

Id

Name

Marks

C#

Java

HTML & CSS

1

John

5

4

4

2

Alex

4

-

-

3

Sara

-

3

-

Application in which I faced with such a task was developed using the technology of Silverlight. Built-in DataGrid functionality described above is not realized. This led to the development of special control FluentGrid. 

How it works:

FluentDataGrid - is the control that builds a table based on a custom data source FluentGridSource. Currently, the construction of the table (view) is available only at runtime. FluentGridSource has Fluent-like interface for the formation of rules of construction.

The key source of data is the formation of the class, which will be a "model line." She describes one row of the result table, for our example of such a class might look like:

public class ExampleRow : PropertyChangedBase
{
    public ExampleRow(int id, string name, IList<IDynamicElement> marks)
    {
        _id = id;
        _name = name;
        Marks = marks;
    }

    private int _id;
    private string _name;

    [DynamicHeader("Id", false, HorizontalAlignment = HorizontalAlignment.Right)]
    public int Id
    {
        get { return _id; }
        set
        {
            NotifyPropertyChanged(() => Id);
            _id = value;
        }
    }

    [DynamicHeader("Name", false,
        HorizontalAlignment = HorizontalAlignment.Left, Width = 200)]
    public string Name
    {
        get { return _name; }
        set
        {
            NotifyPropertyChanged(() => Name);
            _name = value;
        }
    }

    public IList<IDynamicElement> Marks { get; set; }
}

public class MarkDynamicElement : PropertyChangedBase, IdynamicElement
{
    private object _value;

    public MarkDynamicElement(DynamicHeader header, object value)
    {
        Header = header;
        Value = value;
    }

    /// <summary>
    /// Header for the value
    /// </summary>
    public DynamicHeader Header { get; set; }

    /// <summary>
    /// Value that will be displayed
    /// </summary>
    public object Value
    {
        get { return _value; }
        set
        {
            _value = value;
            NotifyPropertyChanged(() => Value);
        }
    }
}

The base class implements the INotifyPropertyChanged PropertyChangedBase. We see that in the line two "static" column Id and Name, attribute DynamicHeader helps us set a cap column. There is also a list of Marks, a "dynamic" of the table, which can be constructed, for example, by using LINQ. Its elements have to implement a special interface IDynamicElement.

In forming a data source, you can add formatting rules AddFromatter (), totals AddSummary (), validation rules for totals AddValidator (), the validation rules of values ​​in table cells AddCellValidator (), and set rules for the formation of the hierarchy. In order to specify the hierarchy, you must specify the property model - key (Id), the property - a reference to the parent element (ParentId) and the property on which to display the hierarchy. 

How to use:  

The first step is defining the control in the XAML file:  

<CurriculumControl Source="{Binding SimpleSampleSource,Mode=TwoWay}" SelectedItem="{Binding SelectedRow, Mode=TwoWay}" /> 

Next step is to create a row with the appropriate attributes for the grid as described above. 

Than you should create view model, construct FluentGridSource

DynamicExampleSource = FluentGridSource.CreateFrom(DynamicExampleSource, Repository.GetExampleRows());
Constructing FluentGrisSource may be more complex if you set some validation, totals
ValidationSampleSource = new FluentGridSource(typeof(SimpleRow));
ValidationSampleSource = FluentGridSource.CreateFrom(ValidationSampleSource, Repository.GetSimpleRows());

#region Formatters

ValidationSampleSource
    .SetOptions(true, 50)
    .AddFormatter(new DynamicHeader {Name = "Min", HeaderGroup = new OverallSalaryHeaderGroup()},
                  (row, value) => ((double) value).ToString("c", new CultureInfo("en-us")));
#endregion

#region Summaries
ValidationSampleSource
    .AddSummary(new DynamicHeaderCollection {new DynamicHeader {Name = "Employee name"}}, x => "Total")
    .AddSummary(
        new DynamicHeaderCollection
            {new DynamicHeader {Name = "Min", HeaderGroup = new OverallSalaryHeaderGroup()}},
        delegate(IDictionary<DynamicHeader, IEnumerable> allValues)
            {
                var header = allValues.Keys.Single(x => x.Name == "Min");
                var values = (List<object>) allValues[header];
                return values.Sum(x => (double) x);
            })
    .AddSummary(
        new DynamicHeaderCollection
            {new DynamicHeader {Name = "Max", HeaderGroup = new OverallSalaryHeaderGroup()}},
        delegate(IDictionary<DynamicHeader, IEnumerable> allValues)
            {
                var header = allValues.Keys.Single(x => x.Name == "Max");
                var values = (List<object>) allValues[header];
                return values.Sum(x => (double) x);
            });
#endregion

#region Validations

ValidationSampleSource
    .AddCellValidator(new DynamicHeader { Name = "Min", HeaderGroup = new OverallSalaryHeaderGroup() },
        delegate(object row, object value)
        {
            var simpleRow = (SimpleRow)row;
            var min = (double)value;

            if (min > simpleRow.Max)
                return "Minimum cannot be higher than maximum!";
            if (min < 5000)
                return "Minimum cannot be lower than $5000";

            return null;
        })
    .AddCellValidator(new DynamicHeader { Name = "Max", HeaderGroup = new OverallSalaryHeaderGroup() },
        delegate(object row, object value)
        {
            var simpleRow = (SimpleRow)row;
            var max = (double)value;

            if (max < simpleRow.Min)
                return "Maximum cannot be lower than minimum!";
            if (max > 500000)
                return "Maximum cannot be heigher than $500000";

            return null;
        });

#endregion


European Silverlight Hosting - Amsterdam :: Working with Isolated Storage in Silverlight

clock November 29, 2012 07:46 by author Scott

Isolated storage gives you access to a small segment of hard-disk space, with certain limitations. For example we don't know exactly where our files are being stored. We also can't read the files left by another Silverlight application or recorded for another user. In essence, isolated storage provides carefully restricted, tamperproof file access for applications that need to store permanent information in the local PC, so that information can be retrieved the next time the user runs the application.

How it works:

Isolated storage provides a virtual file system that lets you write data to a small, user-specific and application-specific slot of space. There's no way to know beforehand exactly where the data will be written, and the default space limit is a mere 1 MB (although you can request that the user grant you more).

Is it similar to browser Cookie?

  1. Essentially, isolated storage is the Silverlight equivalent of persistent cookies in an ordinary web page. It allows small bits of information to be stored in a dedicated location that has specific controls in place to prevent malicious attacks.
     
  2. Isolated storage is persistent–unlike the browser cache, it never expires, and it's not removed if the user chooses to explicitly delete temporary Internet files.
     
  3. Isolated storage isn't a good storage place for important documents, because they're never backed up, are easily deleted, and can be even more easily lost.
     
  4. Isolated storage is intended to be a limited-size storage location for data, not a handcrafted replacement for HTTP Caching.


Scope of Isolated Storage:


With isolated storage, a unique storage location is created for every combination of user and application. In other words, the same computer can have multiple isolated storage locations for the same application, assuming each one is for a different user. Similarly, the same user can have multiple isolated storage locations, one for each Silverlight application. Isolated storage isn't affected by browser, so a Windows user switching from Internet Explorer to Firefox will get the same isolated storage location in both browsers.

What all can we store in an Isolated Storage: Good choices include user-specific details, user preferences, and information about recent user actions. Isolated storage is also great temporary storage.

So now we are ready to create a application which will demonstrate how it works.

Step 1: Create a Silverlight Application project and name it IsolatedStorage.

Step 2: Now we will try to understand how to write data and read data from these storages Medias. We will also see if we want to increase the space on the handdisk; how can we do that as well.

So we created a simple xmal like this:

<Grid x:Name="LayoutRoot"  Margin="10"  Background="WhiteSmoke" Width="340" Height="200" HorizontalAlignment="Center" VerticalAlignment="Center">
        <Grid.RowDefinitions>
            <RowDefinition Height="Auto"></RowDefinition>
            <RowDefinition Height="Auto"></RowDefinition>         

        </Grid.RowDefinitions>

            <Grid.ColumnDefinitions>
            <ColumnDefinition Width="Auto" ></ColumnDefinition>
            <ColumnDefinition Width="Auto" ></ColumnDefinition>           

        </Grid.ColumnDefinitions>

            <TextBlock Text="Enter Your Name" Margin="3" Padding="5" HorizontalAlignment="Left" 
                       VerticalAlignment="Center" Grid.Row="0" Grid.Column="0">               
           
</TextBlock>

            <TextBox x:Name="txtname" Margin="3" Padding="5"
                        HorizontalAlignment="Left" VerticalAlignment="Center"
                        Grid.Row="0" Grid.Column="1" Height="30" Width="200" ></TextBox>          

            <Grid Grid.Column="1" Grid.Row="1"  Margin="5" >
                <Grid.RowDefinitions>
                    <RowDefinition Height="50" ></RowDefinition>
                    <RowDefinition ></RowDefinition>
                    <RowDefinition ></RowDefinition>
            </Grid.RowDefinitions>

                <Grid.ColumnDefinitions>
                    <ColumnDefinition ></ColumnDefinition>
                    <ColumnDefinition ></ColumnDefinition>
                </Grid.ColumnDefinitions>

            <Button x:Name="btnWrite"  Margin="5" Padding="5" Width="90" Height="30"
                    Content="Click to Write" HorizontalAlignment="Center" VerticalAlignment="Top"
                    Click="btnWrite_Click">
            </Button>

            <Button x:Name="btnRead"  Margin="5" Padding="5" Width="90" Height="30"
                    Content="Click to Read"
                    HorizontalAlignment="Center" VerticalAlignment="Top" Click="btnRead_Click"
                    Grid.Row="0" Grid.Column="1">
            </Button>

            <Button x:Name="btnSize"  Padding="5" Width="180" Height="30"
                    Content="Click to Increase Disk Storage Space"
                     HorizontalAlignment="Center" VerticalAlignment="Top"
                    Click="btnSize_Click" Grid.Row="1" Grid.Column="0" Grid.ColumnSpan="2">
            </Button>

            <TextBlock x:Name="lblData" Margin="5"  HorizontalAlignment="Center" VerticalAlignment="Top"                       
                    Grid.Row="2" Grid.Column="0" Grid.ColumnSpan="2"></TextBlock>

        </Grid>

Step 3: Now come to Code Behind and write handler for btnWrite_Click.

Also add this Isolated storage namespace.

using System.IO.IsolatedStorage;

private void btnWrite_Click(object sender, RoutedEventArgs e)
        {
            // Write to isolated storage.
            try
            {               
                //this gives you exactly what you want: an application-specific, user-specific
                //location where you can store data.

               IsolatedStorageFile store = IsolatedStorageFile.GetUserStoreForApplication();

                 //If we would have used
                //IsolatedStorageFile.GetUserStoreForSite ,
                //then a storage site that's accessible to all the Silverlight applications on the same website domain.
                using (IsolatedStorageFileStream fs = store.CreateFile("data.txt"))
                {
                    StreamWriter sw = new StreamWriter(fs);                  
                    sw.Write(txtname.Text);                  
                    sw.Close();
                }
                txtname.Text = string.Empty;

            }
            catch
            {

            }
        }


Let us concentrate on this line.

IsolatedStorageFile
store = IsolatedStorageFile.GetUserStoreForApplication();

Silverlight creates isolated stores automatically. To interact with an isolated store, you use the IsolatedStorageFile class. You get the IsolatedStorageFile object for the current user and application by calling the static IsolatedStorageFile.GetUserStoreForApplication() method, as shown here:

Step 4: Press F5 and test write and read buttons.

Step 5: Now let's concentrate on how disk storage works. Initially, each Silverlight application gets 1 MB of space in it's isolated store. You can examine the IsolatedStorageFile.AvailableFreeSpace property to find out how much free space remains. If your application needs more space, you can use an option: the IsolatedStorageFile IncreaseQuotaTo() method.

We must request a value that's higher than the current quota. Otherwise, you'll receive an exception. That means you can't use the IncreaseQuotaTo() method to ensure that there's a certain level of free space.

If everything goes well, you will be presented with something such as shown in the figure below.


About HostForLIFE.eu

HostForLIFE.eu is European Windows Hosting Provider which focuses on Windows Platform only. We deliver on-demand hosting solutions including Shared hosting, Reseller Hosting, Cloud Hosting, Dedicated Servers, and IT as a Service for companies of all sizes.

We have offered the latest Windows 2016 Hosting, ASP.NET Core 2.2.1 Hosting, ASP.NET MVC 6 Hosting and SQL 2017 Hosting.


Tag cloud

Sign in